Refreshing and Crunchy Yeolmu & Eolgari Kimchi
#SummerKimchi #CrispyKimchi #AllPurposeKimchiPaste #HowToMakeYeolmuEolgariKimchi #SummerDelicacy

Introducing Yeolmu & Eolgari Kimchi, a summer delicacy made with our all-purpose kimchi paste! It’s incredibly delicious mixed into a bowl of freshly steamed rice, and it also makes a fantastic cold noodle dish (bibim guksu) when tossed with chilled somyeon noodles.
Kimchi Ingredients- All-purpose Kimchi Paste 3 cups
- Young Summer Radish (Yeolmu) 2 bunches
- Coarse Sea Salt 3 Tbsp (for salting yeolmu)
- Leaf Radish (Eolgari) 1 bunch
- Coarse Sea Salt 2 Tbsp (for salting eolgari)
All-Purpose Kimchi Paste Ingredients- Sweet Rice Flour 2 Tbsp
- Water 1 cup
- Korean Radish (Mu) 1/2 (approx. 200g)
- Red Pepper Flakes (Gochugaru) 1 cup (approx. 100g)
- Salted Fermented Shrimp (Saeujeot) 2 Tbsp (finely minced)
- Fish Sauce (Myeolchi Aekjeot) 4 Tbsp
- Minced Garlic 3 Tbsp
- Chopped Scallions 4 Tbsp
- Plum Extract (Maesil Aek) 3 Tbsp
- Red Pepper Seeds (Gochussi) 1 Tbsp
- Minced Ginger 1 Tbsp
- Rice Wine (Cheongju or Soju) 2 Tbsp
- Sugar 2 Tbsp
- Anchovy & Kelp Broth (Myeolchi Dashima Hwangtae Yuksu) 4 cups (approx. 800ml)
- Sweet Rice Flour 2 Tbsp
- Water 1 cup
- Korean Radish (Mu) 1/2 (approx. 200g)
- Red Pepper Flakes (Gochugaru) 1 cup (approx. 100g)
- Salted Fermented Shrimp (Saeujeot) 2 Tbsp (finely minced)
- Fish Sauce (Myeolchi Aekjeot) 4 Tbsp
- Minced Garlic 3 Tbsp
- Chopped Scallions 4 Tbsp
- Plum Extract (Maesil Aek) 3 Tbsp
- Red Pepper Seeds (Gochussi) 1 Tbsp
- Minced Ginger 1 Tbsp
- Rice Wine (Cheongju or Soju) 2 Tbsp
- Sugar 2 Tbsp
- Anchovy & Kelp Broth (Myeolchi Dashima Hwangtae Yuksu) 4 cups (approx. 800ml)
Cooking Instructions
Step 1
First, trim the Eolgari radishes, remove any dirty root ends, and rinse them thoroughly under running water. Drain them well, then tear them by hand into bite-sized pieces (about 1.5-2 inches long). Tearing them by hand, rather than cutting with a knife, helps preserve their texture for a better crunch.

Step 2
It’s important to salt the Eolgari radishes and Yeolmu separately because they have different wilting times. Salting them together could make the Eolgari too salty. Eolgari leaves are tender, but Yeolmu stems are tougher and more fibrous, requiring a longer salting time. Sprinkle 2 Tbsp of coarse sea salt over the Eolgari, mix well, and let it salt for about 2 hours.

Step 3
Next, prepare the Yeolmu. Pay special attention to the radish root part; clean it thoroughly using the back of a knife or spoon to remove any soil or impurities. If you enjoy the peppery taste of the radish root, leave it as is; otherwise, you can trim it off or slice it thinly. After cleaning, rinse the Yeolmu several times. Cut it into pieces similar in size to the Eolgari, then sprinkle 3 Tbsp of coarse sea salt, mix well, and let it salt for about 30-40 minutes.

Step 4
While the Eolgari is salting, turn the leaves over once or twice to ensure even wilting. After about 2 hours, when the Eolgari has wilted to about two-thirds of its original volume, rinse it thoroughly in cold water to remove excess salt. Then, squeeze out as much water as possible by hand.

Step 5
The Yeolmu requires a slightly shorter salting time. After about 30-40 minutes, rinse it in cold water and drain. Now, combine the salted Eolgari and Yeolmu.

Step 6
Take your pre-made and refrigerated all-purpose kimchi paste and add it to the prepared Yeolmu and Eolgari. Using a generous amount of paste will make the kimchi even more delicious.

Step 7
Gently mix the paste into the vegetables, ensuring it coats everything evenly. Be careful not to mash or stir vigorously like you would for Napa cabbage kimchi or kkakdugi, as this can release a raw, grassy flavor from the Yeolmu and Eolgari. Instead, gently fold and toss the ingredients to combine.

Step 8
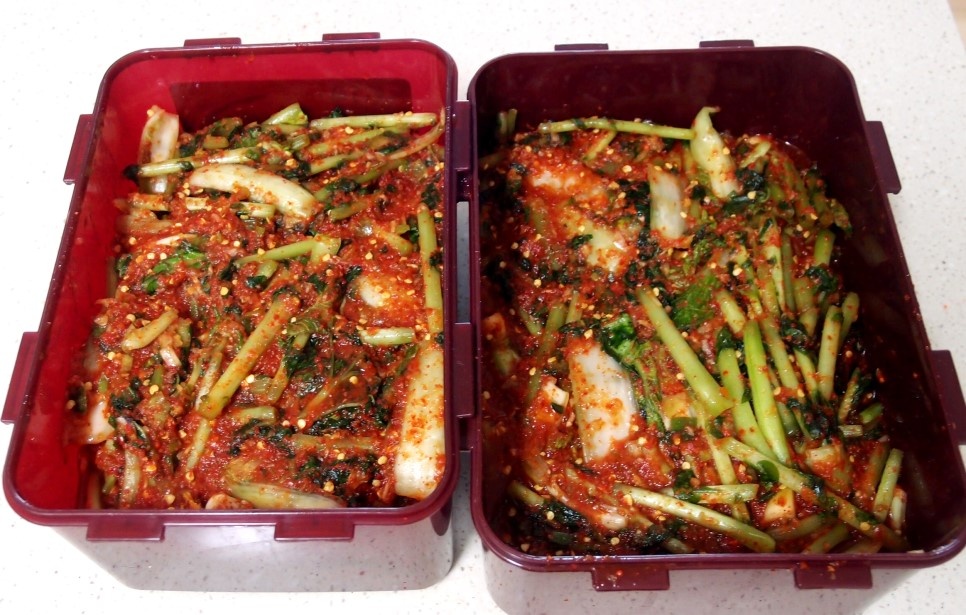
Transfer the finished Yeolmu & Eolgari Kimchi (made from 2 bunches of Yeolmu and 1 bunch of Eolgari) into a kimchi container. Press down firmly as you fill the container to eliminate air pockets, which helps in preserving its freshness.

Step 9
Cover the top of the kimchi with a piece of plastic wrap, then seal the container with its lid. This helps to seal out air and allows the paste to permeate the vegetables effectively. Leave it at room temperature for about a day (or half a day if it’s hot) to ferment, then store it in the refrigerator or a kimchi refrigerator for another 2-3 days. Enjoy your perfectly chilled and flavorful Yeolmu & Eolgari Kimchi!

Step 10
The well-fermented Yeolmu & Eolgari Kimchi will have a distinct, deep flavor profile, quite different from when it was first made. It will have a refreshing, slightly effervescent quality from proper fermentation. It’s a true rice thief!