Incredibly Easy ‘No-Boil’ Crispy Oi-Ji (Korean Pickled Cucumber)
Simple & Delicious! How to Make Oi-Ji Without Boiling. Highly Recommended by Manmulsang!

Oh my goodness! Can a recipe be this easy? #ManmulsangOiJi #LeeBoEunRecipe. This Oi-Ji recipe doesn’t require boiling water and becomes perfectly crisp and delicious in just one week! #OiJiWithoutBoiling It’s impossibly simple! You won’t believe how easy this recipe is. It’s truly that simple!
Oi-Ji Ingredients- 50 cucumbers
- 2 and 1/4 cups coarse salt (approx. 450ml)
- 4 and 1/2 cups sugar (approx. 900ml)
- 4 and 1/2 cups vinegar (approx. 900ml)
- 1 bottle soju (1.8L Korean distilled spirit)
Seasoned Oi-Ji Ingredients- 2 prepared Oi-Ji pieces
- 1 teaspoon gochugaru (Korean chili flakes)
- A pinch of minced garlic
- 1 teaspoon sesame oil
- 0.5 tablespoon toasted sesame seeds (crushed)
- A sprinkle of whole sesame seeds
- 2 prepared Oi-Ji pieces
- 1 teaspoon gochugaru (Korean chili flakes)
- A pinch of minced garlic
- 1 teaspoon sesame oil
- 0.5 tablespoon toasted sesame seeds (crushed)
- A sprinkle of whole sesame seeds
Cooking Instructions
Step 1
First, prepare 50 cucumbers. Wash them thoroughly under running water and then ensure they are completely dry. Any remaining moisture can cause the Oi-Ji to become mushy. For an extra thorough clean, you can dissolve baking soda in water and wash them that way. I personally scrubbed them vigorously by hand to remove all dirt and residue.

Step 2
Prepare a large container for making the Oi-Ji. Make sure the container is clean and completely dry before use. To prevent any leaks and for easier handling later, line the inside of the container with two plastic bags. This will be very helpful when removing the Oi-Ji or adding seasonings.

Step 3
Layer the prepared cucumbers snugly into the container. As you stack the cucumbers, sprinkle coarse salt and sugar evenly between the layers. The ratio of cucumbers to salt and sugar is crucial for the flavor and preservation of the Oi-Ji, so accurate measurement is important.

Step 4
Now it’s time to add the key flavor components: vinegar and soju. Pour the prepared vinegar and soju over the cucumbers. Soju helps to remove any unpleasant odors and enhances the preservation qualities of the Oi-Ji. Ensure you pour evenly so that all the cucumbers are coated by the liquid mixture.

Step 5
Cover the container securely with the plastic bags and seal it tightly. I tied the bags shut, but you could also use a strong clip for a good seal. To ensure the cucumbers are pressed down and release their moisture effectively, place a weight (like a press stone or a heavy object) on top of the cucumbers. Pressing them down is essential for achieving that delightfully crisp Oi-Ji texture. Finally, put the lid on the container.

Step 6
After one day, open the container to check on the Oi-Ji. Interestingly, the cucumbers on the top layer still appear green, while those at the bottom have started to turn the characteristic yellowish hue of well-fermented Oi-Ji. It’s an exciting stage to witness!

Step 7
Take out the Oi-Ji that has fermented for one day and place them back into the container. It’s a good idea to flip them so that the top cucumbers go to the bottom and vice versa. This helps ensure all the cucumbers are evenly pickled. Once again, place the weight on top to press them down and encourage moisture release.

Step 8
Repeat this process. Take out the Oi-Ji, flip them, put them back in the container, and press down with the weight. Continue this daily routine for a total of 5 days. This consistent flipping and pressing significantly improves the flavor and texture of the Oi-Ji.

Step 9
Here’s how the Oi-Ji looks on the 5th day. You can see that they are well on their way to developing the proper shape and color of Oi-Ji. They are becoming wonderfully crisp with just the right amount of moisture removed.

Step 10
Look at that! The crispy Oi-Ji shape is perfect, and the appetizing golden color is absolutely beautiful. At this point, you can consider your Oi-Ji making a success!

Step 11
Seriously, who knew there was such an easy way to make Oi-Ji ‘without boiling’? It’s astonishing! To continue the fermentation process, I placed the Oi-Ji back into the container, sealed it, and pressed it down with the weight. After about two weeks of further fermentation, you can transfer the entire container to the refrigerator for long-term storage.

Step 12
Take out the fermented Oi-Ji, place them on a cutting board, and finely chop them into bite-sized pieces. Chopping the Oi-Ji small is ideal for making the seasoned Oi-Ji dish.

Step 13
The chopped Oi-Ji can be quite salty if seasoned directly, so rinse them briefly in cold water. Rinsing just once will bring the saltiness to a perfect level, making them delicious and not too salty. Be careful not to soak them for too long, as this can diminish their crisp texture.

Step 14
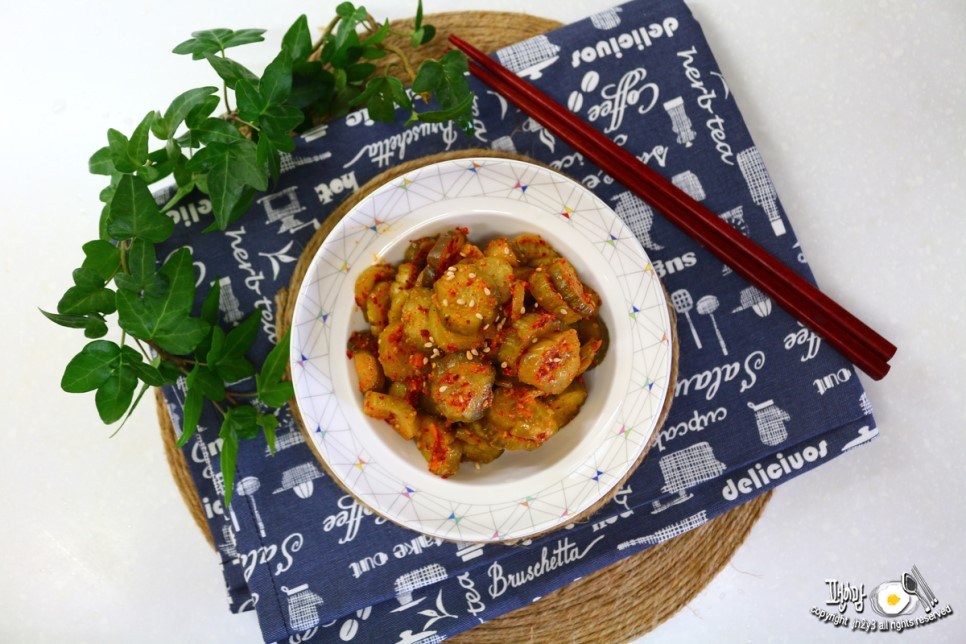
Now, add all the prepared seasonings (gochugaru, minced garlic, sesame oil, and sesame seeds) and gently mix them together by hand. Even with a small amount, adding sesame oil and seeds enhances the nutty and rich flavor. The finished seasoned Oi-Ji offers a delightful crunch and a perfectly balanced sweet and sour taste, making it an irresistible side dish. It’s not overly sour like a pickle, and the seasoning is just right!


