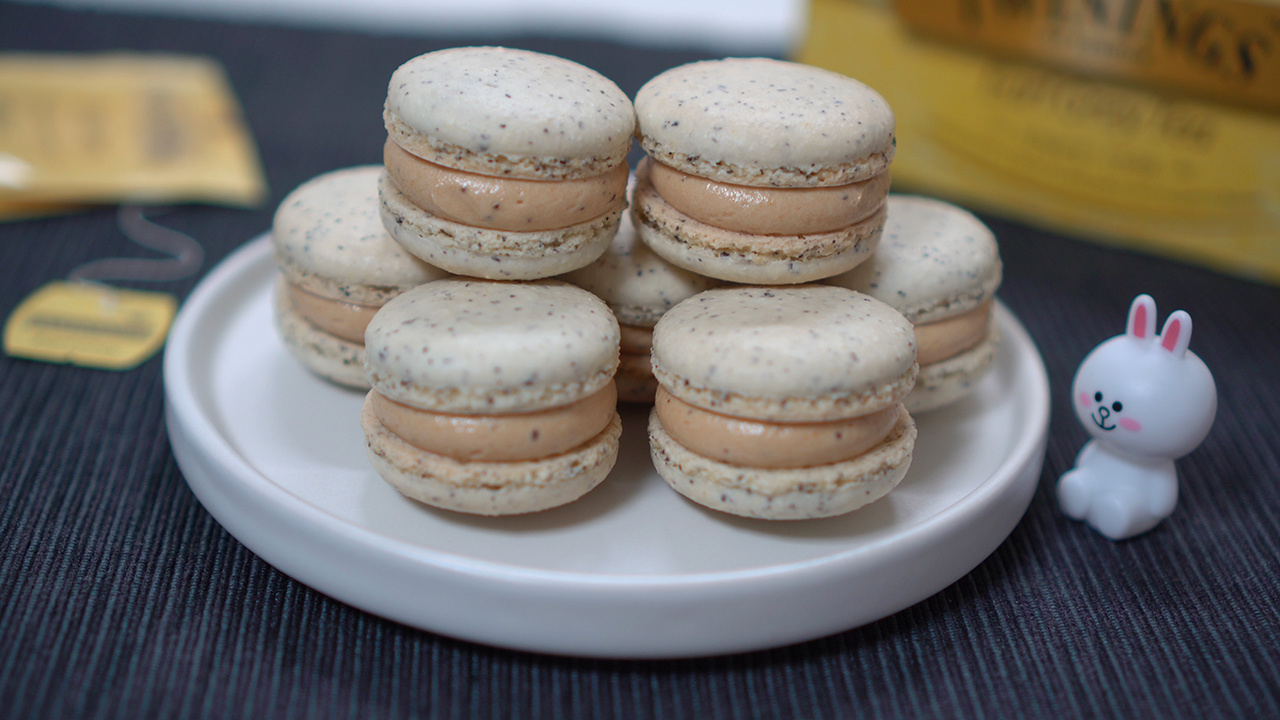
Elegant Earl Grey Macarons: A Naturally Colored Delight
Experience the sophisticated flavor of Earl Grey in these naturally colored macarons, free from artificial dyes.

Create beautiful macarons with a delicate Earl Grey infusion, achieving a lovely hue without any artificial coloring. The subtle floral and citrus notes of Earl Grey pair wonderfully with the crisp shell and chewy interior. For an even richer experience, pair with our Ultimate Earl Grey Ganache recipe (@6922157) and the luxurious Anglaise Buttercream (@6925094).
Macaron Shells- 46g Almond Flour (finely ground)
- 42g Powdered Sugar
- 35g Egg Whites (room temperature)
- 33g Granulated Sugar
- 2g Earl Grey Tea Leaves (finely ground)
Earl Grey Filling- 60g Anglaise Buttercream (prepared in advance)
- 150ml Milk
- 80ml Heavy Cream
- 35g Granulated Sugar
- 2 Earl Grey Tea Bags
- 60g Anglaise Buttercream (prepared in advance)
- 150ml Milk
- 80ml Heavy Cream
- 35g Granulated Sugar
- 2 Earl Grey Tea Bags
Cooking Instructions
Step 1
Begin by preparing the dry ingredients for the macaron shells. In a bowl, sift together the finely ground almond flour, powdered sugar, and the finely ground Earl Grey tea leaves. Sift them 2-3 times to ensure a very fine, lump-free mixture. Set aside.

Step 2
Place the room temperature egg whites in the clean bowl of your stand mixer (or a large mixing bowl if using a hand mixer). Start whipping on low speed until a light foam begins to form.

Step 3
Once the egg whites lose their yellow tint and start to form a frothy foam, gradually add about one-third of the granulated sugar (approx. 11g). Increase the mixer speed to medium and continue whipping.

Step 4
Add another third of the granulated sugar (approx. 11g) and continue to whip. The meringue will start to become firmer. When you lift the whisk, it should form a soft peak that slightly curls over. Be careful not to overbeat at this stage.

Step 5
Add the remaining one-third of the granulated sugar (approx. 11g) and increase the mixer speed to high. Whip until a stiff, glossy meringue forms. When you lift the whisk, the peak should stand straight up without collapsing. This is crucial for achieving well-risen shells.

Step 6
Add the sifted dry ingredients (almond flour, powdered sugar, Earl Grey tea) back over the meringue. Sift them again directly onto the meringue to ensure no clumps remain. This second sifting helps incorporate the dry ingredients evenly.

Step 7
Using a spatula, gently fold the dry ingredients into the meringue. Use a motion that scrapes down the sides of the bowl and then folds the batter over. Mix only until no dry streaks are visible. Overmixing will deflate the meringue, leading to flat macarons.

Step 8
Perform the ‘macaronage’ to achieve the correct batter consistency. Continue folding and pressing the batter against the side of the bowl with your spatula. The batter is ready when it flows off the spatula in a thick ribbon that slowly melts back into the rest of the batter within about 10-15 seconds. It should be thick but fluid.

Step 9
Transfer the batter into a piping bag fitted with a plain round tip (about 1cm or 3/8 inch in diameter). Ensure the bag is well-sealed to prevent batter from squeezing out the top.

Step 10
Pipe uniform rounds of batter onto a baking sheet lined with parchment paper or a silicone baking mat. Aim for rounds about 3.5cm (approximately 1.4 inches) in diameter, leaving some space between each one.

Step 11
Firmly tap the baking sheet on your work surface 2-3 times. This helps to release any trapped air bubbles within the batter and allows the macaron shells to spread slightly, forming a smoother surface and helping the ‘feet’ to develop.

Step 12
If any small air bubbles remain on the surface of the piped batter, gently pop them with a toothpick. This ensures a smooth, professional finish to your macaron shells.

Step 13
Let the piped macarons air-dry at room temperature for at least 30 minutes, or until a skin forms. When you lightly touch the surface, it should not stick to your finger. The drying time can vary depending on humidity; extend it if necessary, especially in humid weather. This step is crucial for preventing cracked shells during baking.

Step 14
Bake the dried macaron shells in a preheated oven at 150°C (300°F) for 8 minutes. Then, reduce the oven temperature to 140°C (285°F) and bake for an additional 5 minutes. Oven temperatures can vary, so monitor your macarons and adjust baking time as needed. They should have developed ‘feet’ and be firm to the touch.

Step 15
Remove the macarons from the oven and let them cool completely on the baking sheet before attempting to remove them. Once fully cooled, carefully peel them off the parchment or mat. Pair up shells of similar size and shape for filling.

Step 16
Prepare the filling. In a clean bowl, combine the prepared Anglaise Buttercream with the prepared Earl Grey Ganache. Whisk or stir until smooth and well combined, ensuring the Earl Grey flavor is evenly distributed.

Step 17
Pipe a generous amount of the Earl Grey buttercream filling onto the flat side of one macaron shell. Add a small dollop of the Earl Grey ganache in the center for an extra burst of flavor. Place the matching shell on top and gently press down to distribute the filling evenly.

Step 18
Place the filled macarons in an airtight container and refrigerate for at least 2 hours (preferably 24 hours) before serving. This ‘maturation’ period allows the flavors to meld and the texture to soften slightly, resulting in the perfect chewy macaron.

Step 19
Enjoy your delightful Earl Grey macarons!


