Seaweed and Egg Roll (Miyeok Gyeranmari)
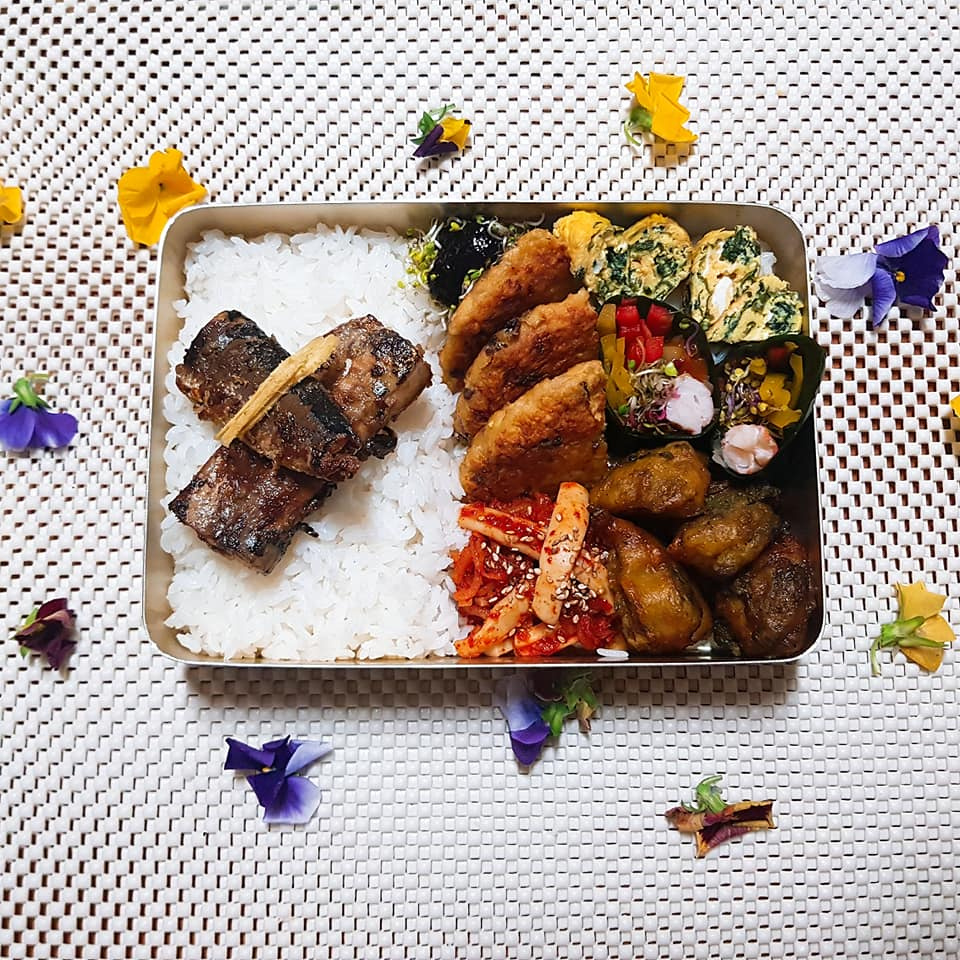
[Convenient Meal Product] Seafood Lunchbox

As this is a competition for convenient seafood products, we’ve created a special set of six easy-to-make side dishes to accompany a meal. We believe offering a variety of simple dishes is more appealing and delicious than a single menu item, featuring fish, seaweed, crustaceans, and shellfish. Furthermore, since seafood lunchboxes are not commonly found in convenience stores, we thought this would be an ideal product for sale as lunchbox components, given that all sides can be refrigerated or frozen for a long shelf life.
Miso-Glazed Saury Rice- 200g Rice
- 1 can Saury
- 2 Tbsp Miso paste
- 1 Tbsp Mirin (rice wine)
- 1 Tbsp Oligosaccharide (or corn syrup)
Mackerel Hamburg Steak- 1 Mackerel
- 1/4 Onion
- 2 Tbsp Flour
- 1 Egg
- 5g Ginger
- 1 Tbsp Oyster sauce
- 1 tsp Tabasco sauce
Abalone Curry Fritters with Abalone Liver Sauce- 2 Abalones
- 3 Tbsp Curry powder
- 5 Tbsp Frying powder
Kelp and Shrimp Rolls- 50g Dried Kelp
- 3 Shrimp
- 1/4 Bell pepper
- 1/4 Onion
- 20g Sprouts
Seaweed Egg Roll- 2 Eggs
- 20g Dried Seaweed
Squid Kimchi- 1 Squid body
- 1/4 Radish
- 3 Tbsp Red chili powder
- 1 Tbsp Corn syrup
- 1 Tbsp Anchovy sauce
- 1 tsp Vinegar
- 1 Mackerel
- 1/4 Onion
- 2 Tbsp Flour
- 1 Egg
- 5g Ginger
- 1 Tbsp Oyster sauce
- 1 tsp Tabasco sauce
Abalone Curry Fritters with Abalone Liver Sauce- 2 Abalones
- 3 Tbsp Curry powder
- 5 Tbsp Frying powder
Kelp and Shrimp Rolls- 50g Dried Kelp
- 3 Shrimp
- 1/4 Bell pepper
- 1/4 Onion
- 20g Sprouts
Seaweed Egg Roll- 2 Eggs
- 20g Dried Seaweed
Squid Kimchi- 1 Squid body
- 1/4 Radish
- 3 Tbsp Red chili powder
- 1 Tbsp Corn syrup
- 1 Tbsp Anchovy sauce
- 1 tsp Vinegar
- 50g Dried Kelp
- 3 Shrimp
- 1/4 Bell pepper
- 1/4 Onion
- 20g Sprouts
Seaweed Egg Roll- 2 Eggs
- 20g Dried Seaweed
Squid Kimchi- 1 Squid body
- 1/4 Radish
- 3 Tbsp Red chili powder
- 1 Tbsp Corn syrup
- 1 Tbsp Anchovy sauce
- 1 tsp Vinegar
- 1 Squid body
- 1/4 Radish
- 3 Tbsp Red chili powder
- 1 Tbsp Corn syrup
- 1 Tbsp Anchovy sauce
- 1 tsp Vinegar
Cooking Instructions
Step 1
All seafood used is domestically sourced, and canned saury was utilized.

Step 2
(Miso-Glazed Saury Rice) Drain the saury from the can. In a bowl, mix the miso paste and mirin to create the glaze.

Step 3
Brush the saury with the miso glaze and pan-fry until golden brown. Cook over medium-low heat to prevent burning.

Step 4
Serve the finished miso-glazed saury over warm rice for a delicious Miso-Glazed Saury Rice.

Step 5
(Mackerel Hamburg Steak) Remove only the central bones from the mackerel, then finely mince the flesh. Finely chop the onion as well.

Step 6
Combine the minced mackerel, chopped onion, egg, ginger, and flour in a bowl. Mix and knead until the mixture becomes cohesive and slightly sticky.

Step 7
Shape the mixture into hamburg steak patties. Heat a lightly oiled pan over medium heat and sear the patties on both sides until golden brown and cooked through. You can cover the pan to ensure even cooking.

Step 8
In a small pan, combine the oyster sauce and Tabasco sauce. Lightly sauté this sauce in the oil left from cooking the mackerel patties to enhance the flavor.

Step 9
Place the cooked Mackerel Hamburg Steak on a plate and drizzle with the sautéed oyster sauce and Tabasco mixture.

Step 10
(Abalone Curry Fritters with Abalone Liver Sauce) Clean the abalones thoroughly by scrubbing with a brush to remove any grit. Carefully pry the abalone meat from the shell using a spoon. Remove the hard, beak-like mouth part. Finely chop the abalone liver for the sauce.

Step 11
In a bowl, mix the frying powder and curry powder. Gradually add cold water and whisk until you achieve a smooth batter consistency, suitable for coating the abalone.

Step 12
Heat oil in a deep fryer or pot to 180°C (350°F). Dip the prepared abalone pieces into the batter and carefully fry them for about 3-4 minutes until golden and crispy. They will float when cooked.

Step 13
In a separate pan, sauté the chopped abalone liver with a little sesame oil. Add curry powder and cook briefly. Pour in 100ml of water and simmer until the sauce thickens into a rich, flavorful consistency.

Step 14
Arrange the crispy abalone fritters on a plate and generously spoon the homemade abalone liver sauce over them for a delightful Abalone Curry Fritter dish.

Step 15
(Kelp and Shrimp Rolls) Remove the digestive tract from the shrimp using a toothpick. Blanch the shrimp in boiling water until they turn pink and opaque, then immediately rinse under cold water to stop the cooking.

Step 16
Thinly slice the bell pepper and onion into julienne strips. Soak the dried kelp until pliable, then cut it into long, ribbon-like strips.

Step 17
Lay a strip of kelp flat. Arrange the julienned bell pepper, onion, sprouts, and blanched shrimp in a line on the kelp. Tightly roll them up like a sushi roll.

Step 18
Slice the rolls into bite-sized pieces and arrange them attractively on a plate for a refreshing and crisp Kelp and Shrimp Roll.

Step 19
(Seaweed Egg Roll) Crack the eggs into a bowl. Finely chop the rehydrated seaweed and add it to the eggs. Season with salt and pepper, then whisk thoroughly to break up the egg whites and combine everything.

Step 20
Heat a lightly oiled non-stick pan over low to medium-low heat. Pour a thin layer of the egg mixture into the pan. As the egg sets and cooks, gently roll it from one end towards the other. Move the rolled portion to one side, pour in more egg mixture, and continue rolling to create a layered egg roll. Repeat until all the egg mixture is used.

Step 21
Let the finished egg roll cool slightly before slicing it into bite-sized pieces. Slicing while hot can cause it to crumble.

Step 22
This soft Seaweed Egg Roll is a perfect side dish for lunchboxes or can be enjoyed on its own as a satisfying bite.

Step 23
(Squid Kimchi) Remove the skin from the squid and cut it into bite-sized pieces. Julienne the radish, then lightly salt it and let it sit to retain its crispiness.

Step 24
Briefly blanch the prepared squid in boiling water until it turns opaque. Avoid overcooking, as it can become tough. Drain well.

Step 25
In a bowl, combine the blanched squid, drained julienned radish, red chili powder, corn syrup, anchovy sauce, and vinegar. Mix gently to coat everything evenly. Taste and adjust seasoning as needed.

Step 26
Your delicious Squid Kimchi is ready! This flavorful side dish offers a delightful balance of sweet, spicy, and tangy notes.


