Lee Young-ja’s Scallion Kimchi (Pa Kimchi)
How to Make Lee Young-ja’s Flavorful Scallion Kimchi Recipe (Quick & Easy)

This is the much-talked-about Lee Young-ja style scallion kimchi, and I finally got to make it! I used a bunch of scallions left over from making kimchi to create this flavorful pa kimchi. This recipe is special because it’s quick and doesn’t require making a rice flour slurry, making it incredibly convenient.
Ingredients- 900g scallions (spring onions)
- 120ml fermented anchovy sauce made with blue crabs (kkotge-aejeot)
- 200ml gochugaru (Korean chili flakes, approx. 1 paper cup)
- 3 Tbsp plum extract (maesil-cheong)
- 3 Tbsp dried radish greens (mucheong)
Pureed Ingredients- 1/4 pear (or 100ml pear juice)
- 1/4 onion
- 1 Tbsp minced garlic (optional, adjust to taste)
- 1 Tbsp minced ginger
- 1 Tbsp toasted sesame seeds
- 1/4 pear (or 100ml pear juice)
- 1/4 onion
- 1 Tbsp minced garlic (optional, adjust to taste)
- 1 Tbsp minced ginger
- 1 Tbsp toasted sesame seeds
Cooking Instructions
Step 1
What makes Lee Young-ja’s scallion kimchi so great is that it’s a simple recipe, avoiding the need to make a rice flour slurry or lengthy salting processes. It’s perfect for busy days!

Step 2
When you buy a bunch of scallions, they often have quite a bit of soil. I found myself trimming them right at the sink. If you trim off the root ends, you can plant them in a pot, and they’ll grow back, giving you another harvest!

Step 3
After trimming, I set aside a small portion for kimchi making and ended up with about 900g of scallions. For thicker white parts, making a slit helps the seasoning penetrate better. However, the scallions I bought were moderately sized, so I used them as they were.

Step 4
Fill a large bowl with plenty of water and soak the scallions. Wash them thoroughly, paying close attention to the roots to remove any clinging soil. It’s crucial to rinse them meticulously under running water, especially in the crevices where the white part meets the green leaves, as dirt can accumulate there. Rinse about 3 times until perfectly clean, then drain them well in a colander.

Step 5
Prepare the ‘kkotge-aejeot’ (fermented sauce with blue crabs), which is a key ingredient in Lee Young-ja’s pa kimchi. Tilt a basin slightly and pour the sauce over the white parts of the scallions. This step adds a subtle savory depth.

Step 6
Let’s prepare the ingredients for the blender. Add 1/4 pear, 1/4 onion, 1 Tbsp minced garlic, 1 Tbsp minced ginger, and 1 Tbsp salted shrimp (saeujeot) to the blender. You can substitute the pear with 100ml of pear juice. To enhance sweetness and flavor, also add 3 Tbsp of plum extract and 3 Tbsp of dried radish greens. Blend until everything is smooth.

Step 7
After tossing the scallions with the ‘kkotge-aejeot’, let them sit for about 20 minutes to lightly pickle. You don’t need to salt them for too long to maintain their crispiness. While the scallions are pickling, combine the blended ingredients with 200ml of gochugaru in a bowl to make the seasoning paste. Pour the ‘kkotge-aejeot’ that was used on the scallions into this paste and mix well to balance the flavors.

Step 8
Pour the prepared seasoning paste over the scallions and mix gently to coat evenly. Mixing all the seasoning ingredients together before adding them to the scallions helps the flavors meld and ensures the paste coats the vegetables uniformly. Start with the white parts and work your way to the leaves, ensuring every part is well-seasoned.

Step 9
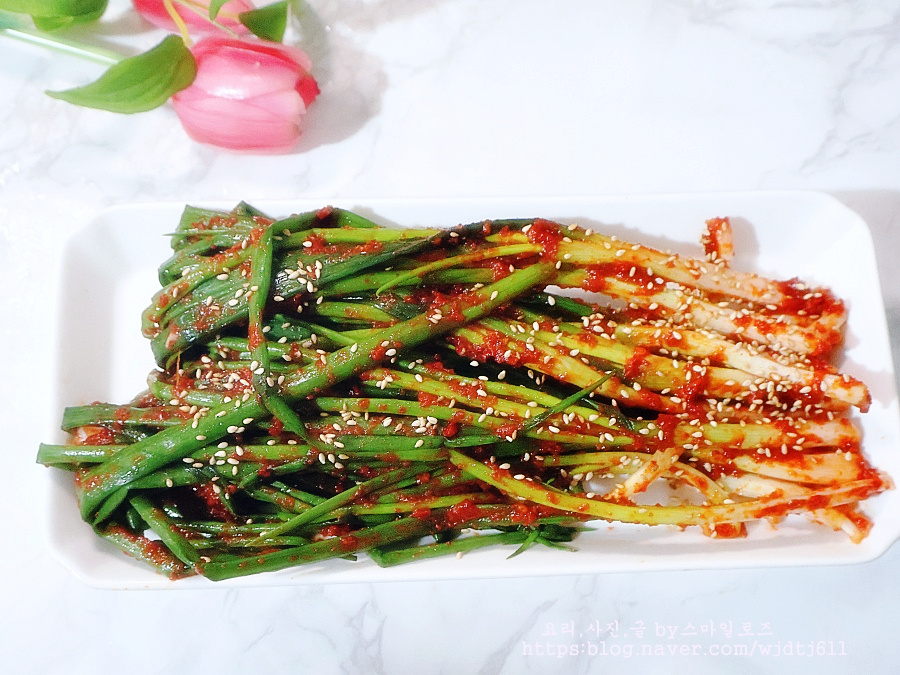
Carefully spread the seasoning onto the white parts of the scallions, and your delicious pa kimchi is complete! Arranging it neatly in a dish will present a beautifully finished dish, bursting with its signature spicy and savory flavor.

Step 10
Transfer the finished kimchi to an airtight container and press down firmly. This minimizes air contact, aiding in a better fermentation process. Leave it at room temperature for about a day, then store it in your kimchi refrigerator for a delicious, tangy, and savory scallion kimchi experience.

Step 11
As I was arranging and photographing the kimchi, the aroma was so inviting that I couldn’t resist trying a few stalks! It was incredibly delicious right away. Honestly, I didn’t used to eat much scallion kimchi, but ever since I started making it, I’ve become completely captivated by its flavor. They say learning something new late is the most addictive – I think that applies to me! Haha.

Step 12
Finally, Lee Young-ja’s pa kimchi, or scallion kimchi, is ready! It’s delightfully spicy and savory, perfect for revitalizing a dull appetite. Making it is not difficult at all, and the simple seasoning paste, without the need for rice flour slurry, makes it even easier. Following Lee Young-ja’s method resulted in a truly delicious kimchi!

Step 13
It’s absolutely delicious served on top of warm rice. It’s also a fantastic accompaniment to rich meat dishes, jjajangmyeon, or ramen – a match made in heaven! Before the main kimchi-making season, try making this flavorful scallion kimchi with autumn scallions to elevate your fall meals.


