Attractive Nude Gimbap Creation
Our Weekend Special: Sexy Nude Gimbap for Eyes and Palate

Wondering what to serve your family this weekend? Surprise them with ‘Nude Gimbap’, a simple yet special dish that’s a feast for both the eyes and the taste buds. It offers a unique charm distinct from traditional gimbap, ensuring everyone enjoys a delicious meal. Make your weekend delightful with these pretty and tasty nude gimbap!
Basic Rice Ingredients- 2 bowls of warm rice
Rice Seasoning- 1 tsp salt
- 1 tsp toasted sesame seeds
- 1 Tbsp perilla oil
Gimbap Filling Ingredients- 2 eggs
- 2 sheets of wide fish cake
- 4 pieces of pickled radish (danmuji)
- 4 pieces of seasoned burdock root
Spicy Seasoned Kimchi Filling- 2 stalks of ripe napa kimchi
- 1 tsp sugar
- 1 tsp toasted sesame seeds
- 1 tsp perilla oil
- 1 tsp salt
- 1 tsp toasted sesame seeds
- 1 Tbsp perilla oil
Gimbap Filling Ingredients- 2 eggs
- 2 sheets of wide fish cake
- 4 pieces of pickled radish (danmuji)
- 4 pieces of seasoned burdock root
Spicy Seasoned Kimchi Filling- 2 stalks of ripe napa kimchi
- 1 tsp sugar
- 1 tsp toasted sesame seeds
- 1 tsp perilla oil
- 2 stalks of ripe napa kimchi
- 1 tsp sugar
- 1 tsp toasted sesame seeds
- 1 tsp perilla oil
Cooking Instructions
Step 1
First, let’s prepare the rice, the foundation of our gimbap. In 2 bowls of warm rice, add 1 tablespoon of perilla oil, 1 teaspoon of toasted sesame seeds, and 1 teaspoon of salt. Gently mix with a spatula, being careful not to mash the rice grains, to create seasoned rice.

Step 2
Next, we’ll prepare the egg garnish (jidan). Crack 2 eggs into a bowl and whisk them thoroughly, making sure to remove the chalazae (the white stringy bits) for a smooth texture. Add 1 teaspoon of salt and mix well to season.

Step 3
Heat a pan over low heat. Add just enough cooking oil to coat the pan, then wipe it with a paper towel; this helps create a thin, non-stick garnish. Pour the whisked egg mixture thinly and widely into the pan, and cook until golden brown on both sides. You will make 2 sheets in total.

Step 4
Once the egg garnishes have cooled slightly, cut each sheet in half. This will give you 4 pieces of egg garnish, perfect for filling the gimbap.

Step 5
Now, prepare the fish cakes for the filling. Cut 2 sheets of wide fish cake into strips about 1 cm thick, suitable for gimbap. Place the cut fish cakes in a pan and cook over low heat with a little oil until they become soft and warm. Be careful not to use high heat, as they can burn easily.

Step 6
The fish cakes are now nicely browned. Stir-frying them like this brings out their natural savory flavor, making them delicious even without soy sauce. They are also tasty dipped lightly in soy sauce.

Step 7
Prepare the essential gimbap ingredients from your refrigerator: pickled radish (danmuji) and seasoned burdock root. If you make gimbap often, it’s always convenient to have these readily available. Using store-bought versions makes preparation quicker.

Step 8
Take about 2 stalks of ripe napa kimchi, lightly squeeze out excess moisture, and cut them into pieces similar in length and width to the pickled radish (about 1 cm thick). These will add a nice crunch and spicy kick to the gimbap.

Step 9
Season the cut kimchi for added flavor. Mix 1 teaspoon of perilla oil, 1 teaspoon of toasted sesame seeds, and 1 teaspoon of sugar with the kimchi. Gently toss until well combined. This sweet, sour, and spicy mix complements the gimbap perfectly.

Step 10
All the filling ingredients are now ready! Let’s start rolling the gimbap. Place a sheet of seaweed (gim) on a bamboo rolling mat. Spread the seasoned rice thinly and evenly over the entire sheet of seaweed. It’s crucial to spread the rice thinly; otherwise, the gimbap might burst or look messy.

Step 11
On top of the thinly spread rice, place a sheet of plastic wrap (cling film or a plastic bag). This wrap will help you roll the gimbap neatly and prevent the rice from scattering.

Step 12
With the plastic wrap in place, flip the seaweed and rice over together. Now, the seaweed side should be facing up. Arrange your prepared filling ingredients neatly in a line. Start with the soft egg garnish, laid lengthwise.

Step 13
Place one piece of the cooked fish cake on top of the egg garnish. Then, add the pickled radish, seasoned burdock root, and the deliciously seasoned kimchi. Layer the remaining ingredients one by one.

Step 14
Once all the fillings are in place, it’s time to roll the gimbap. Using the bamboo mat, press firmly as you roll to ensure the fillings stay packed tightly and the gimbap is firm. Roll it up with care, just like the lyrics ‘Roll it well. Press it well.’ The plastic wrap makes it easier to achieve a neat, well-formed roll.

Step 15
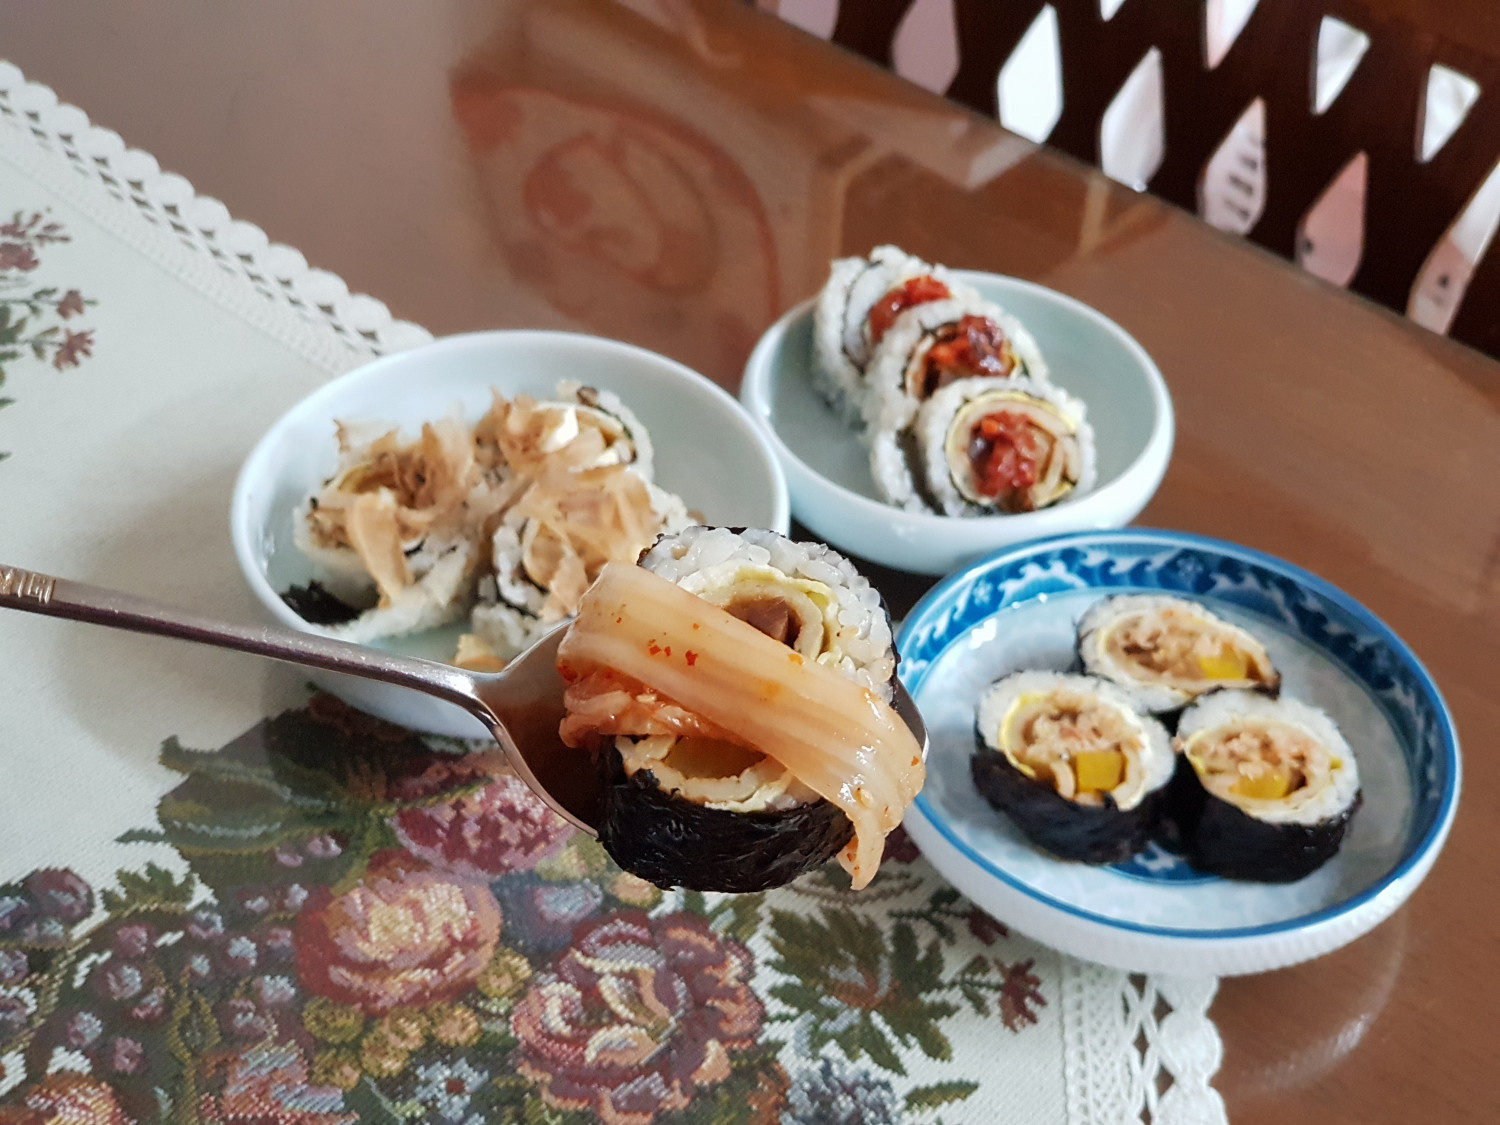
Let’s add a creative topping to the finished nude gimbap. Drizzle some creamy mayonnaise over the roll.

Step 16
Sprinkle bonito flakes (katsuobushi) over the mayonnaise for a smoky aroma. This topping gives it a flavor reminiscent of what you’d find at a conveyor belt sushi restaurant. You can create impressive restaurant-quality dishes at home!

Step 17
How about topping another nude gimbap with some spicy squid kimchi (ojingeo jeotgal) you have at home? This might seem unusual, but the savory and spicy flavor pairs surprisingly well with the nude gimbap, making it a unique delicacy.

Step 18
If you have any leftover ingredients and rice, don’t worry! You can make regular gimbap by spreading rice on a sheet of seaweed, adding the remaining fillings, and rolling it up as usual. You’ll end up with a simple yet familiar and delicious gimbap.

Step 19
Finally, both types of delicious gimbap are complete! You have the ‘dressed’ gimbap (with seaweed on the outside) and the ‘undressed’ nude gimbap (with rice on the outside) side-by-side. Just looking at them is enough to make your mouth water, isn’t it?

Step 20
For another variation, top the regular gimbap with flying fish roe (tobiko). The delightful popping texture will add another layer of flavor. This is also a highly recommended treat! ^^

Step 21
As a result, two kinds of delicious gimbap are ready. The fun of choosing what to eat and the joy of sharing them will make your meal even more special.

Step 22
Eating these homemade gimbap makes me wonder if I just have a big appetite, or if I’m simply obsessed with gimbap, because I find them all so delicious. I feel transported to my ‘own gimbap paradise’ and enjoy them immensely. At this rate, I might just roll away with the gimbap! Haha.