Beautiful Kiwi Cutting Techniques
Elevate Your Fruit Presentation: Easy & Elegant Ways to Cut Kiwis

Learn two delightful methods to cut kiwis beautifully, perfect for kids and special occasions. These simple techniques, using just a small knife and skewers, are easy enough for anyone to master. Make your fruit platters truly shine!
Ingredients- Fresh kiwis
Cooking Instructions
Step 1
Hello everyone! Today, I’m excited to share some wonderful ways to cut kiwis, transforming them into beautiful, eye-catching treats perfect for special occasions or fun kids’ snacks. All you need is a small paring knife and some skewers. I was surprised at how easy it was the first time I tried it, and I’m sure you’ll find it simple too! Imagine how delighted the children will be when they see these beautifully cut kiwis at your next gathering!

Step 2
The kiwis I’m using today are from ‘Allfresh.’ My sister, who’s expecting, tried them and raved that they were the best kiwis she’s ever had! She said they were so sweet that she worried about her blood sugar after eating a whole watermelon. Because of her glowing review, I decided to order them along with some watermelon and other fruits.

Step 3
First, wash the kiwis thoroughly. The skin plays a crucial role in one of the cutting methods we’ll be using, so it’s important to wash them well, as we’ll be keeping some of the skin on.

Step 4
Using a small, sharp paring knife, especially one with a pointed tip, will make the cutting process faster and easier. Remember to always cut carefully to avoid any accidents!

Step 5
Focus on the center of the kiwi. Using your knife, make shallow, zig-zag cuts, pressing down a bit deeper as you go. You can adjust the width of these cuts to your preference. Once you’ve made one cut, you’ll quickly get the hang of it!

Step 6
After making the cuts, the kiwi should look something like this. It’s best to use kiwis that are slightly firm rather than overly ripe, as they hold their shape better. Gently twist the kiwi by holding the top and bottom halves to separate it into two pieces.

Step 7
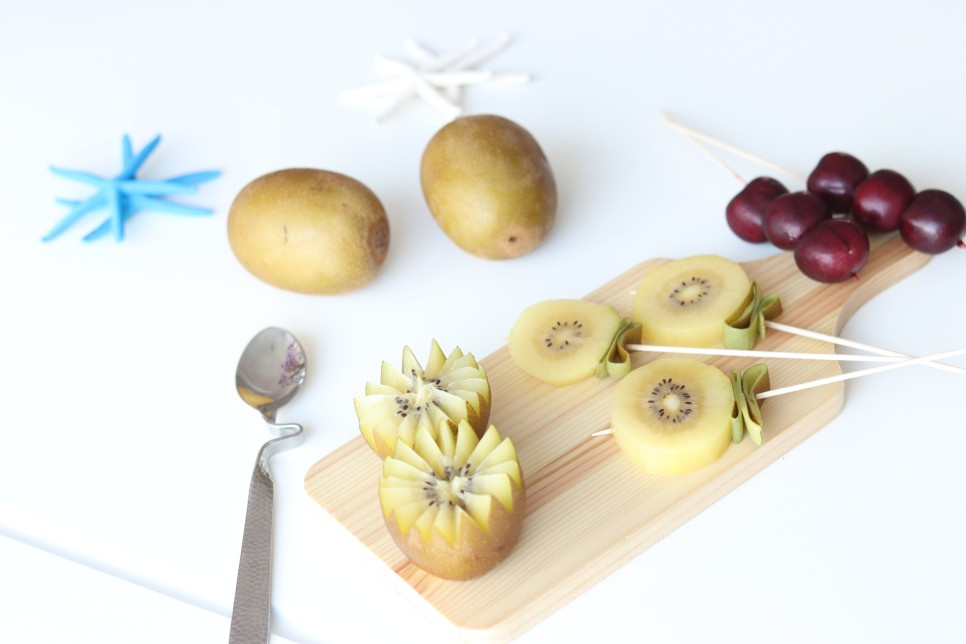
Voila! Look at this beautiful reveal. Doesn’t it resemble a blooming flower? This way, you can easily scoop out the kiwi flesh with a spoon.

Step 8
If you plan to stand the kiwi pieces up for your fruit platter, be sure to trim the bottom flat. This will ensure they stand upright securely.

Step 9
I was really pleased with how my first attempt turned out! I was so excited, exclaiming ‘Wow!’ as I cut. I think even if the cuts are a little wider, it will still look lovely. Now, let me show you the second cutting method.

Step 10
I always keep a good supply of skewers on hand. You can usually get a large pack for about a dollar, and they last a surprisingly long time. It’s convenient to have them ready whenever needed.

Step 11
Slice the kiwi into rounds about 1.5 cm thick. If you slice them too thinly, they might break or split when you insert the skewers. (I admit, a few did break on me, and I ended up eating them as I worked!)

Step 12
For the second method, we’ll create a decorative ribbon shape using the kiwi skin. When slicing, don’t peel the entire kiwi. Instead, leave about 1 cm of the skin attached at the end, and then carefully peel away the rest in a thin strip.

Step 13
This remaining 1 cm of skin will be used to form a beautiful ribbon shape. Gently shape the peel and then secure it with a skewer. I’m so grateful for such creative ideas! It’s amazing how someone thought of this.

Step 14
The finished product looks like a colorful candy! It’s even more charming when viewed from a distance. I’m confident I can make them even prettier next time.

Step 15
Cutting kiwis this way makes them even more appealing and, I believe, more delicious! I can’t wait to see my children’s reactions. I should bring them over to show them soon. Wishing you all a wonderful rest of your day!


