Captivating Purple Hue! Chewy and Delicious Black Raspberry Bread
Chewy and Beautifully Purple Black Raspberry Bread Recipe

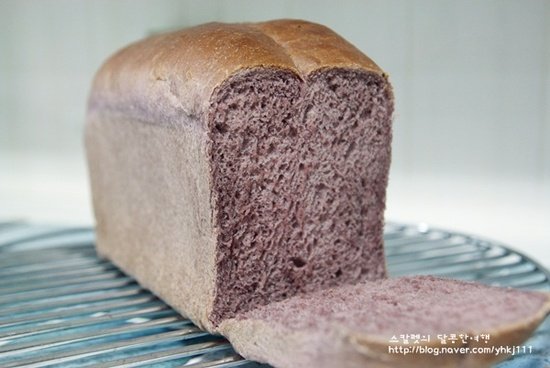
Introducing a black raspberry bread that boasts a stunning deep purple color, making it irresistible to tear apart with your hands. Its delightfully chewy texture is perfect for a comforting homemade treat. Experience the joy of healthy and delicious home baking.
Ingredients- 350g Bread Flour
- 5g Salt
- 10g Sugar
- 7g Active Dry Yeast
- 70g Water
- 70g Black Raspberry Puree or Jam
- 100g Milk
- 15g Canola Oil
Cooking Instructions
Step 1
Begin by making the dough using a bread maker. Place all ingredients except the canola oil into the bread maker bowl and mix until a dough forms. Then, add the canola oil and select the ‘Dough’ cycle. Knead until you achieve a smooth, elastic dough, then remove it. Shape the dough into a ball, place it in a bowl, and start the first rise in a warm place (approximately 1 hour).

Step 2
After the first rise, allow the dough to undergo a second proofing until it has doubled or tripled in volume. The proofing time can vary depending on the temperature, so be patient and wait until the dough significantly increases in size. During warmer seasons, the dough will rise quite quickly!

Step 3
To check if the dough has proofed sufficiently, perform the ‘dimple test’. Lightly flour your finger and gently poke the dough. If the indentation remains without collapsing, the dough is ready. Additionally, try the ‘windowpane test’ to assess the dough’s elasticity. If you can stretch it thinly until it becomes transparent without tearing, resembling a windowpane, your dough is perfectly developed.

Step 4
Once the dough has proofed well, gently punch it down within the bowl to release the trapped gases. After deflating, carefully remove the dough from the bowl.

Step 5
Divide the dough into two equal portions and shape each into a ball. Cover the dough balls with a damp cloth or plastic wrap and let them rest for about 10 to 20 minutes for an intermediate proof (bench rest).

Step 6
After the intermediate proof, gently deflate the dough balls again. Then, use a rolling pin to flatten each piece into a rectangle that is roughly the length of your loaf pan. Starting from one end, carefully roll up the dough tightly, creating a spiral. Pinch the seam to seal it securely.

Step 7
Place the two rolled dough logs side-by-side into your greased loaf pan. (Tip: If the dough feels a bit sticky, use a small amount of flour on your work surface and hands to make shaping easier.) Feel free to shape the dough according to your preference. Allow the dough in the pan to undergo its final proof (second proof). This proof is complete when the dough has risen to about the top of the pan, or slightly over. Be mindful that excessive proofing can lead to a significant oven spring, so aim for a well-risen but not over-proofed dough.

Step 8
Once the final proof is done and the dough has puffed up beautifully, bake in a preheated oven at 180°C (350°F) for approximately 25 to 30 minutes. If the top of the bread starts to brown too quickly, loosely tent it with aluminum foil to prevent burning. Enjoy your delicious homemade black raspberry bread!


