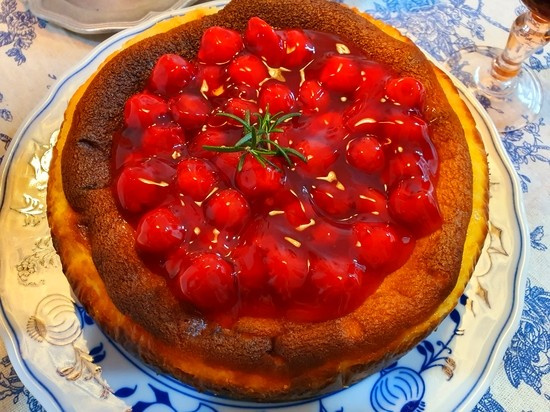
Cherry Cheesecake: A Jewel for Your Holiday Table
Crafting a Festive Cherry Cheesecake Perfect for Christmas

As the festive season approaches, imagine complementing your Christmas celebration with the vibrant allure of a ruby-red cherry cheesecake. Paired with a rich red wine, this exquisite dessert promises to elevate your holiday gatherings. We’ve crafted this recipe to be both a showstopper and a delightful treat, perfect for making your special occasions even more memorable.
Cheesecake Filling- 75g Unsalted Butter
- 197g Granulated Sugar
- 570g Cream Cheese, softened to room temperature
- 197g Eggs, at room temperature
- 38g Cornstarch
- 55g Milk, warmed
- 14g Butter, melted
- 326g Heavy Cream, warmed
- 11g Lemon Juice
- 4g Vanilla Extract
Crust- 1 package (approx. 200g) Digestive or Graham Crackers, crushed
- 75g Unsalted Butter, melted
- 14g Granulated Sugar
- 1 package (approx. 200g) Digestive or Graham Crackers, crushed
- 75g Unsalted Butter, melted
- 14g Granulated Sugar
Cooking Instructions
Step 1
Let’s start with the crust. Crush your digestive biscuits into fine crumbs using a food processor or by placing them in a zip-top bag and crushing with a rolling pin. In a bowl, combine the biscuit crumbs with the melted 75g of unsalted butter and 14g of sugar. Mix until well combined and resembles wet sand. Press this mixture firmly and evenly into the bottom of your prepared springform pan. Place the pan in the refrigerator to set while you prepare the filling.

Step 2
For the cheesecake filling, sift together the 38g of cornstarch and 197g of granulated sugar into a bowl. Sifting ensures there are no lumps and will contribute to a smoother texture in your final cheesecake.

Step 3
In a separate bowl, whisk the 197g of eggs. Gradually add the sifted cornstarch and sugar mixture from step 1, whisking gently until just combined. To ensure the eggs don’t scramble and to achieve a silky smooth consistency, place this bowl over a saucepan of simmering water (double boiler method) and whisk continuously until slightly thickened and warm to the touch.
Step 4
In a large mixing bowl, place the 570g of softened cream cheese. Using a stand mixer with a paddle attachment or a hand mixer, beat the cream cheese until it’s completely smooth and creamy, with no lumps. This is a crucial step for a velvety cheesecake texture.
Step 5
Add the 14g of melted butter (for the filling) to the cream cheese and mix until thoroughly incorporated. Ensure the butter is fully blended into the cream cheese mixture.
Step 6
Gradually add the egg and cornstarch mixture from step 2 to the cream cheese mixture, mixing on low speed until just combined. Be careful not to overmix at this stage, as it can incorporate too much air. The goal is a smooth, homogenous batter.
Step 7
Gently warm the 55g of milk and 326g of heavy cream. You can do this in separate small saucepans or briefly in the microwave. Ensure they are warm, not hot.
Step 8
Slowly pour the warmed milk and cream mixture into the cream cheese batter while mixing on low speed. Once combined, add the 11g of lemon juice and 4g of vanilla extract. Mix gently until everything is just incorporated. Overmixing can lead to a cracked cheesecake.
Step 9
Pour the cheesecake batter through a fine-mesh sieve into a clean bowl. This straining process will remove any tiny lumps and ensure an ultra-smooth, silky texture for your cheesecake. Gently help it through the sieve with a spatula if needed.
Step 10
Carefully pour the strained cheesecake batter over the chilled crust in the springform pan. Gently smooth the top with an offset spatula or the back of a spoon to create an even surface.
Step 11
Preheat your oven to 180°C (350°F). Place the cheesecake pan in the preheated oven and bake for approximately 40 minutes. You’ll know it’s ready when the edges are set but the center still has a slight wobble (like jelly). This wobble indicates a moist, creamy interior. Reduce the oven temperature to 160°C (320°F) and bake for an additional 7 minutes to set the top further.

Step 12
Once baked, carefully remove the cheesecake from the oven and let it cool completely in the pan on a wire rack. After it has reached room temperature, cover the pan (without touching the surface) and refrigerate overnight (at least 8 hours). This chilling period is essential for the cheesecake to fully set and for its flavors to meld.
Step 13
Carefully release the cheesecake from the springform pan. Drain the canned cherries well and arrange them decoratively over the top of the chilled cheesecake. For an extra touch of elegance, garnish with a few fresh rosemary sprigs in the center or around the edges. The bright red cherries will look like beautiful jewels against the creamy white cheesecake.

Step 14
Cheesecake and wine are a classic pairing! The rich, creamy texture and subtle sweetness of the cheesecake are beautifully complemented by the tannins and fruit notes of a good wine. The wine cuts through the richness of the cheesecake, creating a delightful balance on the palate.

Step 15
Each bite is a decadent experience: wonderfully sweet, incredibly moist, and it simply melts in your mouth. The smooth cream cheese base is perfectly balanced by the tartness of the cherries.

Step 16
For your year-end parties or when entertaining guests, this Cherry Cheesecake paired with a glass of red grape wine is an effortlessly elegant dessert solution. It’s the perfect way to add a touch of festive sparkle to any gathering.


