Chewy and Fluffy Rice Cake (Gijeongtteok/Jeungpyeon)
How to Make Soft and Chewy Steamed Rice Cake (Gijeongtteok/Jeungpyeon) Using Leftover Rice Flour

Did you have leftover rice flour from making songpyeon after the Chuseok holiday? And perhaps a bottle of makgeolli (rice wine) bought to make jeon? With these two ingredients, it’s time to make jeungpyeon! Wow, this chewy texture is unbelievable! Am I perhaps destined to open a rice cake shop? Haha, I always get so excited when I make something. This recipe will guide you through making delicious, soft, and chewy jeungpyeon at home.
Ingredients- Wet rice flour 10 cups (containing salt)
- Sugar 1 cup
- Fresh makgeolli 1 cup
- Water 1 cup
Cooking Instructions
Step 1
★ Rice Flour Tip: If you bought rice flour from a local rice cake shop, it usually contains salt. If using dry rice flour from a supermarket, add 1 Tbsp of salt per 10 cups of rice flour. Also, dry rice flour may require about 1/3 cup more water to achieve the right consistency.
★ Makgeolli Tip: For fermentation, it’s crucial to use ‘fresh’ makgeolli (unpasteurized). This type contains active yeast necessary for fermentation. Look for ‘saeng’ (fresh) on the label. Fresh makgeolli has a shorter shelf life.

Step 2
Sift the rice flour through a fine-mesh sieve. This step removes any lumps and aerates the flour, contributing to a smoother texture in the final rice cake.

Step 3
In a large bowl, combine the sifted rice flour (10 cups), sugar (1 cup), fresh makgeolli (1 cup), and water (1 cup). Mix thoroughly with a spatula or your hands until all ingredients are well incorporated and there are no dry pockets of flour. Ensure a smooth batter.

Step 4
Don’t be alarmed if the batter appears quite thin initially. This is normal. The consistency can vary depending on the type and moisture content of the rice flour, so this initial thinness is expected.

Step 5
Begin the first fermentation. Cover the bowl with plastic wrap or a lid and let it sit in a warm place for about 4 hours. If your kitchen is cool, you can place the bowl under blankets or inside an oven with a pan of warm water at the bottom (without the water directly touching the batter bowl) to maintain a consistent warm temperature for fermentation.

Step 6
After approximately 4 hours, gently stir the fermented batter. You should observe that the batter has risen significantly. You’ll likely hear or see small bubbles (like popping sounds) as you mix, indicating successful fermentation.

Step 7
Proceed with the second fermentation. Place the bowl back in a warm spot for another 3-4 hours. Once this second fermentation is complete, gently stir the batter again to redistribute the air bubbles.

Step 8
Prepare your steaming molds. It’s best to fill the molds thinly for a chewier and more tender texture. If you have mousse rings, they work well. Otherwise, you can fashion molds from aluminum foil into desired shapes (round or square). Line these foil molds with a damp cloth before adding the batter. Avoid overfilling the steamer; leave some space around the molds for steam to circulate effectively, ensuring the cakes cook evenly.

Step 9
Pour the fermented batter into the prepared molds. Be mindful not to overfill, aiming for a thinner layer for optimal texture.

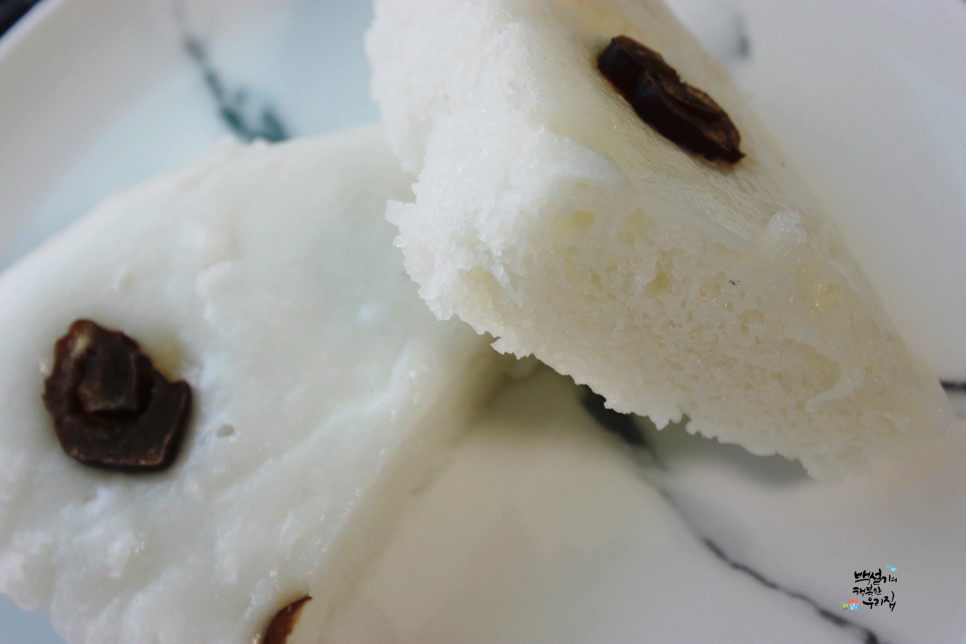
Step 10
Decorate the top of the batter with toppings. I used thinly sliced dates, rolled into flower shapes. Black sesame seeds are also a lovely addition.

Step 11
Before steaming, let the filled molds sit in the steamer for about 10 minutes. Add cold water to the steamer, keep the lid open, and steam over medium-low heat for 10 minutes. This pre-steaming step helps the cakes puff up slightly, creating a lovely dome shape.

Step 12
Now, cover the steamer with the lid and steam over high heat for 20 minutes. After 20 minutes, reduce the heat to medium-low and steam for an additional 10 minutes, allowing it to ‘rest’ or steam gently. This final steaming ensures the cakes are fully cooked and wonderfully moist.

Step 13
Voila! You now have beautiful and delicious jeungpyeon ready to enjoy. They look as good as they taste!

Step 14
Look at that beautiful sheen on the freshly steamed jeungpyeon! They are exceptionally chewy and delicious when warm.

Step 15
I tried steaming the leftover batter in muffin liners. However, the muffin liners lacked structure, and the batter spread out quite a bit sideways. They didn’t hold their shape well.

Step 16
Although the appearance wasn’t ideal, the smaller, spread-out cakes were surprisingly even chewier and fluffier! This method resulted in a wonderfully tender texture, perfect for individual servings.

Step 17
I ended up with two small jeungpyeon cakes and some mini ‘bangoreul jeungpyeon’ (drop-shaped). If you love jeungpyeon, consider making them in pretty shapes to serve as a delightful cake for special occasions!

Step 18
These homemade jeungpyeon make an excellent meal replacement. If you have leftover rice flour, don’t hesitate to make this wonderful treat. Forget buying jeungpyeon; make them fresh at home!