Colorful and Pretty Rolled Inari Sushi
Beautiful Rolled Inari Sushi Recipe for Your Autumn Picnic Lunchbox

The weather is crisp and clear in autumn, perfect for a picnic! Here’s a special rolled inari sushi recipe that’s not only visually appealing but also delicious, making it an ideal lunchbox item for your outing. Its unique shape and taste are sure to impress everyone.
Main Ingredients- 8 sheets of store-bought inari pockets (square shape)
- 2 servings of rice (approx. 300g)
- 10 sheets of lunchbox seaweed (gim)
- A pinch of sesame seeds
- A little bit of soy sauce for braised meat (jangjorim sauce), or a mix of soy sauce, sugar, and sesame oil
Garnish (Optional)- 1 slice of processed ham
- A little bit of ketchup
- 1 slice of processed ham
- A little bit of ketchup
Cooking Instructions
Step 1
First, prepare the store-bought inari pockets. Gently unfold each inari pocket and lightly press with both hands to squeeze out some of the seasoned liquid inside. Be careful not to press too hard, as this could tear the inari. Draining some liquid prevents the sushi from becoming too salty.

Step 2
Next, season the rice. In a bowl with 2 servings of warm rice, add about 1-2 teaspoons of the jangjorim sauce (or your soy sauce, sugar, and sesame oil mixture). Sprinkle in some roasted sesame seeds. Use a spatula to gently mix everything together, ensuring the rice grains aren’t crushed and the seasoning is evenly distributed.

Step 3
Now, it’s time to add the seaweed to the inari pockets. Lay the prepared inari pockets flat again. Place one sheet of lunchbox seaweed on top of each inari pocket. If the seaweed is slightly smaller than the inari, place it as is. If it’s the same size, you can trim it to fit. The seaweed layer will help prevent the rice from falling out and adds an extra layer of umami.

Step 4
Place a moderate amount of the seasoned rice onto the seaweed-covered inari pocket. Don’t overfill, as the sushi might burst open. Aim to cover about two-thirds of the inari pocket with rice. Lightly wetting your hands with water or vinegar water before handling the rice will prevent sticking.

Step 5
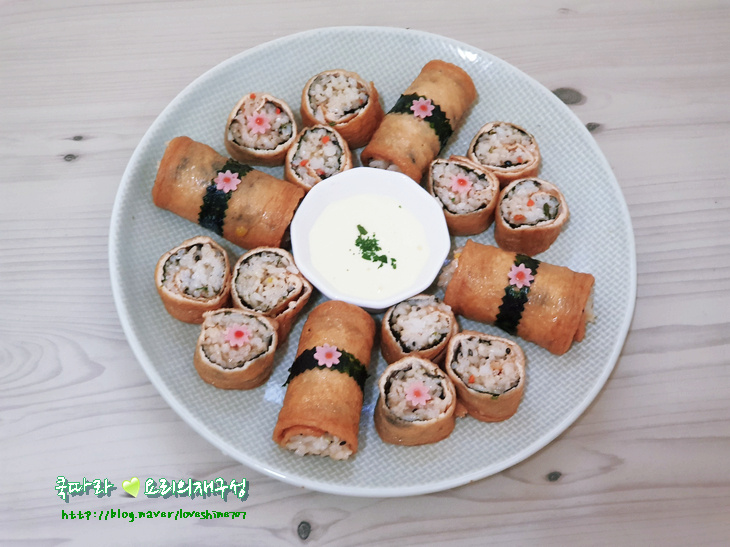
Here’s the crucial step for creating the rolled inari sushi. Starting from the bottom edge of the inari pocket, hold the seaweed and rice and carefully roll it up tightly, but gently, to avoid tearing the inari. Use both hands to roll with consistent pressure from start to finish for a neat shape. Your basic rolled inari sushi is now complete!

Step 6
Would you like to make them even prettier before packing them into your lunchbox? Wrap a strip of lunchbox seaweed around the center of each rolled inari sushi. For an extra charming touch, cut small shapes like flowers or hearts from the sliced ham and attach them to the seaweed band. Add a tiny dot of ketchup in the center of the ham flower for a vibrant accent. These can be enjoyed as they are, or for easier eating, slice each roll into three bite-sized pieces. This makes for a practical and delightful lunchbox meal!


