Colorful Three-Color Rice Balls
Super Simple and Delicious Three-Color Rice Balls Recipe for Lunchboxes

Round and perfectly bite-sized, these three-color rice balls are a feast for the eyes! Today, we’re sharing a recipe that transforms simple ingredients into visually stunning three-color rice balls with just a slight change in preparation. They are guaranteed to impress anyone who receives them. Let’s make these magical rice balls that will make any ordinary day special!
Ingredients (Serves 4)- 300g white rice (approx. 1.5 cups)
- 2 sheets kombu (kelp, approx. 10×10 cm)
- 1/2 carrot
- 5 pickled radish sheets (for kimbap)
- 5 burdock roots (for kimbap)
- 10g seasoned laver (or 5 sheets roasted seaweed)
- 10g dried small shrimp
- 10g dried small anchovies
Cooking Instructions
Step 1
This recipe is for 4 servings, using about 300g of rice. If you’re making it for 2 people, simply halve all the ingredient quantities.

Step 2
Rinse the rice gently 3 to 4 times. Over-washing can strip away nutrients and the rice’s natural sweetness. Be gentle to avoid breaking the grains.

Step 3
Slightly firm rice (don-bap) works better for rice balls than very soft rice (jin-bap). Reduce the usual amount of water slightly and let the rice soak for 5 minutes.

Step 4
After soaking, add the 2 sheets of kombu just before starting the cooking process. Adding kombu too early can release a sticky substance that affects the rice’s texture. It’s best added right before cooking for a subtle oceanic flavor and pleasant texture.

Step 5
Now, start the rice cooker on the white rice setting. Cooking times may vary depending on your rice cooker model. Our rice was perfectly cooked after about 30 minutes!

Step 6
The rice is ready! It’s lightly seasoned with kombu, giving it a wonderfully chewy texture and delightful aroma. Each grain looks perfectly separate.

Step 7
Transfer the cooked rice to a wide bowl to cool down. If you mix in the vegetables while the rice is piping hot, they can overcook and release water, making the rice balls mushy. While the rice cools, let’s prepare the other ingredients.

Step 8
Finely chop 1/2 carrot. Vegetables add texture and vibrant color to the rice balls. Don’t hesitate to use what you have in your fridge – bell peppers, cabbage, or zucchini are great alternatives. Finely chopped veggies can even help picky eaters enjoy their meal.

Step 9
Finely chop the 5 sheets of pickled radish (kimbap-style). Their sweet and tangy flavor will add a delightful zest. If you have Yuzu-flavored pickled radish, that would be a delicious variation too.

Step 10
It’s crucial to chop all vegetables as finely as possible so they blend well with the rice grains. Large vegetable pieces can make the rice balls difficult to form and cause them to fall apart.

Step 11
Finely chop the 5 pieces of burdock root (kimbap-style). Since these are often pre-seasoned for kimbap, they are convenient to use. The slightly crunchy texture of burdock will add an interesting contrast.

Step 12
Place 5 sheets of roasted seaweed in a plastic bag and crush them into small pieces. You can use store-bought seaweed flakes, but crushing your own is easy and ensures you control the saltiness, especially if you’re preparing this for young children.

Step 13
Heat a non-stick pan over low heat. Add the dried small shrimp and dried small anchovies and sauté for about 3 minutes until crispy and fragrant. This step adds a wonderful savory crunch. If you have Furikake (Japanese rice seasoning), you can skip this step and use it directly.

Step 14
A small note: Furikake can sometimes be a bit hard, so it might not be ideal for very young children or those with sensitive teeth. By now, your rice should be perfectly lukewarm and ready for mixing.

Step 15
In the lukewarm rice, add 1/2 teaspoon of salt and 2 tablespoons of sesame oil. Mix gently. If you are using a good amount of seasoned laver or furikake, you might not need to add extra salt, as the seasoning from the laver itself is often sufficient.

Step 16
Once the rice is evenly coated with sesame oil, add the sautéed dried shrimp and anchovies. Mix them in gently.

Step 17
Now, add all the finely chopped vegetables. Mix everything together thoroughly. It’s best to season the rice first, then add the sautéed shrimp and anchovies, and finally the vegetables, mixing step-by-step rather than all at once.

Step 18
This mixture is already delicious enough to eat as is! But to make it truly special for a lunchbox, we’ll shape them into beautiful rice balls. Let’s create three different styles quickly and easily!

Step 19
Take about one-third of the rice mixture and form it into small, bite-sized balls. You can adjust the size to your preference, but smaller balls are generally easier to eat and less messy. Aim for a size that fits perfectly in one bite.

Step 20
Arrange these perfectly formed first rice balls on a plate – your first style is complete! How easy was that? Let’s move on to the second style.

Step 21
Take half of the remaining rice mixture. Add half of the prepared crushed seaweed to it. Mix them together gently.

Step 22
Form the rice-and-seaweed mixture into small, round balls.

Step 23
Voila! Your second style, cute rice balls coated with seaweed flakes, is ready. Now for the third and final version!

Step 24
Shape the last portion of the rice mixture into bite-sized balls, just like before.

Step 25
Now, roll these rice balls in the remaining crushed seaweed until they are nicely coated. Gently press the seaweed onto the rice balls to ensure it sticks well.

Step 26
And there you have it! Your third style, a lovely rice ball dressed in seaweed, is beautifully finished!

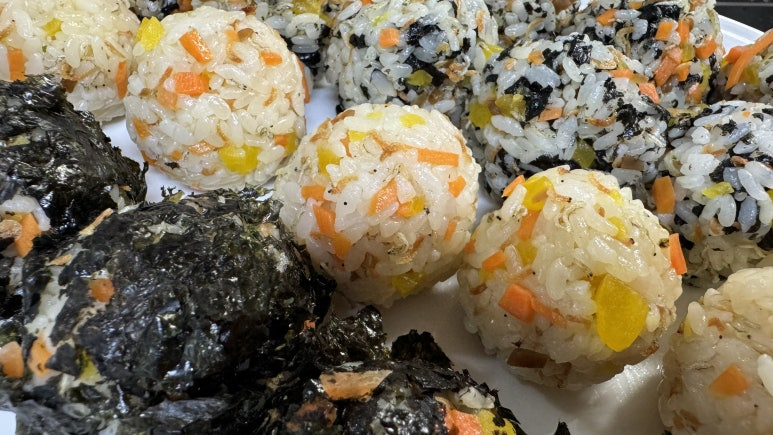
Step 27
Look how colorful and appealing these three different styles are when arranged together! Children often think they are made with entirely different ingredients and will be more enthusiastic about eating them.

Step 28
These three-color rice balls are perfect for lunchboxes! Serve them with barley tea for kids, or with a warm soup for adults, for a satisfying meal. Enjoy making and eating them!


