Crisp Summer Delicacy: Making Refreshing Yeolmu Kimchi
The Secret to Deliciously Crisp and Refreshing Yeolmu Kimchi

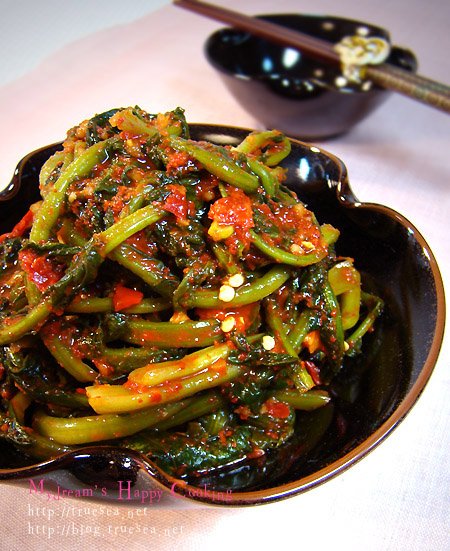
On hot summer days when appetites wane, we introduce Yeolmu Kimchi, a healthy dish to help you beat the heat. Enjoy its refreshing taste and crisp texture!
Main Ingredients- 2 bunches of fresh young radish greens (Yeolmu)
Brining Solution- 2 + 1/2 cups coarse sea salt
- 2 liters of water
Seasoning Paste- 2 cups Korean chili powder (Gochugaru)
- 1 + 1/2 cups fish sauce (like Kanari Aekjeot)
- 10 red chilies (pureed)
- 1 knob of fresh ginger
- 1 cup garlic cloves (minced)
Flour Paste (for thickening and flavor)- 2 tablespoons flour
- 2 cups water
- 2 + 1/2 cups coarse sea salt
- 2 liters of water
Seasoning Paste- 2 cups Korean chili powder (Gochugaru)
- 1 + 1/2 cups fish sauce (like Kanari Aekjeot)
- 10 red chilies (pureed)
- 1 knob of fresh ginger
- 1 cup garlic cloves (minced)
Flour Paste (for thickening and flavor)- 2 tablespoons flour
- 2 cups water
- 2 tablespoons flour
- 2 cups water
Cooking Instructions
Step 1
First, gently wash the yeolmu (young radish greens) under running water to remove any dirt. Place the cleaned yeolmu in a large bowl. Dissolve 2 and a half cups of coarse sea salt in 2 liters of water to create the brining solution. Pour this solution over the yeolmu, ensuring it’s well submerged. Let it brine for about 40 minutes, then gently turn the greens over and let them sit for another 20 minutes. The brining time may vary depending on the salt concentration and the ambient temperature. Avoid over-salting or letting the greens become too limp; the goal is to wilt them slightly, preserving their crispness and natural sweetness. Over-brining can make the kimchi too salty and diminish its flavor.

Step 2
While the yeolmu is brining, prepare the seasoning paste. For the garlic, using a hand blender or food processor will result in a smooth paste without excess liquid, which is ideal for kimchi. In a separate pot, whisk together 2 tablespoons of flour with 2 cups of water until smooth. Cook over low heat, stirring constantly, until it thickens into a paste. Let this flour paste cool completely. (Alternatively, you can use glutinous rice flour or cooked rice to make the paste.) For the red chilies, blend them with 1/2 cup of fish sauce until smooth. Set aside the remaining 1 cup of fish sauce to be added to the main seasoning.

Step 3
Once the yeolmu has wilted and is properly brined, gently rinse it a couple of times under cold running water to remove excess salt. Drain thoroughly. In a large bowl, combine the chili powder, minced garlic, grated ginger, pureed red chilies, 1.5 cups of fish sauce, and the cooled flour paste. Mix well until you have a cohesive seasoning paste. Now, carefully add the brined yeolmu to the seasoning paste. Gently mix and coat the greens, handling them as if they were delicate baby leaves. Avoid vigorous kneading or mashing, as this can release a raw, grassy flavor. (Pro Tip!) It’s generally not recommended to add sugar to yeolmu kimchi. The natural sweetness from the radish greens themselves, combined with the savory depth of the fish sauce, creates a perfectly balanced flavor. Adding sugar can make the kimchi liquid sticky and accelerate souring.

Step 4
Transfer the seasoned yeolmu kimchi into a clean, airtight container, preferably glass (like a Lock & Lock container). Press down gently to remove air pockets.

Step 5
Seal the container tightly and leave it at room temperature for about a day to begin fermentation. Fermentation time can vary with temperature; check after 24 hours and adjust to your preferred level of sourness. You should have a pleasantly tangy and crisp kimchi!

Step 6
Yeolmu kimchi can become overly sour if left to ferment for too long at room temperature, making it difficult to enjoy over an extended period. Once it reaches your desired level of fermentation (crisp with a mild tang), transfer it to the refrigerator. Stored in the fridge, it will continue to ferment slowly and can be enjoyed for a considerable time. Enjoy this refreshing yeolmu kimchi to liven up your summer meals!


