Crispy and Chewy Homemade Salt Bread
The Ultimate Salt Bread Recipe to Make at Home: Perfect Harmony of Crispy Exterior and Chewy Interior!

Hello everyone, I’m Minggle, your nutritionist! Today, I’m thrilled to share my absolute favorite ‘Salt Bread’ recipe with you all! It requires no special ingredients but is packed with a nutty flavor and boasts a heavenly texture – crispy on the outside, chewy on the inside – making it impossible to eat just one. I’ll guide you through each step, ensuring even beginner bakers can follow along with ease. Discover your best salt bread yet with this recipe!
Dough Ingredients- 151g Bread Flour
- 100g All-Purpose Flour
Liquid and Leavening Ingredients- 104g Cold Water
- 76g Milk
- 16g Olive Oil
- 4g Active Dry Yeast
- 104g Cold Water
- 76g Milk
- 16g Olive Oil
- 4g Active Dry Yeast
Cooking Instructions
Step 1
First, accurately measure all the ingredients needed for your salt bread. Sifting the dry ingredients will help you achieve a smoother dough.

Step 2
In a large bowl, combine 104g of cold water and 16g of olive oil, and mix them lightly.

Step 3
Pour 76g of milk into a small saucepan and heat it over low heat until the edges just begin to simmer. Be careful not to overheat it.

Step 4
Carefully pour the warm milk into the bowl containing the water and olive oil mixture.

Step 5
Using a spatula, gently stir the liquid ingredients in the bowl until they are well combined. It’s important to keep the liquid temperature from getting too high at this stage.

Step 6
Once the bowl’s contents are lukewarm (around 35-40°C or 95-104°F), add 8g of sugar and 4g of active dry yeast. Stir gently and let it sit for about 15 minutes to allow the yeast to activate. You should see a foamy layer on top, indicating the yeast is alive and active.

Step 7
After 15 minutes, you’ll notice the yeast has become very active and formed a rich foam. This confirms your yeast activation was successful!

Step 8
In a separate bowl, sift together 151g of bread flour and 100g of all-purpose flour. Sifting the flour contributes to a finer dough texture.

Step 9
Over the sifted flour, add half (3g) of the 6g of flaky salt through a sieve. The remaining salt will be added later when incorporating the butter.

Step 10
Using your spatula, gently combine the flour mixture with the activated yeast liquid. Mix as if you’re folding or cutting, until the ingredients start to come together into a rough dough. It’s okay if it seems shaggy at first.

Step 11
Once all the flour is incorporated and the mixture forms a cohesive mass with no dry bits, your initial dough is ready. You don’t need to knead it extensively at this point.

Step 12
Lightly mist the surface of the dough with water or cover the bowl with a damp cloth. Let it rest in a warm place (around 25-30°C or 77-86°F) for about 30 minutes for the first proof. The dough should increase in volume by about 1.5 times.

Step 13
After 30 minutes, you’ll see the dough has puffed up nicely from the first proof. A good test is to poke it gently with a finger; if the indentation remains, the proofing is successful.

Step 14
Now, add a portion of the room-temperature 86g of butter to the dough, along with the remaining 3g of salt. The dough might feel sticky initially, but as you incorporate the butter, it will become smoother.

Step 15
As the butter melts into the dough, it will transform into a smoother, silkier, and more lustrous dough. Continue mixing by folding and stretching the dough to fully integrate the butter.

Step 16
Cover the dough again with plastic wrap or a lid, and let it undergo a second proof in a warm place for about 40 minutes. Allow the dough to double in size.

Step 17
After 40 minutes, observe the dough after its second proof. It will be noticeably fuller and softer. The dough should feel lighter and airier.

Step 18
To achieve a smooth surface, wear plastic gloves or lightly oil your work surface. Gently shape the dough into your desired form. Be careful not to deflate it too much.

Step 19
Cover the dough again with plastic wrap and let it rest for a final 30 minutes in a warm place for the third proof. This final rest allows the dough to relax before shaping.

Step 20
While the dough is undergoing its final proof, prepare the butter: divide the 86g of butter into 8 equal small cubes for filling the bread. Also, portion out a small amount of butter, shaped rectangulary, for brushing on top of the baked bread. Keep the butter chilled.

Step 21
Preheat your oven to 210°C (410°F). It’s crucial to ensure the oven is fully preheated before baking.

Step 22
Gather your baking tools: a baking mat, a dough scraper, and a rolling pin.

Step 23
Carefully transfer the proofed dough onto your work surface or baking mat. Handle it gently to avoid degassing it.

Step 24
Using your dough scraper or a knife, divide the dough into 8 equal portions. Aim for consistency in size for each piece.

Step 25
Shape each dough portion into a round or a slightly elongated triangular form. Feel free to shape them as you prefer.

Step 26
Gently roll out each dough piece with a rolling pin. Make the top edge narrower and the bottom edge wider to facilitate rolling it up neatly.

Step 27
Place one of the chilled butter cubes onto the wider bottom part of each rolled-out dough piece.

Step 28
Carefully roll up the dough, encasing the butter within. Pinch the seams tightly to prevent the butter from leaking out during baking.

Step 29
Here are the shaped salt breads, ready to go, with the butter securely tucked inside. They look nicely formed and uniform.

Step 30
Place the shaped dough onto a baking sheet lined with parchment paper or a baking mat, ensuring there is space between each bread to allow for expansion.

Step 31
Cover the shaped breads with plastic wrap or a damp cloth. Allow them to proof for about 20 minutes in a warm place (final proof). This is also a good time to start preheating your oven.

Step 32
Prepare a small bowl of milk to brush onto the tops of the breads. Have a pastry brush ready.

Step 33
Gently brush the tops of the proofed breads with the prepared milk. This will help create a beautiful golden crust when baked.

Step 34
Sprinkle coarse sea salt evenly over the milk-washed tops of the breads. This is the signature touch for salt bread!

Step 35
Bake in the preheated oven at 210°C (410°F) for 17-20 minutes. Baking times and temperatures can vary depending on your oven, so keep an eye on the bread’s color to determine doneness.

Step 36
Shortly before the breads are finished baking, melt the reserved butter in the microwave for about 30 seconds. Be careful not to overheat it.

Step 37
Voila! Your beautifully golden salt breads are finally ready! Freshly baked bread straight from the oven is always a delightful sight.

Step 38
While the bread is still warm, brush the melted butter over the tops. This step infuses the bread with extra butter flavor and a lovely sheen.

Step 39
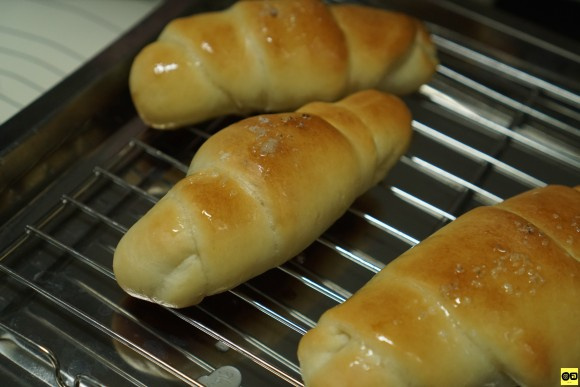
Let the finished salt breads cool slightly on a wire rack. They are best enjoyed when still warm, allowing you to fully appreciate their crispy exterior and chewy interior.

Step 40
The crispy bottom of a freshly baked salt bread offers a delightful texture and nutty flavor with every bite. This is one of its charming characteristics!

Step 41
Thanks to the melted butter inside, you’ll experience a wonderfully soft and chewy texture alongside a rich, deep buttery flavor. Each bite is pure bliss. Enjoy your delicious creation!


