Crispy and Savory Stir-Fried Dried Pollack
How to Make Stir-Fried Dried Pollack, Dried Pollack Recipes, Soy Sauce Stir-Fried Dried Pollack, Rice Thief Side Dish, Delicious Even for Those Who Dislike Dried Pollack

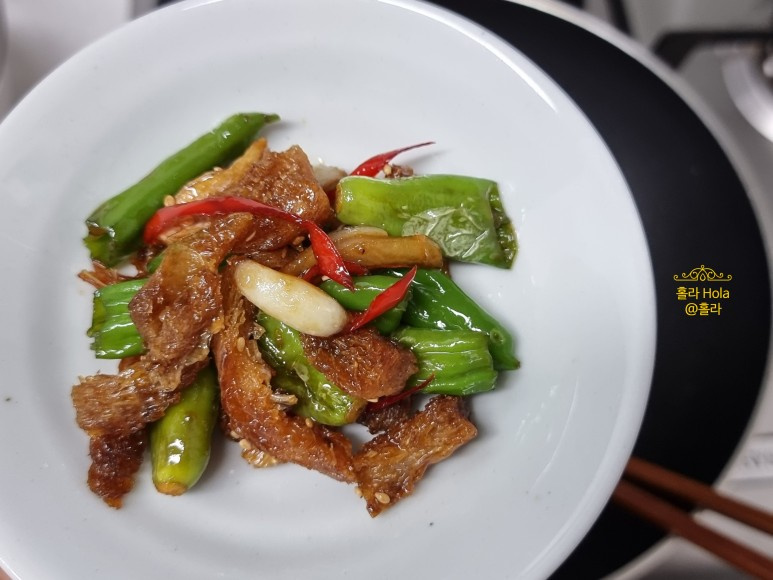
Inspired by a unique side dish from a restaurant owner’s mother, this recipe transforms dried pollack into a delightful, crispy, and savory treat. Instead of the usual spicy gochujang, we’re making a crowd-pleasing sweet and salty version with a perfect balance of soy sauce and sugar. Tender-crisp Korean green peppers (kwari gochu), aromatic sliced garlic, and vibrant red chili peppers are added for a harmonious blend of flavors and textures. Frying the dried pollack first removes any fishy odor and enhances its nutty, savory notes, making it an irresistible side dish for rice (‘rice thief’) or a perfect accompaniment to drinks.
Ingredients- Dried Pollack (Hwangtaech Chae) 60g
- Sliced Garlic 110g
- Korean Green Peppers (Kwari Gochu) 80g
- Red Chili Pepper 1
- Cooking Oil, ample amount
- Soy Sauce 3 Tbsp
- Sugar 2 Tbsp
- Corn Syrup (or Oligosaccharide) 1 Tbsp
- Toasted Sesame Seeds 1 Tbsp
- Salt, a pinch
Cooking Instructions
Step 1
Cut the dried pollack into bite-sized pieces using scissors. Aim for pieces about 4-5 cm long for easier eating.

Step 2
Remove the stems from the Korean green peppers, wash them thoroughly under running water, and pat them dry. Cut them into 2-3 pieces each, depending on your preference. Avoid cutting them too small, as they might become mushy during stir-frying.

Step 3
This step is noted in the recipe but seasoning the dried pollack with salt before frying is not typical. It’s presumed to be a light seasoning step. If you choose to follow this, lightly sprinkle a pinch of salt over the dried pollack to lightly season it. (Optional step)

Step 4
If you added salt, let it sit for about 5 minutes for the seasoning to absorb. Be careful not to let it sit too long, or it may become too salty.

Step 5
In a deep pan or wok, add enough cooking oil to generously fry the dried pollack pieces without them sticking together. Heat the oil over medium-high heat.

Step 6
Once the oil is sufficiently hot, add the prepared dried pollack. Frying in batches (2-3 times) can help achieve extra crispiness. Stir the pollack continuously as it fries to prevent sticking.

Step 7
The dried pollack will initially seem to absorb the oil, but as it cooks and its moisture evaporates, it will release the oil and become crispy.

Step 8
Fry the dried pollack until it is golden brown and crispy. Remove the fried pollack with a slotted spoon and drain excess oil. Reserve the frying oil; it will be used for stir-frying the other ingredients.

Step 9
Wipe the pan clean, then heat it again over medium heat. Add about 1-2 tablespoons of the reserved frying oil to the pan. Too much oil can make the dish greasy.

Step 10
Add the sliced garlic to the pan and sauté over medium-low heat until fragrant. Be careful not to burn the garlic.

Step 11
Once the garlic is fragrant, add the cut Korean green peppers and stir-fry together. Cook until the peppers are slightly softened and vibrant in color.

Step 12
Add the red chili pepper for color and stir-fry for another minute. Removing the seeds and slicing the red chili pepper thinly will make it look appealing.

Step 13
Add 2 tablespoons of soy sauce along the sides of the pan and quickly stir-fry with the ingredients. This helps coat the ingredients evenly.

Step 14
Add the fried dried pollack back to the pan. Gently toss to coat it evenly with the sauce, being careful not to break the pollack.

Step 15
Add the remaining 1 tablespoon of soy sauce over the pollack and continue to stir-fry. This balances the sweet and savory flavors.

Step 16
Add 2 tablespoons of sugar and stir-fry with the dried pollack. The sugar will dissolve, giving the pollack a glossy sheen and adding sweetness.

Step 17
Finally, add 1 tablespoon of corn syrup and stir well to coat. The corn syrup adds shine and helps the sauce adhere better.

Step 18
Just before turning off the heat, add 1 tablespoon of toasted sesame seeds and mix well for added nutty flavor.

Step 19
Once all ingredients are well combined, turn off the heat and serve. It’s delicious served over warm rice or as a side with drinks.


