Crispy & Chewy Cheese Balls: Homemade BHC Style!
Make BHC-Style Cheese Balls: Crispy Outside, Chewy Inside!

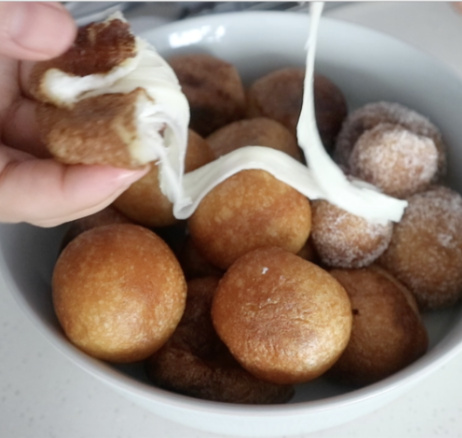
Inspired by the delicious BHC cheese balls, I decided to create my own version at home! While slightly different from the original, offering a texture closer to a chewy glutinous rice donut, I personally find this version even more delightful! This recipe captures that irresistible combination of a crispy exterior and a wonderfully stretchy, chewy interior, all filled with melted cheese. Enjoy this homemade treat that rivals your favorite takeout!
Cheese Ball Dough Ingredients- 200g Wet glutinous rice flour
- 35g All-purpose flour
- 35g Granulated sugar
- 2g Salt
- 3g Baking soda
- 3g Baking powder
- 15g Unsalted butter, softened
- 53g Boiling hot water
Cooking Instructions
Step 1
Begin by preparing the wet glutinous rice flour. Sift 200g of wet glutinous rice flour through a fine-mesh sieve 2-3 times. This step ensures a smooth, lump-free dough for the best texture.

Step 2
To the sifted glutinous rice flour, add 35g of all-purpose flour, also sifted. Then, incorporate 35g of granulated sugar, 2g of salt, 3g of baking soda, and 3g of baking powder. Whisk these dry ingredients together until well combined.

Step 3
Gradually pour 53g of boiling hot water into the dry ingredients while stirring with a spatula or spoon. The hot water helps to partially cook the flour, contributing to the signature chewy texture of the cheese balls.

Step 4
Once the mixture starts to come together, add 15g of softened unsalted butter. Knead the dough with your hands for about 10 minutes until it becomes smooth, elastic, and develops a good amount of chewiness. Proper kneading is key for a delightful texture. Wrap the dough tightly in plastic wrap and let it rest for about 15-20 minutes.

Step 5
Prepare the mozzarella cheese filling. Place about 1 cup of mozzarella cheese in a microwave-safe bowl and heat for 30 seconds to 1 minute until it’s slightly softened and pliable. Quickly shape it into a compact ball. Be careful not to overheat, as it will become too liquid.

Step 6
Take a portion of the rested dough (about the size of a small golf ball). Flatten it into a disc in your palm and smooth the edges. Create a small indentation in the center with your thumb, similar to how you would make a songpyeon (Korean rice cake). Place the prepared cheese ball into the indentation and carefully wrap the dough around it, sealing it completely. Ensure there are no gaps where the cheese can escape during frying.

Step 7
A crucial tip for perfect cheese balls: the dough layer should be about 0.5cm thick. If the dough is too thin, the cheese might leak out when frying. Conversely, too much cheese can make it difficult to enclose. Aim for a balanced ratio to ensure a delightful eating experience.

Step 8
Once the cheese is completely enclosed, gently roll the dough ball between your palms to create a perfectly smooth, round shape. A smooth surface will result in a beautifully golden and attractive fried cheese ball.

Step 9
Heat vegetable oil in a deep pan or pot to 170°C (338°F). Carefully add the cheese balls to the hot oil, ensuring not to overcrowd the pan. Fry them, turning gently and frequently, for about 5-7 minutes, or until they are golden brown and crispy. Drain excess oil on a wire rack and serve immediately while they are warm and the cheese is wonderfully gooey!


