Crispy & Chewy Salt Bread (Sogeumppang)
Easy Homemade Salt Bread Recipe

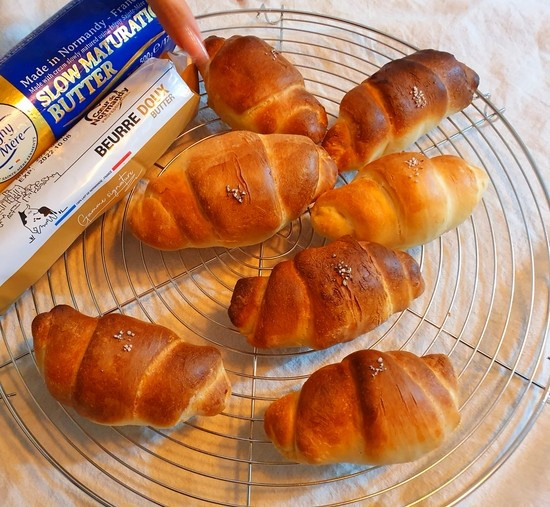
I finally made the super popular Salt Bread, a star in Seongsu-dong these days! I made salted butter using Isigny French butter and proofed the dough with a mix of all-purpose flour for a soft texture and bread flour for chewiness. The signature salt crystals are visible on top, making it undeniably a Salt Bread! It’s amazing how it tastes just like the ones I bought in Seongsu-dong. It’s nutty, soft, chewy, and savory. The addictive flavor makes me want to bake it a few more times soon!
Salt Bread Dough Ingredients- 20g Unsalted Butter (for dough)
- 400g All-Purpose Flour
- 200g Bread Flour
- 260g Warm Water
- 100g Warm Milk
- 8g Instant Dry Yeast
- 10g Salt
- 12g Sugar
Salted Butter Ingredients- 100g Butter (softened at room temperature)
- 2g Salt
- 100g Butter (softened at room temperature)
- 2g Salt
Cooking Instructions
Step 1
First, in a bowl, combine 260g of warm water and 100g of warm milk. Add 8g of instant dry yeast, 10g of salt, and 12g of sugar, and stir well to dissolve. The warm temperature is crucial for activating the yeast.

Step 2
Melt 20g of unsalted butter and mix it into the mixture from step 1. Then, add 400g of all-purpose flour and 200g of bread flour. Knead by hand or use a stand mixer until no dry flour is visible and the dough becomes smooth.

Step 3
If using a stand mixer, check for a smooth dough like this.

Step 4
Place the dough in a bowl, cover with plastic wrap or a damp cloth, and let it proof at room temperature for about 20 minutes. Placing it in a rice cooker on the ‘warm’ setting or inside a microwave (without turning it on) can provide a warmer environment for proofing.

Step 5
Take the proofed dough out and transfer it to a work surface. Fold the dough about 10 times. This process activates the gluten in the dough, contributing to a chewier texture.

Step 6
Return the dough to the bowl, cover it, and let it proof at room temperature for another 20 minutes. Then, fold the dough about 10 times, similar to folding origami. This ‘no-knead’ method simplifies the process while yielding great results.

Step 7
Now, let the dough proof at room temperature for 30 minutes. After proofing, gently deflate the dough by pressing out the gas. Divide it into portions of about 65g each and shape them into balls (round). Cover the dough balls with a damp cloth and let them rest for 15 minutes.

Step 8
< Making Salted Butter > Let’s prepare the butter filling. In a bowl, mix 100g of softened butter (at room temperature) with 2g of salt.

Step 9
Using a mini whisk or a fork, gently whip the butter and salt until well combined and creamy.

Step 10
Place the whipped butter onto a sheet of parchment paper and roll it up like a sushi roll (maki) to form a log.

Step 11
To make it easy to slice and maintain its shape, shape the rolled butter into a rectangular log and freeze until firm. This will make it easier to handle when inserting into the dough.

Step 12
Prepare the rested dough balls. Use a rolling pin to flatten each ball into a cone shape. Place a piece of the frozen salted butter (about 8g) in the center and roll it up tightly. It’s important to seal the butter inside completely to prevent it from leaking out during baking.

Step 13
After filling and rolling all the dough portions with butter, you’ll have these beautiful Salt Bread shapes.

Step 14
Line a baking sheet with parchment paper and place the shaped Salt Breads on it, ensuring there’s enough space between them so they don’t touch while baking.

Step 15
Brush the tops of the dough with milk. Brushing generously with milk will help the crust crack nicely and achieve a beautiful golden-brown color when baked.

Step 16
Finally, sprinkle a little coarse salt on top of each bread. This completes the iconic look of Salt Bread.

Step 17
Bake in a preheated oven at 200°C (390°F) for about 13 minutes. You’ll hear the butter sizzling as it bakes, infusing the bread with rich flavor. Your delicious Salt Bread will be ready!


