Delicious Kimchi Making
A Hearty Winter Preparation! Easily Make 40kg of Kimchi with Brined Napa Cabbage

Kimchi-making season is here again! This year, my husband and I prepared kimchi using 40kg of perfectly brined napa cabbage. While it’s a generous amount for just two people, we plan to share it with our eldest son’s family, my sister-in-law’s family, my brother-in-law, and our parents. The thought of enjoying delicious kimchi throughout the winter, enriching our family meals, makes the effort feel exciting. We’ve decided to prepare the filling ingredients on the first day and mix the kimchi on the second day. Although it can be done in one day, my husband is a bit busy, so it’s taking us two days! Once the kimchi is done, I’m already looking forward to savoring some delicious boiled pork belly (suyuk) served with a fresh piece of kimchi. Doesn’t that make your mouth water? Let’s get started with making kimchi!
Main Kimchi Filling Ingredients- 40kg brined napa cabbage
- 1.2kg red mustard greens (Honggat)
- 1kg chives (Jjokpa)
- 5 carrots
- 4 Korean radishes (approx. 6kg)
- 2kg Korean chili powder (Gochugaru)
- 600g dried chili peppers
- 500g glutinous rice flour
- 100g dried kelp (for kimchi filling)
- 3 Tbsp coarse sea salt (for seasoning adjustment)
- 200g dried kelp (for broth)
Broth Ingredients- 4 liters water
- 1/2 Korean radish
- 2 onions
- 3 leeks
- 30g dried anchovies (Dippori)
- 50g dried kelp
Ingredients for Blending- Dried chili peppers (soaked)
- 600g salted yellow croaker (Hwangseok-eojeot)
- 5 cups anchovy fish sauce (Myeolchi-aekjeot)
- 500g salted shrimp (Saeu-jeot)
- 700g garlic
- 350g ginger
- 3 cups (600ml) plum extract (Maesil-cheong)
- 2 pears
- 2 apples
- 2 onions
- 4 liters water
- 1/2 Korean radish
- 2 onions
- 3 leeks
- 30g dried anchovies (Dippori)
- 50g dried kelp
Ingredients for Blending- Dried chili peppers (soaked)
- 600g salted yellow croaker (Hwangseok-eojeot)
- 5 cups anchovy fish sauce (Myeolchi-aekjeot)
- 500g salted shrimp (Saeu-jeot)
- 700g garlic
- 350g ginger
- 3 cups (600ml) plum extract (Maesil-cheong)
- 2 pears
- 2 apples
- 2 onions
Cooking Instructions
Step 1
First, let’s make the savory broth, the foundation of delicious kimchi. In a large pot, combine 4 liters of water, 1/2 Korean radish (about 700g), 2 onions (washed with skins on), 300g of dried anchovies (Dippori), 50g of dried kelp, and 2 leeks. Simmer for about 30 minutes until well-infused. After about 15 minutes of simmering, remove the dried kelp to prevent any bitterness from developing. This broth will add a deep umami flavor.

Step 2
Next, we’ll prepare the salted yellow croaker, a key ingredient for our kimchi paste. In a pot, combine 600g of salted yellow croaker and 2 cups (400ml) of water. Bring to a boil, then add half a bulb of ginger and simmer for exactly 3 minutes. This process effectively removes any fishy odor and helps the croaker meat tenderize. Strain the mixture through a sieve, reserving only the liquid. This fermented fish sauce will add a rich flavor.

Step 3
Now, let’s make the glutinous rice paste, which will help the kimchi seasoning adhere beautifully. Dissolve 500g of wet glutinous rice flour in 1 liter of water. Make sure there are no lumps; stirring thoroughly is key for a smooth paste.

Step 4
After straining the broth from step 1, place the pot back on the stove. Turn on the heat, pour in the dissolved glutinous rice flour mixture, and stir continuously to prevent clumping. Once the mixture comes to a boil, continue to cook for another 3 minutes, then turn off the heat and let it cool completely. This rice paste acts as a binder for the kimchi seasoning.

Step 5
Let’s create the base for soaking our dried chili peppers. In a large bowl, pour 5 cups of anchovy fish sauce and add 600g of dried chili peppers. Let them soak. Soaking the chilies in fish sauce will soften them and infuse them with flavor.

Step 6
Prepare the fruits and vegetables for blending. Peel the apples, pears, and onions, then chop them into smaller pieces to make them easier to blend. Pre-chopping will make the blending process much smoother.

Step 7
Now, it’s time to blend all the seasoning ingredients. Add the soaked dried chili peppers, 500g of salted shrimp, the strained salted yellow croaker liquid, 3 cups (600ml) of plum extract, 700g of peeled garlic, 350g of peeled ginger, 2 pears, 2 apples, and 2 onions to your blender. Add a little water if needed to achieve a smooth, paste-like consistency. Blending these ingredients creates a rich and smooth kimchi paste.

Step 8
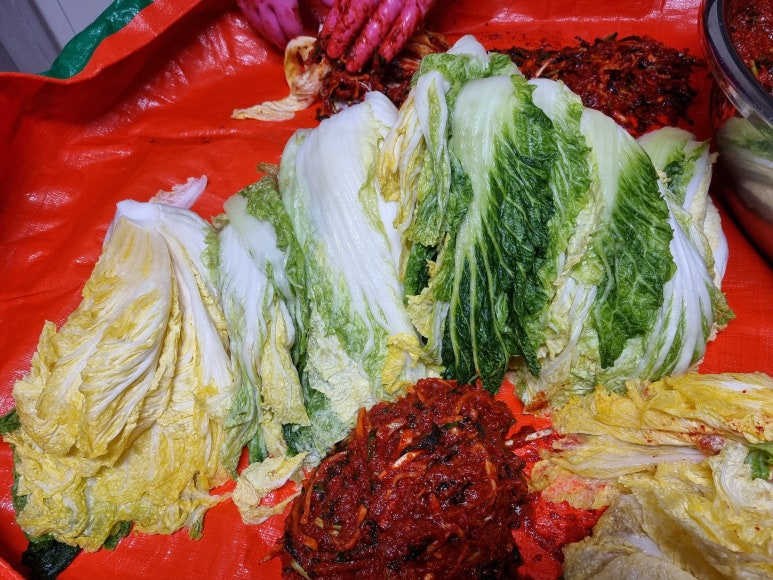
Time to prepare the vegetables that will add crunch and color to our kimchi. Peel and thinly julienne 4 Korean radishes (about 6kg). Cut the red mustard greens into 2-3 cm lengths and the chives into 3-4 cm lengths. Peel and julienne 5 carrots. Briefly soak 100g of dried kelp in water, then drain and finely chop it. These fresh ingredients will contribute wonderful texture and visual appeal to the kimchi.
Step 9
Now, let’s assemble the kimchi paste. In a very large bowl, add 2kg of Korean chili powder. Then, add the blended seasoning mixture (fruits, ginger, garlic, fermented seafood), the finely chopped soaked dried kelp, and the cooled glutinous rice paste. Mix everything together to get ready for the next step.

Step 10
Thoroughly mix all the ingredients in the bowl by hand. Ensure the seasoning is evenly distributed without any clumps. Proper mixing ensures that the kimchi is consistently seasoned and delicious.

Step 11
Taste the seasoned paste and adjust the saltiness as needed. Typically, 3 tablespoons of coarse sea salt should be sufficient, but add a little more if you prefer it saltier. It’s best to add salt gradually and taste as you go.
Step 12
Add the prepared vegetables to the seasoning. Gently mix in the julienned radishes, 2-3 cm pieces of red mustard greens, and 3-4 cm pieces of chives. Toss gently to coat everything evenly with the seasoning. Be careful not to overmix, as this can make the vegetables mushy.

Step 13
Our delicious kimchi paste is finally ready! The vibrant colors and rich aroma are truly enticing. Now, all that’s left is to coat the napa cabbage with this wonderful mixture.

Step 14
I ordered brined napa cabbage from Haenam. About an hour before you plan to mix the kimchi, place the brined cabbage halves cut-side up in a colander to drain any excess water. This step is crucial for achieving a crisp texture and preventing the kimchi from becoming too watery.

Step 15
Spread the kimchi paste evenly on a large surface, such as a dining table covered with a mat or a large kimchi-making mat. Arrange the drained napa cabbage halves, ready for the seasoning.

Step 16
Now, the satisfying process of coating the cabbage begins. Start by spreading the kimchi paste generously onto the thick stems of the napa cabbage, then work your way towards the leaves. Ensure the stems are well-coated, as this is where the cabbage needs the most flavor. For the leaves, use the paste already on the stems to gently coat them. Take your time to ensure every part is evenly covered.

Step 17
Once each cabbage half is well-coated, fold the outer leaves over the filling to neatly wrap it up. This helps keep the kimchi compact and presentable.

Step 18
Transfer the finished kimchi into storage containers, packing them down firmly with your hands to remove any air pockets. This is important for proper fermentation and preservation. Cover the top of the kimchi with a piece of kelp for an extra layer of freshness. Let the kimchi sit at room temperature for about a day to begin fermenting, then store it in your kimchi refrigerator.

Step 19
If you have any leftover cabbage after making kimchi, consider making a fresh kimchi salad (geotjeori) with oysters! Serving this vibrant geotjeori with some warm boiled pork belly (suyuk) is a truly rewarding meal that makes all the hard work of kimchi making melt away. With homemade kimchi, you can ensure a happy and delicious winter for your whole family.


