Easy Homemade Dongchimi: A Refreshing Radish Kimchi Recipe
Homemade Natural Digestive Aid! Easy-to-Eat Dongchimi Recipe (Yields 3 x 20L containers)

This Dongchimi is made with radishes cut into easy-to-eat pieces, just as I always prepare it. This year, I’ve added a generous amount of pickled chili peppers for an enhanced flavor. This recipe yields a substantial quantity, enough for three households to share, resulting in three large 20L containers of Dongchimi. It’s like stocking your pantry with a natural digestive aid! You can enjoy it whenever you crave it, and the ingredients are quite simple. Fresh radishes, fragrant scallions, crisp green mustard greens, and sweet and spicy pickled chili peppers are all you need to create this refreshing and delicious Dongchimi.
Ingredients (Based on 200ml cup)- 14 Korean radishes
- 500g green mustard greens (mostly stems)
- 400g scallions (trimmed)
- 4 onions
- About 50 pickled chili peppers
- 300ml glutinous rice flour
- 4 cups coarse sea salt
- 500g garlic
- 50g ginger
- 7 tablespoons sugar substitute (e.g., New Sugar)
- 24L water
- 3 mesh bags (for straining)
Cooking Instructions
Step 1
First, prepare the glutinous rice paste. In a bowl, whisk together 300ml (1.5 cups) of glutinous rice flour with 2L of water until smooth. Cook over low heat, stirring constantly, until it thickens into a paste.

Step 2
Wash the Korean radishes thoroughly.

Step 3
Cut the radishes in half, then slice them into pieces about 1.5cm thick and 7cm long. They should be about the size of your finger for easy eating.

Step 4
You can trim the edges of the cut radish pieces for a neater appearance (optional).

Step 5
In a large bowl, place the cut radishes and sprinkle with 1 cup of coarse sea salt to pickle them. We’ll only salt them for the duration it takes to prepare the seasoning. Add 2 tablespoons of sugar substitute for sweetness and gently toss to combine.

Step 6
Cut the green mustard greens into pieces about 5cm long, focusing on the stems. Avoid using the leafy parts as they can become tough.

Step 7
Cut the scallions into lengths of about 5cm.

Step 8
Arrange the cut green mustard greens and scallions over the salted radishes.

Step 9
This step is about arranging the radish pieces neatly, similar to step 2.

Step 10
Prepare the garlic cloves and ginger slices. They will be blended or ground later.

Step 11
Gently mix the salted radishes with the prepared green mustard greens and scallions. This allows the radishes to absorb the flavors.

Step 12
Now, let’s prepare the ingredients for the brine. First, strain the cooked glutinous rice paste through a fine sieve to ensure a smooth liquid.

Step 13
Slice the 4 onions and place them in one of the mesh bags. Pour the prepared 24L of water into a large container and add the mesh bag with onions. Submerge the garlic and ginger in the water and let them soak to release their flavor.

Step 14
Let the garlic and ginger soak for about 20 minutes.

Step 15
Taste the brine and adjust the seasoning. Add an additional 3 cups of coarse sea salt and 5 tablespoons of sugar substitute. Adjust the salt and sweetness to your preference.

Step 16
Stir well until the added salt is completely dissolved. It’s important to ensure no salt clumps remain.

Step 17
Divide the seasoned brine into three equal portions.

Step 18
Place each portion of brine into a separate mesh bag along with the onions. Tie the bags securely. This method allows the flavors to infuse gradually.

Step 19
Some people prefer to add whole scallions or green mustard greens, but this recipe calls for them to be chopped for easier consumption. You can adjust this according to your preference.

Step 20
Carefully pack the Dongchimi ingredients into your containers. You should have enough to fill three 20L containers generously. It’s best to fill them quite full, almost to the brim, as the liquid will settle.

Step 21
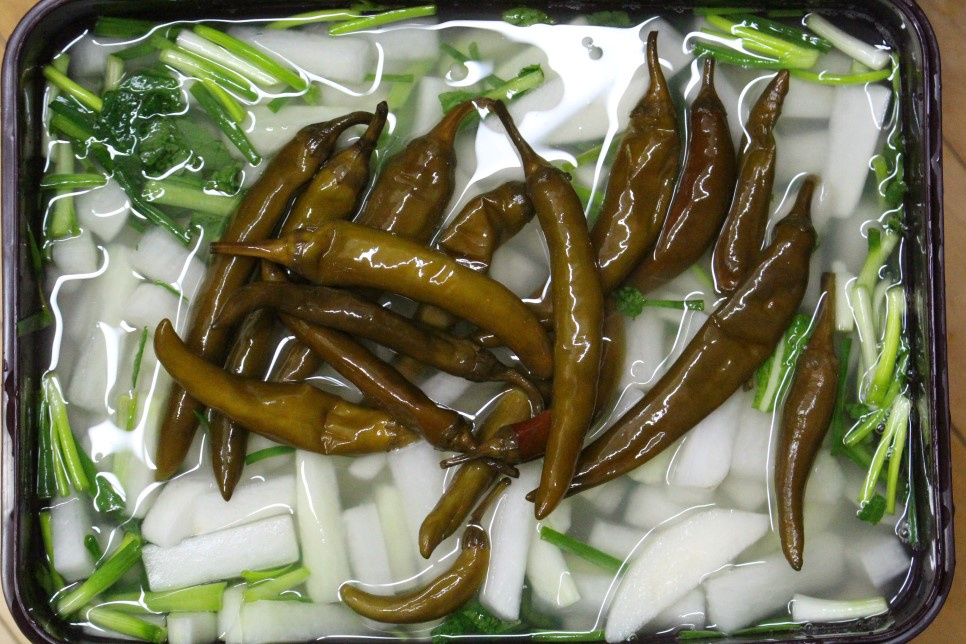
Add a generous amount of pickled chili peppers to the Dongchimi. My friends raved about how delicious the Dongchimi with pickled chilies was last year, so I’ve added plenty this time! The spicy and savory notes from the pickled chilies will enhance the overall flavor of the Dongchimi.


