Fluffy Genoise and Sweet Strawberry Cream Cake
Making a Soft Cake Base (Genoise) and a Delicious Strawberry Cream Cake at Home

This recipe guides you through creating a homemade strawberry cream cake, featuring a moist and soft cake base (Genoise) baked from scratch, generously filled with whipped cream and fresh strawberries. Fulfilling your child’s request for a special cake, this recipe is perfect for a delightful baking adventure. Enjoy the exquisite combination of a fluffy cake, sweet cream, and tangy strawberries.
Cake Base (Genoise) Ingredients- 3 egg whites (approx. 95g)
- 90g granulated sugar
- 3 egg yolks (approx. 70g)
- 90g cake flour
- 1g salt
- 22g olive oil (or vegetable oil)
- 30g milk
- 5-6 drops vanilla extract (to remove egg smell, optional)
Cooking Instructions
Step 1
First, prepare the ingredients for the cake base. You will need 3 egg whites (about 95g), 90g sugar, 3 egg yolks (about 70g), 90g cake flour, 1g salt, 22g olive oil, 30g milk, and 5-6 drops of vanilla extract to mask the egg odor. The vanilla extract is optional.

Step 2
Carefully separate the eggs into whites and yolks. Place the egg whites in a clean bowl and lightly whip them with a whisk until foamy, as shown in the picture.

Step 3
Add one-third of the prepared 90g sugar to the egg whites and continue whipping. (I’m using organic sugar as I don’t have white sugar, but any sugar works. Adjust the amount to your preference.)

Step 4
As the egg white foam becomes richer and slightly reduces in volume, add another third of the sugar and continue whipping. Repeat this process to create a stable meringue.

Step 5
Add the remaining third of the sugar and whip vigorously until you achieve stiff, glossy peaks, as shown in the photo. Be careful not to over-whip.

Step 6
When you lift the whisk, if the peaks stand up firmly without curling, your meringue is ready. Avoid over-beating.

Step 7
Gently fold the separated egg yolks into the finished meringue. Use a spatula to mix lightly, taking care not to deflate the foam. It’s important to ensure the yolks are evenly incorporated without losing volume.

Step 8
In a separate bowl, sift together the cake flour and salt. Mix them gently until just combined, without overmixing.

Step 9
Combine the milk and olive oil (or vegetable oil) in a small bowl and microwave for about 20 seconds until warm. Pour the warmed liquid mixture into the batter.

Step 10
Using a spatula, gently fold the mixture using a J-shape motion. The goal is to incorporate the milk and oil into the meringue batter smoothly without lumps, all while preserving as much air as possible. Mix delicately.

Step 11
Add 5-6 drops of vanilla extract and gently fold it in, again being careful not to deflate the meringue. This adds a lovely vanilla aroma.

Step 12
Line a 16cm cake pan with parchment paper and pour the batter into it. Gently tap the pan on the counter a few times to release any large air bubbles. You can also draw a spiral with a chopstick on the surface before tapping to help even out the batter and release bubbles.

Step 13
Bake in a preheated oven at 150°C (300°F) for about 40 minutes. Alternatively, you can bake at 160°C (320°F) for 25 minutes. Oven temperatures vary, so monitor the cake’s browning and adjust the time as needed. Checking the color of the top is a good indicator.

Step 14
To check if the cake is done, insert a skewer or toothpick into the center. If it comes out clean with no batter sticking to it, the cake is fully baked.

Step 15
Once baked, immediately invert the cake onto a wire rack and let it cool completely.

Step 16
After the cake has cooled, use a serrated knife to gently level the top surface. Then, carefully slice the cake into 2 or 3 equal layers. (The layers might be uneven if you don’t have a cake leveler, but that’s okay!)

Step 17
Wash the fresh strawberries thoroughly, remove the stems, and pat them completely dry with paper towels. Slice them into uniform 5mm thick rounds.

Step 18
Prepare 250ml of cold heavy whipping cream and 25g of sugar (approximately 10% of the cream’s weight). You can adjust the sugar amount based on your sweetness preference.

Step 19
Begin whipping the cream and gradually add the sugar in 2-3 additions. Adding sugar all at once can cause the cream to separate, so dividing it is recommended.

Step 20
Whip until soft peaks form, similar to what’s shown in the photo. This indicates the cream is perfectly whipped. Be careful not to over-whip, as it can turn into butter.

Step 21
Place one layer of the sliced cake onto your serving plate or cake stand. (A turntable is not essential!) Spoon a generous amount of whipped cream onto the cake layer and spread it evenly.

Step 22
Arrange the sliced strawberries over the whipped cream layer. You can fill in any gaps with a little more cream for extra deliciousness. Apply a thin layer of cream to the sides of the cake layer to prepare for frosting.

Step 23
Cover the strawberries with more whipped cream, then place the second cake layer on top. Spread whipped cream on this layer, add more strawberries, and then smooth the top surface of the cream.

Step 24
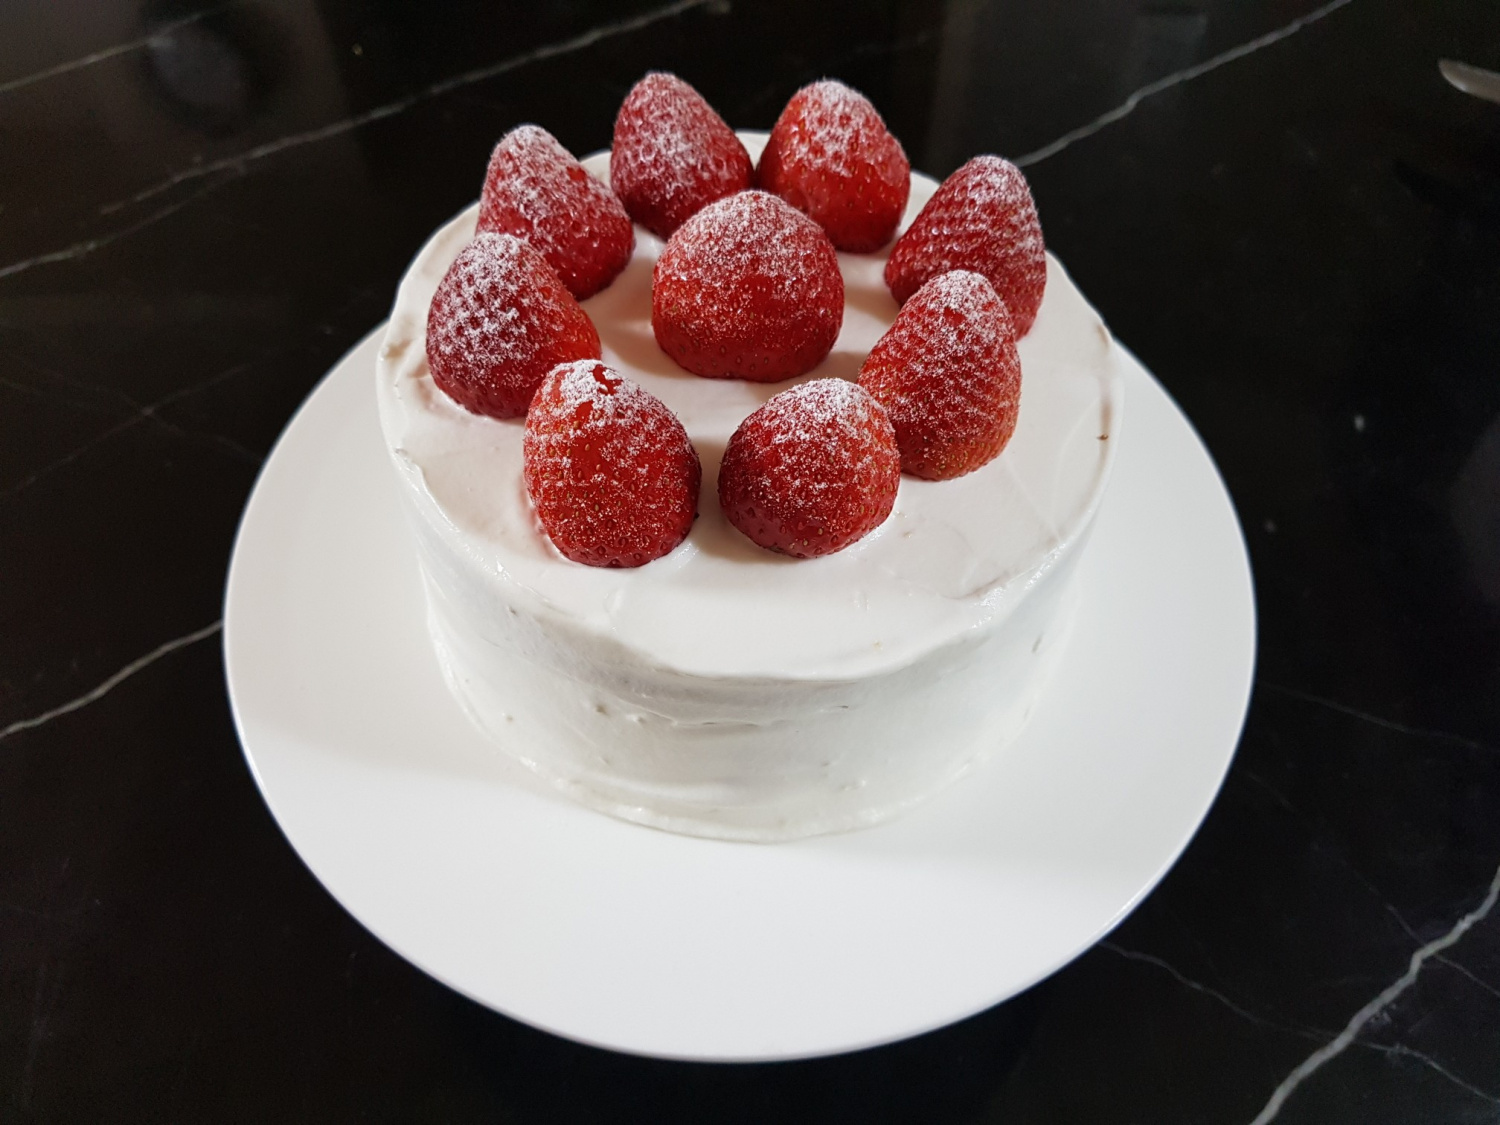
Add the final, third cake layer. Generously frost the top and sides of the cake with whipped cream for a smooth finish. Decorate the top with fresh strawberries attractively.

Step 25
Finally, dust the cake with powdered sugar using a sieve for a beautiful, professional-looking finish.

Step 26
Despite the challenge of frosting without specialized tools, the family’s delight and compliments on the delicious strawberry cream cake brought immense satisfaction. I promise to return with an even more impressive visual and taste next time! I encourage you to try making this delightful cake at home.


