Fragrant Seasonal Peach Rose Tart
Creating a Beautiful Rose-Shaped Peach Tart

As the summer season draws to a close, indulge in the sweet and fragrant flavors of a peach tart made with the freshest seasonal peaches. It’s a shame to simply eat these delightful fruits without transforming them into a special dessert! This recipe elevates your peach tart by artfully arranging thinly sliced peaches into a beautiful rose shape atop the tart. While I personally prefer firmer peaches, this time I opted for soft, ripe white peaches, which didn’t require a syrup to cook down, allowing their natural sweetness to shine. Their tender texture made them perfect for slicing thinly and shaping. The combination of a crisp tart crust, creamy filling, and the naturally sweet, aromatic juice of the peaches creates an exquisite taste experience. This is a truly special homemade baking recipe that everyone, young and old, will adore. Let’s get started!
Tart Pans- One 18cm (approx. 7-inch) and one 20cm (approx. 8-inch) round tart pan
Pâte Sablée (Tart Dough)- 100g all-purpose flour
- 40g almond flour
- 40g powdered sugar
- A pinch of salt
- 60g unsalted butter, cold and cubed
- 25g egg white, at room temperature
Crème Fromage (Cheese Cream)- 90g cream cheese, softened at room temperature
- 90g heavy cream, chilled
- 25g granulated sugar
- 1 tsp vanilla extract
For Garnish- 2 ripe peaches
- 1 egg yolk (for brushing the tart crust)
- 100g all-purpose flour
- 40g almond flour
- 40g powdered sugar
- A pinch of salt
- 60g unsalted butter, cold and cubed
- 25g egg white, at room temperature
Crème Fromage (Cheese Cream)- 90g cream cheese, softened at room temperature
- 90g heavy cream, chilled
- 25g granulated sugar
- 1 tsp vanilla extract
For Garnish- 2 ripe peaches
- 1 egg yolk (for brushing the tart crust)
- 2 ripe peaches
- 1 egg yolk (for brushing the tart crust)
Cooking Instructions
Step 1
First, let’s prepare the crisp and nutty Pâte Sablée (tart dough). Using a food processor makes this step very convenient. In the food processor, combine the all-purpose flour, almond flour, powdered sugar, and salt. Pulse a few times to mix the dry ingredients. Next, add the cold, cubed butter. Pulse briefly until the mixture resembles coarse crumbs, like wet sand. Finally, add the room-temperature egg white and pulse just until the dough comes together into a cohesive ball. Be careful not to overmix, as this can make the crust tough. Once formed, flatten the dough into a disk about 0.5-0.6 cm thick, wrap it tightly in plastic wrap or a bag, and refrigerate for at least 1 hour to rest. This chilling step makes the dough easier to handle.

Step 2
After the dough has rested, take it out of the refrigerator and let it sit at room temperature for about 5-10 minutes until it’s slightly pliable, but still cool. Carefully transfer the dough into your tart pans. Gently press the dough into the bottom and up the sides of the pan, ensuring it adheres well. Use a scraper or knife to trim any excess dough from the edges. Place the lined tart pans back into the refrigerator for another 30 minutes to chill further. This double chilling helps prevent the tart shell from shrinking during baking. Before baking, line the chilled tart shells with parchment paper and fill with pie weights (or dried beans/rice). This is called blind baking and prevents the crust from puffing up.

Step 3
Bake the tart shells in a preheated oven at 180°C (350°F) for 12-15 minutes. Once the edges start to turn golden brown, carefully remove the tart from the oven. Remove the parchment paper and pie weights. Brush the surface of the tart shell with the egg yolk – this will give it a beautiful golden color. Return the tart to the oven and reduce the temperature to 170°C (340°F). Bake for an additional 5-10 minutes, or until the crust is a lovely golden brown and looks fully baked. Transfer the baked tart shells to a wire rack to cool completely. Be gentle when moving them as they can be fragile when warm.

Step 4
Now, let’s make the smooth and creamy Crème Fromage (cheese filling) for the tart. In a bowl, beat the softened cream cheese with a whisk or spatula until smooth and creamy. Add the granulated sugar and mix well until fully incorporated and the mixture is smooth. Stir in the vanilla extract until combined. Gradually pour in the chilled heavy cream while whisking or mixing gently until you achieve a soft, luscious cream consistency. Be careful not to overmix, as the cream can curdle. Stop mixing once the cream is smooth and holds its shape loosely.

Step 5
Transfer the prepared Crème Fromage into a piping bag fitted with your desired tip. Pipe the cream filling evenly into the cooled tart shells, filling them completely. Ensure there are no gaps. You can gently tap the tart or smooth the surface lightly if needed for a neat finish.

Step 6
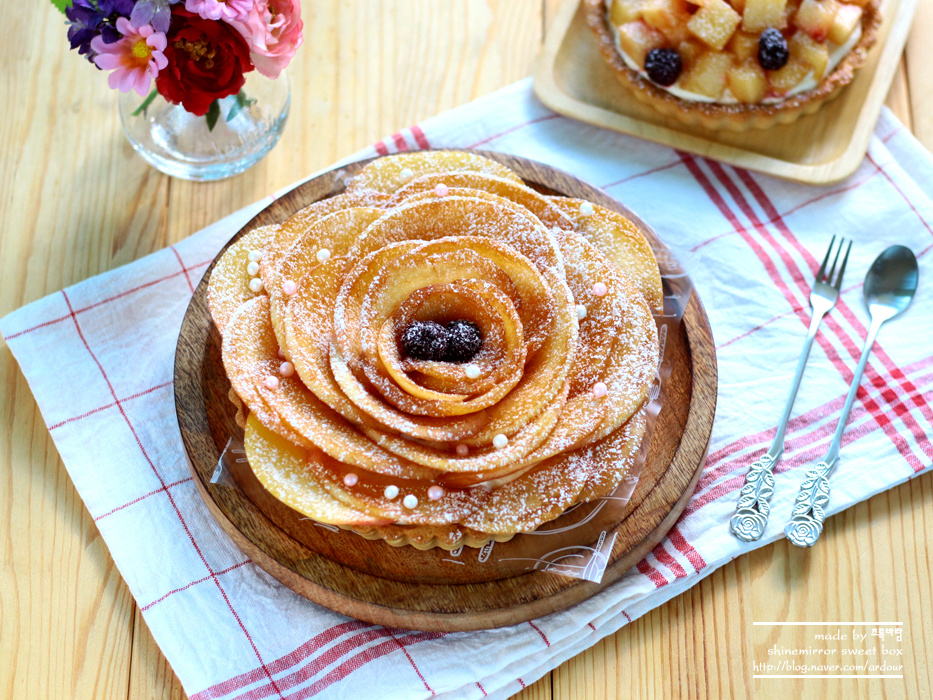
Finally, it’s time to prepare and arrange the star of our tart: the peaches! Wash the peaches, cut them in half, remove the pits, and slice them thinly. Carefully arrange the thin peach slices on top of the cream filling in a beautiful rose pattern, starting from the center and overlapping the slices outwards. Be creative with your arrangement to showcase the beautiful colors and shapes of the peaches. For a final touch, lightly dust with powdered sugar. Your stunning Peach Rose Tart is now complete! Enjoy the delightful combination of fragrant peach flavors and the crisp, buttery tart crust.


