Healthy and Crunchy Kale Kimchi Recipe
#KaleRecipe #HealthyKimchi #EasyKimchiMaking #FreshKimchi #KaleUses #KimchiRecipe

Inspired by seeing kale kimchi made twice on Korean mukbang shows, this recipe brings you a healthy and crunchy kale kimchi. If kale sometimes feels a bit bland, transforming it into kimchi infuses it with rich flavor, making it a delicious and healthy dish you can enjoy without hesitation. Similar to making perilla leaf kimchi, this recipe preserves the fresh, crisp texture of kale. Prepare your own flavorful kimchi paste from scratch for both health and taste. We’ll guide you step-by-step, from making the glutinous rice paste to fermentation, ensuring even beginners can follow with ease.
Kimchi Paste Ingredients- 3 Tbsp glutinous rice flour
- 3 cups water
- 2 dried anchovies (for broth, or use pre-made broth)
- 1/2 carrot (julienned or minced)
- 100g green onions (or 100g white parts of leeks)
- 1.5 cups gochugaru (Korean chili flakes)
- 5 Tbsp minced garlic
- 1 tsp minced ginger
- 3 Tbsp salted fermented shrimp (jeotgal, preferably ‘yukjeot’)
- 1/4 Korean radish (julienned or minced)
- 2 Tbsp fermented fish sauce (made from cutlassfish)
- 1 Tbsp fermented anchovy sauce
- 3 Tbsp plum extract (maesilcheong)
- 2 Tbsp sugar
Cooking Instructions
Step 1
First, let’s make the glutinous rice paste. In a pot, combine 3 Tbsp glutinous rice flour and 3 cups of water, whisking well to dissolve any lumps. Add 2 dried anchovies (or the broth they were in) and bring to a simmer over medium-low heat, stirring constantly. Once the paste begins to thicken and bubble, reduce the heat to low and cook for another 2-3 minutes. Turn off the heat and let it cool completely. The glutinous rice paste acts as a binder, helping the kimchi paste adhere well to the kale.

Step 2
Prepare the carrot. Wash it thoroughly, peel it, and then julienne it thinly or mince it finely. Julienne carrots add color and texture, while minced carrots blend smoothly into the paste.

Step 3
Trim any yellowed leaves from the green onions, wash them, and cut them into approximately 3-4 cm lengths. You can use both the white and green parts.

Step 4
In a large bowl, place the completely cooled glutinous rice paste. Add the julienned carrot and chopped green onions. Gently mix everything together until the ingredients are well combined with the paste.

Step 5
Now, it’s time to add the gochugaru (Korean chili flakes) to flavor the kimchi. Using a mix of fine and coarse gochugaru can result in a richer color and taste. Stir thoroughly to ensure the chili flakes are evenly distributed and there are no clumps.

Step 6
Add 5 Tbsp minced garlic and 1 tsp minced ginger to the mixture. Mix again until everything is well incorporated. Garlic and ginger contribute to the spicy flavor and aromatic quality of the kimchi.

Step 7
Prepare a blender or a mortar and pestle. Add 3 Tbsp of salted fermented shrimp (yukjeot). If you have sliced garlic on hand, you can blend it along with the shrimp to enhance the garlic flavor.

Step 8
Add the radish you’ve prepared for blending to the blender along with the fermented shrimp. Peel and chop the radish into appropriate sizes before adding. Also, pour in 2 Tbsp of fermented fish sauce (made from cutlassfish) and blend until smooth. Blending radish adds a refreshing coolness and a smoother texture to the paste.

Step 9
Add the smoothly blended radish and shrimp mixture to the prepared paste. Mix well. Finally, season with 3 Tbsp plum extract, 2 Tbsp sugar, and 1 Tbsp fermented anchovy sauce. Stir everything thoroughly to combine. Cover the bowl with plastic wrap and let it rest in the refrigerator for at least half a day (4-6 hours) to allow the flavors to deepen.

Step 10
Prepare the main ingredient: kale. Remove any thick, tough stems from the fresh kale leaves, or slice them thinly. Wash the leaves thoroughly and drain them completely. It’s crucial to ensure all excess water is removed. Place them in a colander to drain or pat them dry with paper towels. Excess moisture can cause the kimchi to become mushy.

Step 11
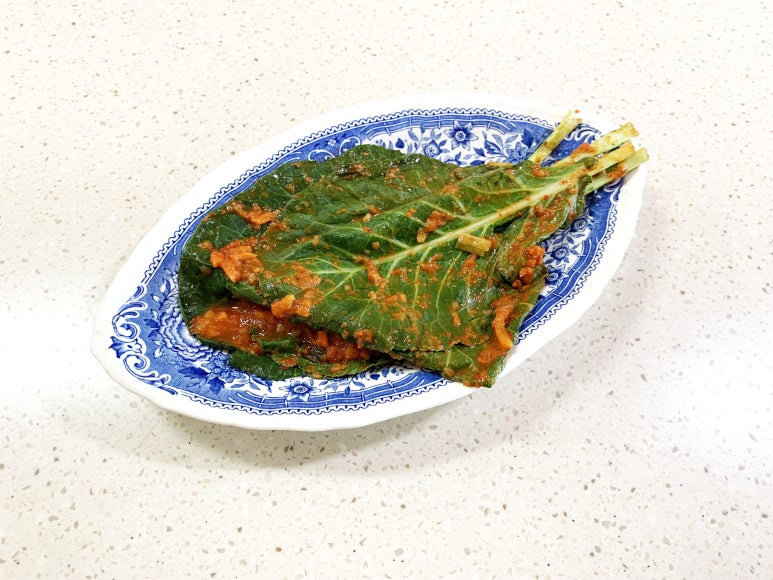
Now it’s time to assemble the kale kimchi. Take one kale leaf at a time and spread the prepared kimchi paste evenly over its surface. Similar to making perilla leaf kimchi, spread a thin layer of paste on one kale leaf, then place another kale leaf on top, and repeat the process, ensuring all kale leaves are coated with the paste. If the leaves are large, you can fold them in half before spreading the paste.

Step 12
Make sure to spread the paste evenly across the entire surface of the kale leaf, not just the edges. If you run out of paste, the flavor might be less intense later, so be thorough.

Step 13
Once all the kale leaves are coated with paste, carefully arrange them in a kimchi container. Avoid packing them too tightly; leave a little space for air circulation. Lightly press down the top layer. Let the kimchi sit at room temperature for about one day to begin the fermentation process. During this time, the kale will start to soften slightly and absorb the flavors of the paste.

Step 14
After one day of room temperature fermentation, transfer the kale kimchi to a kimchi refrigerator. Let it ferment at a low temperature for another 3 days. This slow, cold fermentation process helps maintain the crisp texture of the kale while allowing the kimchi paste’s flavors to penetrate deeply.

Step 15
Your healthy kale kimchi with a satisfying crunch is ready! While it’s delicious when freshly made, its flavor will continue to deepen over time. After about a week in the kimchi refrigerator, it will become even more aged and delicious. Enjoy this versatile kale kimchi that gets better the longer it ferments!


