Homemade Pizza Bread: Chewy Sausage Rolls Made Without a Mixer
Bakery-Quality Sausage Rolls at Home! Easy Hand-Kneaded Recipe for Popular Pizza Bread

Sausage rolls are a nostalgic snack from every bakery, aren’t they? The irresistible combination of tangy ketchup, savory sausage, and soft bread is always a delight! Sometimes called ‘pizza bread’ because of its pizza-like flavor, this beloved treat is now easy to make at home. This detailed recipe shows you how to achieve a wonderfully chewy texture with simple hand-kneading, no mixer required. Perfect as a treat for kids or a satisfying snack when hunger strikes!
Dough Ingredients- 300g Bread flour (high-gluten flour)
- 40g Sugar
- 5g Salt
- 6g Instant dry yeast
- 40g Butter, softened at room temperature (cut into small pieces)
- 70g Warm water
- 70g Warm milk
- 1 Large egg, at room temperature
Delicious Topping Ingredients- 8 Sausages (your favorite kind)
- 200g Mozzarella cheese (chopped or shredded)
- 1 Onion, finely diced
- Canned corn (same amount as diced onion, drained)
- 1 Tbsp Mayonnaise
- A pinch of dried parsley (for garnish)
- 8 Sausages (your favorite kind)
- 200g Mozzarella cheese (chopped or shredded)
- 1 Onion, finely diced
- Canned corn (same amount as diced onion, drained)
- 1 Tbsp Mayonnaise
- A pinch of dried parsley (for garnish)
Cooking Instructions
Step 1
In a bowl, combine the warm water (70g) and instant dry yeast (6g). Stir well to ensure the yeast dissolves and doesn’t clump, allowing it to activate.

Step 2
Once the yeast is dissolved, add the warm milk (70g), sugar (40g), and salt (5g). Stir everything together thoroughly. (Tip: To help the yeast activate better, add the salt and sugar together, keeping them from direct contact with the yeast.)

Step 3
Now, add the room-temperature egg (1 large). Whisk it well with a whisk or fork until fully incorporated into the liquid mixture. Ensure all wet ingredients are well combined.

Step 4
Add the bread flour (300g) directly to the prepared liquid ingredients. (Tip: You don’t need to sift the flour. Just mix until the dry ingredients are no longer visible.)

Step 5
Mix with a spatula or your hands just until no dry flour remains; avoid overmixing at this stage. Cover the bowl tightly with plastic wrap or a lid and let it rest at room temperature for 15 minutes. This allows the gluten to start developing.

Step 6
While the dough rests, lightly flour a clean work surface (like a cutting board) and turn the dough out. It will likely be very sticky and shaggy at first. Using a bench scraper is very helpful for gathering the dough. Sprinkle a little more flour onto your hands and the work surface as needed to prevent sticking, and knead until the dough becomes slightly smoother.

Step 7
Once the dough surface is somewhat smooth, add the softened butter (40g), cut into small pieces. Fold the dough over the butter, enclosing it, and begin kneading again as you did before. Think of it like wrapping the butter inside the dough, similar to making dumplings.

Step 8
As the butter is incorporated, the dough will become even stickier and wetter. Don’t worry! Continue using your bench scraper to gather the dough and keep it from sticking to your hands and the surface, working the butter in.

Step 9
Once the butter is mostly absorbed into the dough, it’s time for intensive kneading. Slap the dough down onto the work surface, stretch it, and fold it over. Lifting the dough and striking it against the board is an effective technique. Continue to sprinkle a little flour as needed to manage the stickiness during this process.

Step 10
Repeat this ‘slap and fold’ motion for about 5 to 10 minutes. You’ll feel the dough gradually becoming more elastic and smoother. This vigorous kneading develops the gluten structure.

Step 11
How do you know it’s ready? Take a small piece of dough and gently stretch it between your fingers. If you can stretch it thin enough to see your fingertips through it, forming a strong, elastic membrane without tearing, it’s done. If it tears easily or the membrane isn’t forming well, knead for a few more minutes.

Step 12
Place the finished dough back into the bowl, cover it with plastic wrap or a damp cloth, and let it proof in a warm place (around 30-35°C or 85-95°F) for about 1 hour, or until it has doubled in size.

Step 13
After the first proof, you’ll see that the dough has nicely doubled. If you kneaded it well, the surface should be relatively smooth, not too bumpy.

Step 14
Gently press down on the risen dough with your palm to deflate it and release the gas. Transfer the dough to your work surface and divide it into 8 equal portions. (Tip: Weighing the portions will help ensure they are all the same size.)

Step 15
Shape each portion into a ball by tucking the edges underneath to create a smooth surface. Cover these dough balls with plastic wrap or a damp cloth and let them rest at room temperature for 15 minutes for their intermediate proof (bench rest). While the dough rests, prepare the toppings. Rinse the sausages under running water and pat them thoroughly dry with paper towels.

Step 16
Take one rested dough ball and gently flatten it with your palm. Shape it into an oval, creating a slight indentation in the center where the sausage will sit. Be careful not to flatten it too thinly.

Step 17
Place a prepared sausage onto the flattened dough.

Step 18
Bring the edges of the dough up and over the sausage, pinching them together securely to fully enclose the sausage. Seal the seams tightly, like wrapping a gift.

Step 19
Once the sausage is enclosed, gently roll the dough on the work surface to even out the shape and ensure the sausage is centered. This helps distribute the dough evenly around the sausage.

Step 20
Using scissors or a knife, make cuts starting from the top edge of the dough. Cut into the dough above the sausage, but not all the way through to the bottom.

Step 21
Cut one section and lay it to the right, then the next section and lay it to the left, creating a zigzag pattern. (Tip: You don’t have to cut diagonally; you can make 6-7 parallel cuts and then arrange them in a zigzag pattern for a pretty effect. Remember not to cut through the bottom of the dough; it should remain connected.)

Step 22
Cover the shaped bread rolls with plastic wrap or a damp cloth and let them proof at room temperature for about 30 minutes for their second fermentation. They should puff up nicely.

Step 23
Meanwhile, prepare the topping. Combine the finely diced onion (1) and the drained canned corn. The ratio is 1:1, but feel free to adjust it to your preference. Mix in the mayonnaise (1 Tbsp) to create the topping sauce.

Step 24
After the second proof, gently check the dough. If any part of the sausage is poking out, carefully press it back into the dough with your finger, trying not to deflate the bread too much.

Step 25
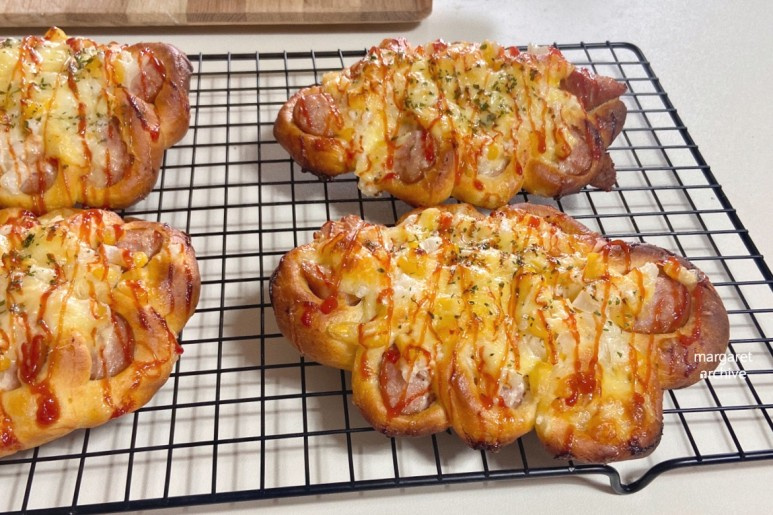
Spoon the prepared topping mixture evenly over the bread. Finish by drizzling ketchup and mayonnaise in a zigzag pattern over the topping to create that classic pizza bread look.

Step 26
Bake in a preheated oven at 180°C (350°F) for 10 to 15 minutes, or until the tops are golden brown and the cheese is melted and bubbly. Enjoy your delicious homemade pizza bread!


