Lemon Cream Cheese Steamed Rice Cake (Seolgi)
Vitamin-Packed Lemon & Cream Cheese Seolgi Rice Cake

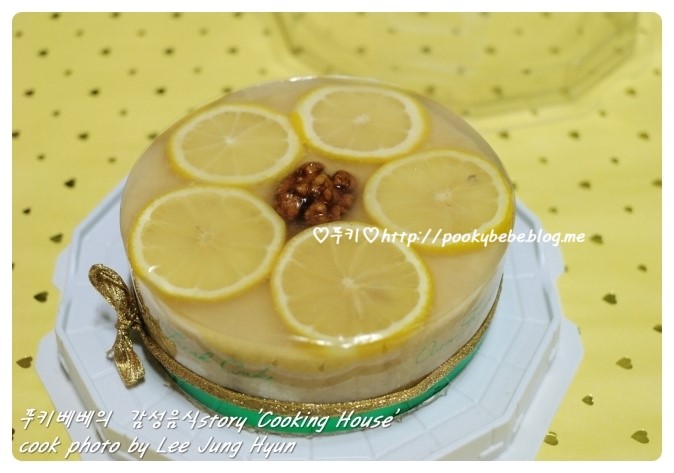
Experience the delightful harmony of a subtle lemon aroma and smooth cream cheese! We’ve perfected this recipe to bring you a vitamin-rich rice cake that’s not too sour and perfectly balanced. Enjoy our special candied lemon slices and rich cheese filling. This visually appealing and delicious cake makes a wonderful gift for any occasion.
Rice Cake Batter- 4 cups seasoned non-glutinous rice flour (with salt)
- 4 Tbsp granulated sugar
- 30g Philadelphia cream cheese
- 3 Tbsp milk
Middle Layer Filling- 90g Philadelphia cream cheese
- 20g dried tropical fruit mix
- 20g water
- 1/2 tsp granulated sugar
Candied Lemon- 1 fresh lemon
- 5 Tbsp white corn syrup
Mousse (Agar Jelly)- 1 tsp agar powder
- 2 cups water
- 4 Tbsp granulated sugar
- Pinch of salt
- 1 Tbsp white corn syrup
- 1 Tbsp starch (tapioca starch)
- 1 Tbsp lukewarm water
- 90g Philadelphia cream cheese
- 20g dried tropical fruit mix
- 20g water
- 1/2 tsp granulated sugar
Candied Lemon- 1 fresh lemon
- 5 Tbsp white corn syrup
Mousse (Agar Jelly)- 1 tsp agar powder
- 2 cups water
- 4 Tbsp granulated sugar
- Pinch of salt
- 1 Tbsp white corn syrup
- 1 Tbsp starch (tapioca starch)
- 1 Tbsp lukewarm water
- 1 tsp agar powder
- 2 cups water
- 4 Tbsp granulated sugar
- Pinch of salt
- 1 Tbsp white corn syrup
- 1 Tbsp starch (tapioca starch)
- 1 Tbsp lukewarm water
Cooking Instructions
Step 1
First, for the mousse, soak the agar powder in 2 cups of water overnight. This ensures the agar dissolves smoothly, leading to a silky-textured mousse.

Step 2
Wash the lemon thoroughly and slice it into thin 3mm rounds. Place the lemon slices and 5 Tbsp of white corn syrup in a saucepan. Simmer over low heat for about 3-5 minutes until slightly candied. Remove from heat and let cool completely. These candied lemon slices will add a bright, refreshing touch to the cake.

Step 3
Now, let’s make the middle layer filling. In a saucepan, combine 20g of dried tropical fruit mix, 20g of water, and 1/2 tsp of granulated sugar. Bring to a boil, then turn off the heat. Add 90g of Philadelphia cream cheese and stir until well combined and smooth, without any lumps. This creates a rich and slightly sweet filling.

Step 4
Time to prepare the rice cake batter. In a bowl, combine the seasoned non-glutinous rice flour (sifted for a finer texture) with the remaining 30g of Philadelphia cream cheese and 3 Tbsp of milk. Use your fingertips to rub the ingredients together until evenly incorporated. Ensure no dry spots remain and the mixture is crumbly.

Step 5
Sift the rice flour mixture through a sieve one more time for an even lighter texture. Then, add 4 Tbsp of granulated sugar and gently mix using a silicone spatula. Be careful not to overmix or press down, as this can make the cake dense. The goal is to combine it lightly without forming large clumps.

Step 6
Spread half of the prepared rice flour mixture into your steaming mold. Dot the middle layer filling generously but evenly over the flour. Avoid overfilling the middle layer, as too much filling can prevent the cake from steaming properly. Then, cover the filling with the remaining rice flour mixture. Ensure there’s a little space for steam to circulate.

Step 7
Fill your steamer pot with water (about 2/3 full) and bring it to a boil. Once boiling, place the filled mold inside and steam over high heat for 20 minutes. After steaming, turn off the heat and let it rest (steam) for another 5 minutes. This resting period allows the cake to finish cooking evenly and become moist.

Step 8
While the cake is steaming, prepare the mousse. Add the soaked agar to a saucepan and bring to a simmer over medium heat. Once the agar has dissolved, add 4 Tbsp of granulated sugar and a pinch of salt, stirring until the sugar dissolves. Stir in 1 Tbsp of white corn syrup. In a separate small bowl, mix 1 Tbsp of tapioca starch with 1 Tbsp of lukewarm water to create a slurry. Gradually add this slurry to the simmering agar mixture, stirring constantly, until it reaches your desired thickened consistency, similar to a thin jelly.

Step 9
Once the steamed rice cake has cooled slightly, secure it firmly in the mold with a cake collar (band) that is slightly taller than the cake itself. This taller collar will help contain the mousse when you pour it over the top, ensuring a neat finish.

Step 10
And now, the grand finale! Carefully pour the prepared mousse over the slightly cooled rice cake, smoothing the top surface. Decorate the cake with the candied lemon slices made in step 2, and place walnut candies (or candied walnuts) in the center for a beautiful finish. Your delicious Lemon Cream Cheese Seolgi Rice Cake is ready! Share this beautiful and tasty creation with your loved ones.


