Meringue Cookies That Melt in Your Mouth
Melt-in-your-mouth Meringue Cookies! Baking time reduced from 100 minutes to 20 minutes^^

These cookies are more like cotton candy than cookies, but they are incredibly addictive cotton candy that you just can’t stop reaching for. ㅎㅎ I’ve always wondered what cookies baked for over an hour would taste like, and how they maintain their shape without flour. ㅎㅎ When I first tried making them, I had a million questions, so I made them before I even tasted them. ㅎㅎ As I kept making them, I gained experience and discovered a faster baking method. ㅎㅎ Kids love them, and they’re so pretty with all their colorful designs, which is why they’re a favorite! ^^
Ingredients- 60g egg whites (chilled)
- 50g granulated sugar
- 60g powdered sugar (sifted)
- 1-2 drops lemon extract
Cooking Instructions
Step 1
First, separate the egg whites into a clean bowl. Lightly whisk the egg whites, then gradually add the granulated sugar in 2-3 additions while continuing to whip. Adding all the sugar at once can prevent it from mixing well with the egg whites, so be sure to add it in stages.

Step 2
Once some foam starts to form, gradually add the sifted powdered sugar in 2-3 additions and continue whipping. Adding too much powdered sugar at once can make the meringue coarse, so adding it little by little is the key to creating a smooth and fine meringue.

Step 3
It’s best to gently mix the mixture with a whisk after adding the powdered sugar each time, until a foamy consistency is achieved. This ensures the powdered sugar doesn’t clump and blends well with the meringue, resulting in a much more refined meringue.

Step 4
It’s important to create stiff peaks. When you lift the whisk, if the peak shape remains firm without bending, your meringue is ready. At this stage, add 1-2 drops of lemon extract or vanilla extract to eliminate any eggy smell.

Step 5
The finished meringue mixture should be very stiff, so much so that it doesn’t fall out when you turn the bowl upside down. The whisk marks should remain clearly visible, and the peaks should stand straight up. This level of stiffness is crucial for the meringue cookies to maintain their shape.

Step 6
If you want to add pretty colors to your meringue mixture, divide the finished mixture into several bowls. Add a small amount of your desired food coloring to each bowl and gently mix to create vibrantly colored meringue mixtures.

Step 7
Transfer each colored meringue mixture into separate piping bags. Avoid overfilling the piping bags, as this can make them difficult to handle. Fill them with a moderate amount of mixture.

Step 8
Prepare a piping bag fitted with a decorative tip. Secure the tip tightly to the bag with a rubber band or string to prevent it from coming loose. The shape of the meringue cookies will vary depending on the decorative tip used.

Step 9
If you want to pipe multiple colors simultaneously for a beautiful gradient effect, place the colored piping bags side-by-side inside the prepared decorative tip. This way, you can achieve naturally blended colors even when piping them all at once.

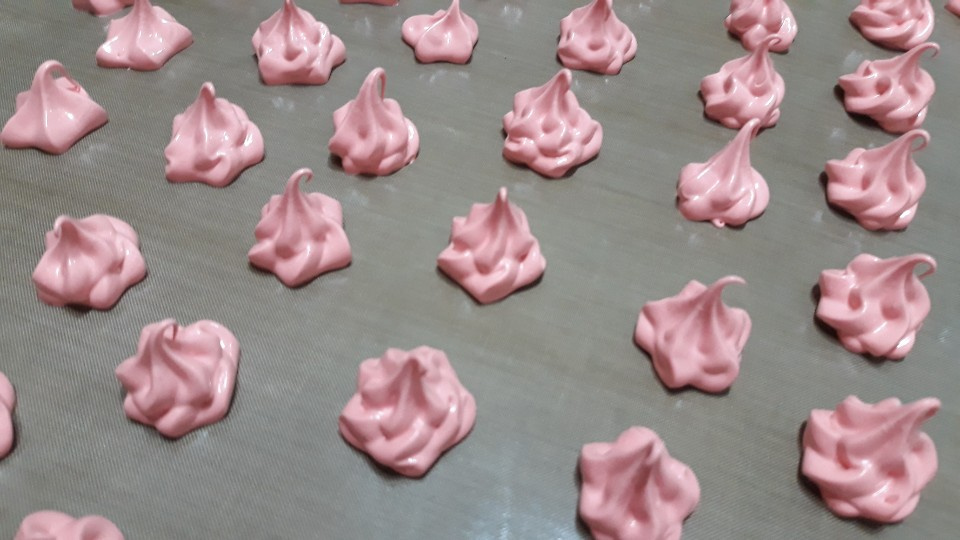
Step 10
Line your baking sheets with parchment paper or baking mats. Pipe the meringue mixture onto the prepared sheets, leaving ample space between each cookie to prevent them from spreading into each other. Let the piped meringue cookies sit at room temperature for at least 30 minutes to allow the surface to dry slightly before baking. This step helps the cookies maintain their shape better during baking.

Step 11
Bake in a preheated oven at 100°C (212°F) for approximately 1 hour and 10 minutes. The baking time may vary depending on your oven and the size of the cookies, so check them periodically and adjust as needed. It’s important to bake them long enough for the meringue cookies to dry out completely and cook through.

Step 12
Once fully baked, remove the meringue cookies from the oven and let them cool completely on the baking sheet. They can be fragile when warm, so handle them gently once they have cooled down completely before packaging. Enjoy your crispy and sweet meringue cookies!


