Nostalgic Old-Fashioned Milk Bingsu
Homemade Milk Shaved Ice (Bingsu) Recipe – Easy Red Bean Paste Cooking with an Electric Rice Cooker (No Machine Needed!)

Hello, this is Yeosajang! While I don’t always love the sweltering heat of summer, it certainly brings a bounty of delicious foods. From cold soba noodles and soybean noodles to watermelon and ice cream, my absolute favorite, especially with my grandmother’s palate, is red bean bingsu with chewy rice cakes! That’s why, as soon as summer starts to arrive, I make sure to boil red beans myself and stock them in the freezer. With this recipe, you can easily make delightful milk bingsu at home, even without a dedicated bingsu machine!
Key Ingredients for Old-Fashioned Red Bean Bingsu- 1 cup red beans
- 5 Tbsp Muscovado sugar (or brown sugar)
- 500ml milk
- Sweetened condensed milk, to taste
- 2-3 Tbsp roasted soybean powder (Injeolmi powder)
- 2 chewy glutinous rice cakes (Mochi)
Cooking Instructions
Step 1
Boiling the red beans, the soul of bingsu, is easier than you think! Don’t worry if you don’t have a pressure cooker; I’ve been successfully boiling red beans with my electric rice cooker for years. First, rinse the red beans thoroughly under cold water. Then, soak them in water for half a day (about 6-8 hours) until they are well-plumped. Place the soaked red beans into your electric rice cooker and select the ‘Normal Cook’ or ‘White Rice’ setting. This will take about 50 minutes, similar to regular cooking time. After the first boil, add about 2 cups (approx. 400ml) of water to the cooked beans, along with 5 tablespoons of Muscovado sugar for sweetness. (Brown sugar works well too.)

Step 2
Gently stir the beans with a spatula or spoon to help the sugar dissolve evenly. Once the sugar is dissolved, select the ‘Normal Cook’ function again to simmer the beans. This process will give the beans a glossy sheen and enhance their sweetness.

Step 3
After approximately 50 minutes, carefully open the lid of the electric rice cooker to check the condition of the red beans. If you press a bean between your fingers, you’ll notice that they have softened significantly from their initial firm state. This is the perfect texture for topping your bingsu!

Step 4
Now it’s time to quickly cool down the hot beans. Place the rice cooker into a sink filled with cold water or a large basin to rapidly reduce the temperature. This helps the beans retain their shape and texture when served on the bingsu.

Step 5
Once cooled, you’ll see that the red beans have a beautiful, glossy finish. ^^

Step 6
These are wonderfully boiled red beans! In the past, I used to blend the beans and freeze them, but I personally prefer the texture of whole beans. So, I store them as they are in silicone airtight containers and freeze them. This way, they are ready to use anytime!

Step 7
Similarly, pour the milk into a silicone container and freeze it. This will help create the creamy, icy texture characteristic of shaved ice.

Step 8
Now, let’s get ready to make our delicious bingsu by taking out the frozen red beans and milk.

Step 9
You can make wonderfully icy bingsu without a machine! Take the frozen milk out of the freezer about 30 minutes to 1 hour before you plan to assemble the bingsu. Let it thaw slightly at room temperature. If it thaws too much, it will be difficult to achieve that refreshing, almost sorbet-like texture, so just a slight thaw is key.

Step 10
The chewy glutinous rice cakes are another essential delight in bingsu! I went to my favorite traditional market and bought these perfectly chewy rice cakes from my go-to rice cake shop. Their rice cakes are always the best! Haha.

Step 11
Once the frozen milk has thawed slightly – cold to the touch but slightly softened – carefully pour the milk into a clean plastic bag. Be cautious, as if it’s frozen too solid, it will be hard to break into small pieces.

Step 12
Place a clean kitchen towel or cloth over the plastic bag. Then, use a rolling pin, the bottom of a glass, or any sturdy object to firmly hit and break the frozen milk into fine pieces. Focus on hitting the edges and corners to create a fluffy, snow-like texture. Hit it with controlled force!

Step 13
Transfer the finely broken milk ice into your serving bowl, piling it up attractively. Try to shape it like a soft mound of snow.

Step 14
Now, generously spoon the sweet and savory red beans you prepared over the milk ice. You can adjust the amount of red beans to your liking.

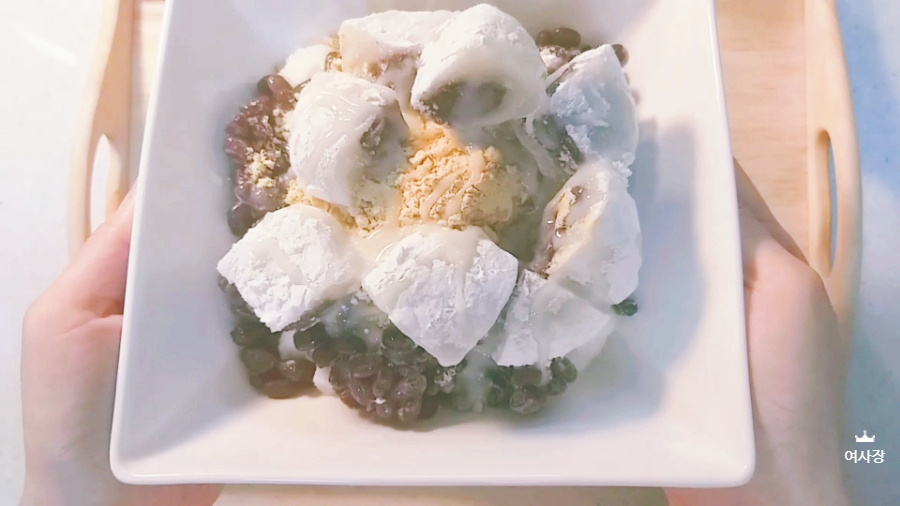
Step 15
This is the most enjoyable and exciting part – the toppings! ^^ First, sprinkle 2-3 tablespoons of roasted soybean powder for a nutty aroma. Next, arrange the chewy glutinous rice cakes, cut into bite-sized pieces, on top. Finally, drizzle sweetened condensed milk over the bingsu to your preference, and voilà! Your delicious old-fashioned milk red bean bingsu is complete!


