Nutty Chestnut Jelly: A Taste of Autumn
Homemade Chestnut Jelly: A Special Gift for Parent’s Day

Today, we’re sharing a recipe for traditional chestnut jelly, adorned with bright yellow chestnuts that offer a delightful nutty flavor. Making this classic Korean dessert at home is surprisingly simple, making it a perfect project for Parent’s Day. Presenting a handmade chestnut jelly is a heartfelt way to express your gratitude. The rich sweetness and comforting chestnut aroma will surely bring joy to your loved ones.
Ingredients- 500g red bean paste (store-bought or homemade)
- 10-15 canned or boiled chestnuts (adjust to preference)
Seasoning & Others- 2 tsp agar-agar powder
- 200ml water
- 100g sugar (adjust sweetness to taste)
- 1 Tbsp corn syrup or oligosaccharide syrup (for gloss and added sweetness)
- 2 tsp agar-agar powder
- 200ml water
- 100g sugar (adjust sweetness to taste)
- 1 Tbsp corn syrup or oligosaccharide syrup (for gloss and added sweetness)
Cooking Instructions
Step 1
In a pot, combine the 200ml of water and 2 tsp of agar-agar powder. Whisk well and let it sit for about 10 minutes to allow the agar-agar to fully hydrate. This soaking step ensures the agar-agar dissolves smoothly without clumps. If using canned chestnuts, drain them completely and arrange them at the bottom of your jelly mold. For a nice touch, you can cut larger chestnuts into halves or quarters. It’s also helpful to take the red bean paste out of the refrigerator in advance so it reaches room temperature, which will make it easier to mix.

Step 2
Place the pot with the hydrated agar-agar mixture over medium-low heat. Stir constantly with a whisk or spatula to prevent sticking. Once it starts to boil and small bubbles appear, continue to cook for about 1 minute, stirring, until the agar-agar is fully dissolved. Reduce the heat to low, then add the 100g of sugar and 1 Tbsp of corn syrup. Stir until the sugar is completely dissolved. Finally, add the room-temperature red bean paste. Continue stirring gently over low heat until the red bean paste is smooth and lump-free. Ensuring the red bean paste is well incorporated without any lumps is key to a smooth jelly.

Step 3
Continue to stir the mixture over low heat, cooking until it thickens slightly. Be careful not to overcook, as it can become too stiff. The ideal consistency is when it’s thick enough to coat the back of a spoon but still pourable. Once you reach the desired consistency, carefully pour the mixture into your prepared mold. After pouring, gently stir the surface with chopsticks to release any trapped air bubbles for a smoother finish. Tapping the mold gently on your work surface a few times will help settle the mixture and eliminate any remaining air pockets, ensuring the chestnuts are well embedded. Allow the jelly to cool down slightly at room temperature before covering it. Then, chill it in a cool place for at least an hour until firm. For best results, I recommend covering the mold with plastic wrap and refrigerating it overnight.

Step 4
Once the chestnut jelly has completely set and is firm to the touch, cut it into serving pieces. For cleaner cuts, slightly dampen your knife with water before slicing. This prevents the jelly from sticking to the blade. Aim for uniform pieces for an attractive presentation.

Step 5
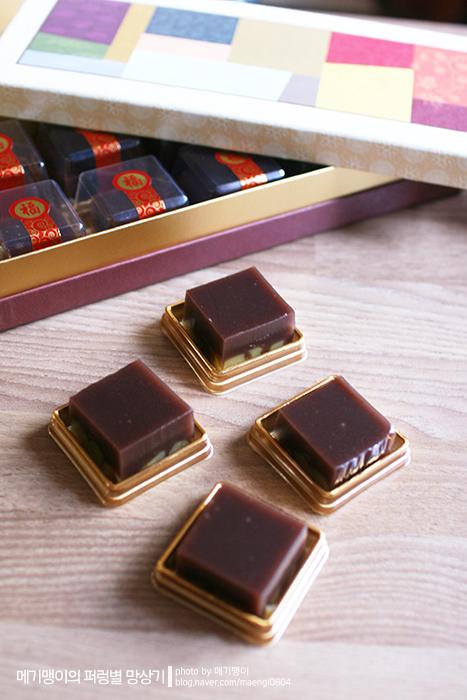
Arrange the beautifully set chestnut jelly in a traditional Japanese confectionery box (wagashi box). Decorate with a sticker and place it in a gift box for a wonderful Parent’s Day present! This recipe yields approximately 16 pieces. You can easily scale up the ingredients if you need more or wish to fit a larger gift box. Consider the height of your mold; too shallow a mold might not look as appealing. If you don’t have a specific box, individual plastic wrappers with a sticker also make for a lovely presentation. I hope you have a wonderful Parent’s Day filled with gratitude and the sweet taste of homemade treats! Wishing you a great day ahead!


