Refreshing Summer Delicacy: Yeolmu Kimchi & Yeolmu Mul Kimchi
The Ultimate Choice to Boost Your Summer Appetite! How to Make Delicious Yeolmu Kimchi and Yeolmu Mul Kimchi Without Fail

Nothing beats the refreshing crunch of Yeolmu Kimchi on a hot summer day! If you’re tired of aged kimchi, prepare this special summer dish for your family. It’s delicious mixed with a bit of chili paste and sesame oil, or perfect with noodles in its refreshing broth. Making both Yeolmu Kimchi and Yeolmu Mul Kimchi together means you’ll have plenty of delicious banchan to last. It’s surprisingly not difficult, so why not give it a try? If you have a large family like Happy Eye’s, you’ll be amazed how quickly even a generous batch disappears!
Basic Yeolmu Kimchi Ingredients- 2 bunches fresh young radish (Yeolmu)
- 1 bunch baby napa cabbage (Eolgari)
- 6 red chili peppers
- 2 onions
- 2 bulbs garlic
- Gochugaru (Korean chili flakes, generous amount)
- A pinch of ginger powder
- Plum extract (Maesilcheong)
- Sweet rice paste (cooked and cooled beforehand)
- 1/2 bunch green onions (scallions)
- Anchovy sauce (Myeolchi aekjeot)
Additional Ingredients for Yeolmu Mul Kimchi- 2 bunches fresh young radish (Yeolmu)
- 1 bunch baby napa cabbage (Eolgari)
- 6 red chili peppers
- 3 onions
- 2 bulbs garlic
- Gochugaru (Korean chili flakes, generous amount)
- A pinch of ginger powder
- Plum extract (Maesilcheong)
- Sweet rice paste (cooked and cooled beforehand)
- 1/2 bunch green onions (scallions)
- Anchovy sauce (Myeolchi aekjeot)
- 2 liters of water
- 2 bunches fresh young radish (Yeolmu)
- 1 bunch baby napa cabbage (Eolgari)
- 6 red chili peppers
- 3 onions
- 2 bulbs garlic
- Gochugaru (Korean chili flakes, generous amount)
- A pinch of ginger powder
- Plum extract (Maesilcheong)
- Sweet rice paste (cooked and cooled beforehand)
- 1/2 bunch green onions (scallions)
- Anchovy sauce (Myeolchi aekjeot)
- 2 liters of water
Cooking Instructions
Step 1
We’ll be making both types of kimchi together. Combining 2 bunches of Yeolmu with 1 bunch of Eolgari will give you a richer flavor. Let’s prepare the fresh Yeolmu and Eolgari and make delicious kimchi!

Step 2
Trim any wilted or dirty leaves from the Yeolmu. Peel the tough outer skin from the radish part, and cut the leaves into bite-sized pieces (about 4 sections). Some people discard the radish part, but it becomes sweet and delicious when cooked, so I highly recommend peeling and using it!

Step 3
Trim the ends of the Eolgari and cut it into 4 sections, just like the Yeolmu.

Step 4
Prepare the sweet rice paste for the Yeolmu Kimchi by boiling it beforehand and letting it cool completely. If you have sweet rice flour, it’s an easy way to make it. Today, I used glutinous rice to make a generous amount.

Step 5
The most crucial step before making kimchi is washing the vegetables. When washing the Yeolmu and Eolgari, avoid scrubbing too hard as it can result in a raw grassy flavor. Instead, gently swish them in water about 3-4 times until clean.

Step 6
We will salt the clean Yeolmu and Eolgari using coarse sea salt. In hot weather, salt them for about 3-4 hours, and in cooler weather, for 4-5 hours. Sprinkle salt between the layers of vegetables during salting to ensure even curing. They are ready when the stems bend gently without breaking.

Step 7
Prepare the seasoning ingredients that will add umami and refreshing flavor to the kimchi. Combine red chili peppers, onions, and garlic in a blender and grind them into a fine paste. Adding ground red chili peppers creates a much spicier and more refreshing taste than using only chili flakes. You can also add dried chili peppers.

Step 8
Now, let’s make the delicious kimchi seasoning! In a large bowl, add the gochugaru, chopped green onions, ground red chili peppers, onions, and garlic. Mix in the anchovy sauce, plum extract, and ginger powder. Add the pre-cooked sweet rice paste as well. Since we won’t be salting the Yeolmu and Eolgari for too long, the seasoning should taste slightly saltier than you prefer. This ensures the perfect seasoning when mixed with the cured vegetables.

Step 9
Lightly rinse the well-cured Yeolmu and Eolgari in cold water and drain them. Now, add the vegetables to the prepared kimchi seasoning and gently mix them together. Be careful not to mix too vigorously to avoid a grassy taste – this gentle mixing is key! And just like that, your delicious Yeolmu Kimchi is ready.

Step 10
Yeolmu Mul Kimchi is made the same way as Yeolmu Kimchi, just with added water. Since you’ll be drinking the broth, add 2 liters of cold water to the prepared kimchi seasoning and mix well.

Step 11
Rinse the 2 bunches of Yeolmu and 1 bunch of Eolgari thoroughly, drain them, and then gently add them to the seasoning mixture thinned with water. You can adjust the amount of water for mul kimchi to your preference, but 2 liters is sufficient as the Yeolmu and Eolgari will release their own liquid. (2 liters of water for 2 bunches of Yeolmu and 1 bunch of Eolgari).

Step 12
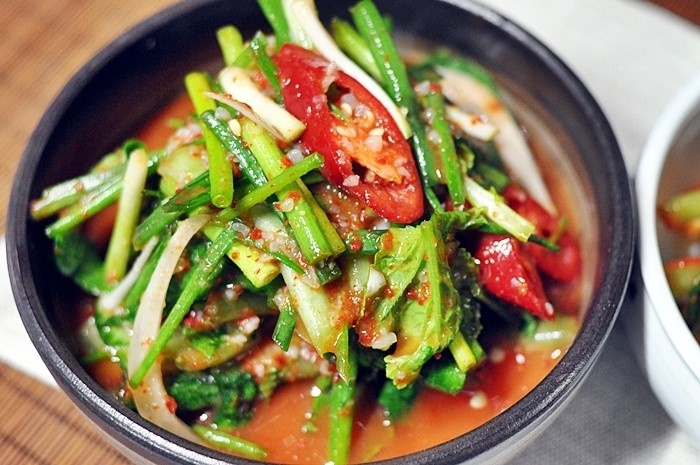
To add color and crunch to the Yeolmu Mul Kimchi, don’t grind all the red chili peppers and onions. Reserve some, slice them diagonally, and arrange them on top of the kimchi as a garnish. This makes it visually appealing and enhances the overall flavor.

Step 13
By adding ground red chili peppers instead of just gochugaru, we’ve created Yeolmu Kimchi and Yeolmu Mul Kimchi with a wonderfully refreshing and spicy taste. Enjoy this delicious summer delicacy!


