Rich Chocolate Cream Cake
Indulge in a Rich Chocolate Cream Cake: Moist Chocolate Sponge with Generous Chocolate Cream Filling!

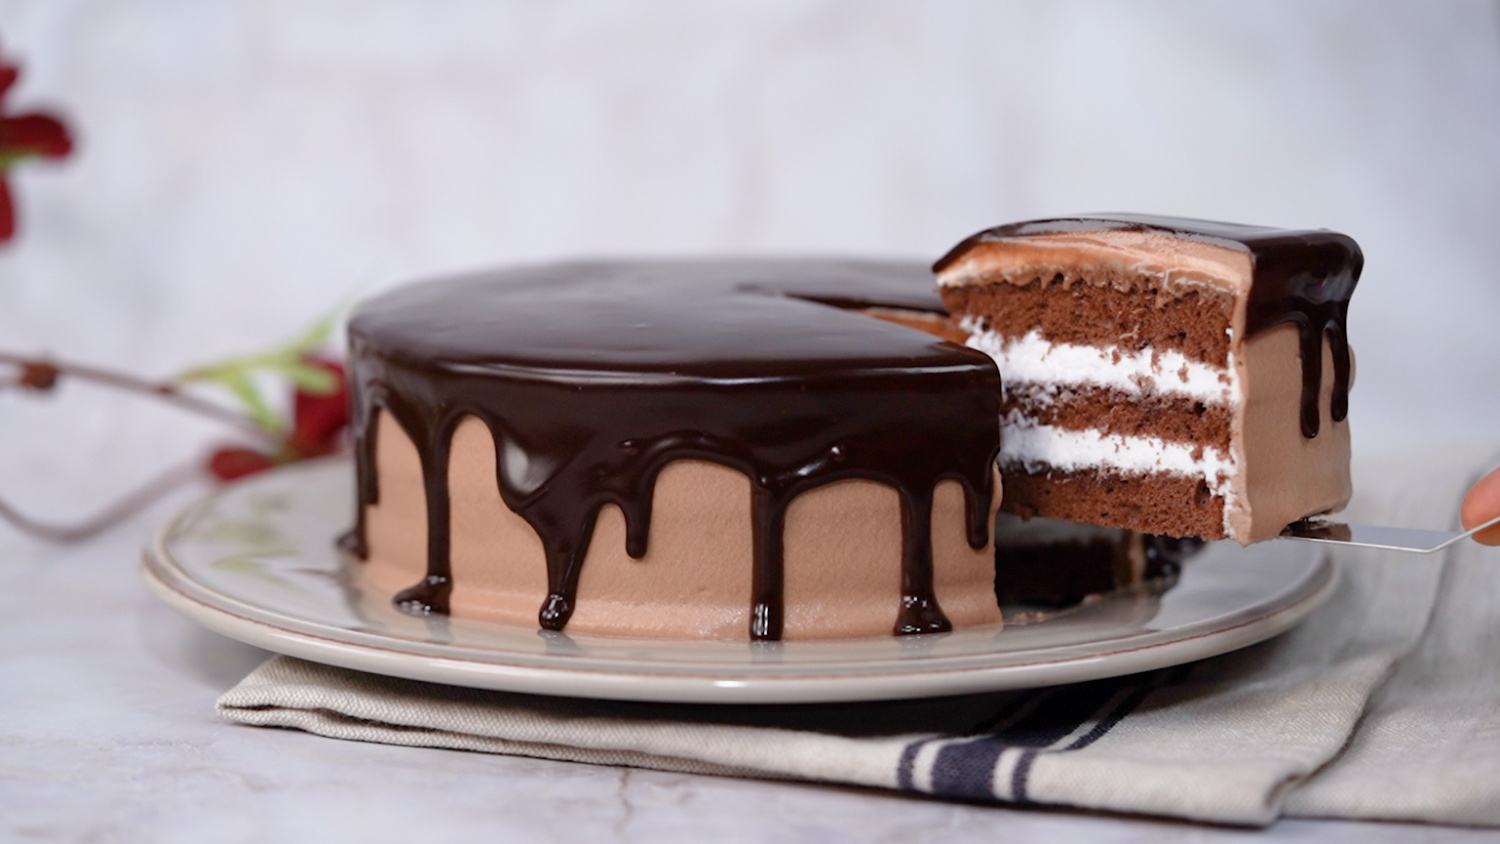
The quintessential cake for any special occasion! To celebrate Valentine’s Day, we’re delighted to present a decadent ‘Rich Chocolate Cream Cake’ layered with luscious chocolate cream. This recipe utilizes the ‘Chocolat Genoise’ sponge cake previously shared, making it achievable for you to create a stunning cake at home! From ‘10000recipe.com’ (Sae-sang ui Modeun Recipe), let us help make your special moments even sweeter.
Cake Base- Chocolat Genoise (Size 1) 1 cake
Rich Ganache- Dark chocolate 80g
- Heavy cream 80g
Chocolate Cream for Icing- Rich ganache 40g
- Heavy cream 100g
Cream for Filling- Heavy cream 180g
- Sweetened condensed milk 20g
Syrup- Water 60g
- Sugar 30g
- Dark chocolate 80g
- Heavy cream 80g
Chocolate Cream for Icing- Rich ganache 40g
- Heavy cream 100g
Cream for Filling- Heavy cream 180g
- Sweetened condensed milk 20g
Syrup- Water 60g
- Sugar 30g
- Heavy cream 180g
- Sweetened condensed milk 20g
Syrup- Water 60g
- Sugar 30g
Cooking Instructions
Step 1
[Make the Rich Ganache] Pour the 80g of heavy cream into a saucepan and heat over medium-low heat until the edges just begin to bubble. Immediately remove from heat and pour over the finely chopped dark chocolate. Let it sit for about 1 minute, then stir gently with a rubber spatula until the chocolate is completely melted and the ganache is smooth and glossy. Set aside 40g of the ganache for the icing and let it cool to room temperature. Keep the remaining ganache for decoration. 
Step 2
[Prepare the Creams] For the icing, place the 100g of heavy cream in a bowl set over an ice bath. Whip until it reaches about 60% consistency – soft peaks. For the filling, combine the 180g of heavy cream with 20g of sweetened condensed milk. Whip this mixture until it’s stiff, reaching about 90% consistency. Transfer the filling cream to a piping bag or cover and refrigerate. It’s crucial to whip it stiffly to prevent the cake from collapsing. 
Step 3
[Apply Syrup and Filling Cream] Slice the prepared Chocolat Genoise into two or three layers, each about 1.5cm thick. Place one cake layer onto your serving plate or into a cake ring. Brush the syrup evenly over the surface to moisten the sponge. Then, spread a generous layer of the stiffly whipped filling cream over the syrup. 
Step 4
[Layer the Cake and Apply First Icing] Add another cake layer (about 1cm thick), brush it with syrup, and then spread a thin layer of the filling cream. You can repeat this layering process for more tiers if desired. Place the final cake layer, brush with syrup, and then use any remaining filling cream to thinly ice the entire cake – top and sides. This initial thin layer, called a ‘crumb coat,’ helps to trap any loose crumbs and create a smooth surface for the final icing. 
Step 5
[Mix Chocolate Cream (Part 1)] Take the 40g of ganache that was cooled to room temperature. Ensure it’s not too cold. Gradually add the ganache to the 100g of whipped cream prepared for icing, mixing well after each addition. It’s best to start with a small amount of ganache and add more as needed to achieve the desired consistency. 
Step 6
[Finish Chocolate Cream and Adjust Consistency] Add the remaining ganache to the cream mixture. Scrape down the sides of the bowl and gently fold everything together with a whisk, incorporating air as you mix to achieve a light texture. If the cream is too stiff, you can add a little more cold heavy cream. If it’s too soft, chill it briefly. The final chocolate cream should hold its shape when scooped with a spatula. 
Step 7
[Final Icing] Generously apply the finished chocolate cream over the crumb-coated cake. Using a spatula or icing knife, gently spread the cream over the top of the cake, then smooth the sides by rotating the cake and drawing the spatula downwards from the top edge. Don’t worry if it’s not perfectly smooth at first; wiping your spatula frequently will help achieve a cleaner finish. 
Step 8
[Chocolate Drip Decoration] Gently warm the remaining ganache (set aside for decoration) until it’s pourable. Carefully drip the slightly warmed ganache around the edges of the cake, allowing it to naturally cascade down the sides. This adds both visual appeal and an extra layer of rich chocolate flavor. Your unique and beautiful Rich Chocolate Cream Cake is now complete! 


