Sea Purslane Kimchi Pancake: A Harmony of Crispiness and Freshness
Sea Purslane Kimchi Pancake: A Christmas-Inspired Green Delight

When you think of Christmas, red and green are the first colors that come to mind! This kimchi pancake is made with fresh sea purslane, reminiscent of the festive season’s palette. Sea purslane is a delicious and nutritious vegetable, known for its slightly salty, crisp texture and absence of bitterness, making it a favorite for everyone. Combined with tangy kimchi and fried to a delightful crisp using tempura flour, this pancake offers a unique and flavorful experience. We’ve detailed each step to ensure even beginners can easily recreate this vibrant and healthy dish.
Pancake Ingredients- 100g fresh sea purslane
- 80g well-fermented napa cabbage kimchi
- 1 small onion
- 2 cups tempura flour (for extra crispiness)
- Vegetable oil for frying (generous amount)
Cooking Instructions
Step 1
Begin by preparing all your ingredients. Rinse the sea purslane and pat it dry. Finely chop the kimchi and thinly slice the onion.

Step 2
Sea purslane, a vibrant green vegetable grown near the sea, has a pleasant salty flavor and a crisp texture without any bitterness, making it highly versatile and enjoyable for most palates. It’s packed with chlorophyll, dietary fiber, and Vitamin C, making it a fantastic healthy ingredient. Today, we’ll be transforming this nutritious sea purslane into a unique and delightful kimchi pancake.

Step 3
Take your well-fermented kimchi and chop it finely. You don’t need to squeeze out the excess juice; the kimchi brine adds flavor and moisture to the batter. Chop it as finely as possible for even distribution.

Step 4
Peel the onion, wash it thoroughly, and then slice it into very thin strips. This fine julienne will add a subtle sweetness and pleasant texture to the pancake.

Step 5
Roughly chop the sea purslane. You can cut the thicker stems a bit smaller and leave the leaves in larger pieces to maintain a good texture in the finished pancake.

Step 6
In a large mixing bowl, combine the tempura flour and cold water. Using tempura flour is key to achieving an exceptionally crispy pancake! Start with the recommended amount of water, but be prepared to adjust it slightly for the perfect batter consistency.

Step 7
Since we’re using kimchi without squeezing out its liquid, aim for a batter that is thick enough to hold the ingredients together but not overly dense. Whisk the flour and water until you have a smooth, lump-free batter. It should be pourable but not watery.

Step 8
Add the finely chopped kimchi and thinly sliced onion to the batter.

Step 9
Stir everything together until well combined. Your delicious kimchi pancake batter is now ready to be cooked!

Step 10
Heat a generous amount of vegetable oil in a non-stick skillet over medium heat. Once the oil is hot, ladle a good portion of the batter onto the pan and spread it out evenly into a round shape. Aim for a moderate thickness for optimal crispiness.

Step 11
Generously top the batter with the prepared sea purslane. Don’t be shy with the greens; they will wilt down as they cook, so pile them on!

Step 12
Once the bottom of the pancake is golden brown and crispy, carefully flip it over using a spatula. Continue to cook the other side until it’s also golden brown and crispy. Maintaining the right oil temperature is crucial for that perfect crunch.

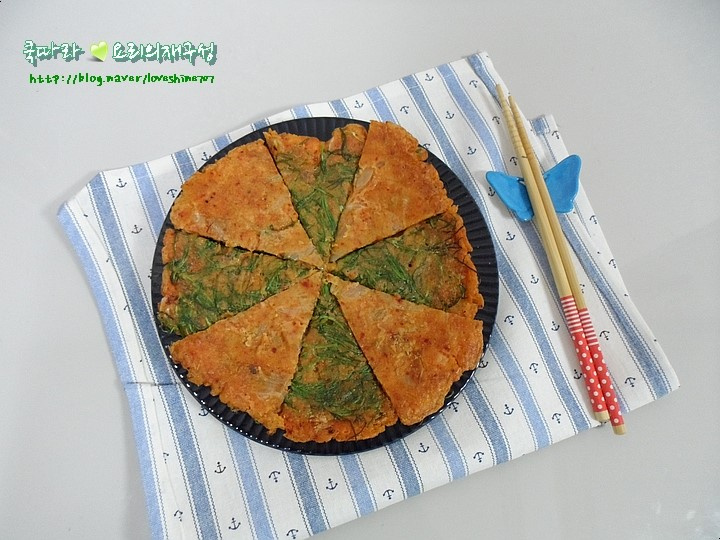
Step 13
Your sea purslane kimchi pancake is ready! It looks beautifully golden brown and appetizing, with the vibrant green of the sea purslane adding a festive touch.

Step 14
Slice the pancake into wedges, similar to cutting a pizza, and arrange them nicely on a serving plate. Enjoy it hot for the best texture and flavor.


