Shrimp Cartoccia: A Mediterranean Steamed Delight
Shrimp, Don’t Just Grill It, Steam It Mediterranean Style! (feat. Shrimp Cartoccia)

Hello there! I’m Repanam, the guy who sells ‘recipes with reason’ on YouTube. While grilled shrimp is undeniably delicious, eating it repeatedly can sometimes become tiresome, right? That’s why I’ve prepared a recipe to enjoy shrimp in a more unique way – with ‘Shrimp Cartoccia,’ a vibrant Mediterranean-style steamed dish! This recipe, inspired by traditional Italian cooking methods, is a beautiful fusion of colorful ingredients and aromatic herbs. It’s as visually appealing as it is delicious, making it a perfect dish for entertaining guests on special occasions!
Main Ingredients- 15 Large Whiteleg Prawns (approx. 20g each)
- 1 Potato
- 6 Cherry Tomatoes
- 6 Scallops (Hong-gari-bi)
- 1/2 Onion
- 10 Whole Garlic Cloves (heads only)
- 1 Lemon (for slicing)
- 1 Sprig of Dill
- 5 Black Olives
- 5 Green Olives
Seasoning & Others- Pinch of Salt
- Pinch of Black Pepper
- Generous amount of Olive Oil
- Pinch of Salt
- Pinch of Black Pepper
- Generous amount of Olive Oil
Cooking Instructions
Step 1
First, prepare 15 large Whiteleg Prawns (about 20g each). Nowadays, with increased domestic aquaculture, you can easily find shrimp in various sizes.

Step 2
Let’s start by cleaning the shrimp. First, remove the sharp, pointy part of the head, which can easily cause injury.

Step 3
Next, trim off any messy or unsightly ‘antennae’ or ‘whiskers’ from the shrimp.

Step 4
To ensure a cleaner dish, remove the ‘digestive tract’ or ‘vein’ located near the tail, which can release water during cooking.

Step 5
For visual appeal, leave half of the shrimp with their shells on. For the other half, peel them completely, removing both the head and shell, to best enjoy their plump and firm texture. It’s recommended to leave the tail on for presentation.

Step 6
When peeling the shrimp, insert a metal chopstick under the belly and gently pry it open. This technique makes peeling the shell much easier and smoother. You’ll find this method incredibly helpful!

Step 7
For the shrimp that have been peeled, gently pull out the ‘intestines’ from the head section.

Step 8
Remove the ‘intestines’ from the belly side as well. This is said to reduce bitterness and cholesterol intake. (However, for shrimp that are not exceptionally large like King Tiger Prawns, the difference might be negligible, so it’s okay to skip this step if you prefer.)

Step 9
When peeling, make sure to leave the tail attached! The ‘cocktail’ style, where the tail is left on, significantly enhances the visual appeal of the shrimp, making it look more appetizing. We highly recommend keeping the tail on for a beautiful presentation.

Step 10
Once the shrimp are cleaned, season them with salt and pepper. It’s common to forget seasoning when you’re focused on the detailed preparation of the shrimp, so please don’t forget this essential step!

Step 11
Next, thinly slice the potato. We will use it without washing to retain its starch for a better texture.

Step 12
Prepare the garlic by peeling off the outer layers and keeping the whole cloves. It’s advisable to remove the very tip of the garlic head, as it’s sometimes associated with causing stomach discomfort.

Step 13
Since potatoes and whole garlic cloves take longer to cook than other ingredients, we’ll pre-cook them. Wrap them separately in parchment paper and air fry at 180°C (350°F) for about 20 minutes. This ensures they are tender and moist before adding them to the main dish.

Step 14
When preparing the parchment paper, folding it in half both horizontally and vertically will help you easily find the center, making it easier to place ingredients precisely.

Step 15
Now, let’s prepare the other accompanying ingredients: 6 scallops (Hong-gari-bi), 1/2 onion chopped into bite-sized cubes, 5 black olives, and 5 green olives, along with 6 cherry tomatoes.

Step 16
Slice 1 lemon thinly for a zesty flavor, and prepare 1 sprig of fresh dill for its aromatic touch.

Step 17
Once the potatoes and garlic are pre-cooked in the air fryer, place one sheet of parchment paper in the air fryer basket, and then place the cooked potatoes and garlic on top of it. This creates a double layer of parchment paper at the bottom, effectively preventing any juices from leaking out during cooking.

Step 18
On the parchment paper, arrange half of the cubed onion and 3 scallops. Then, place the seasoned shrimp neatly on top of these.

Step 19
Generously drizzle olive oil over the shrimp and vegetables. Olive oil enhances the flavors and helps keep the ingredients moist as they cook.

Step 20
Arrange the remaining onion, 3 scallops, cherry tomatoes, green olives, and black olives around the shrimp. Drizzle with more olive oil generously.

Step 21
Finally, artfully place the sliced lemon and the sprig of dill over the ingredients. The lemon’s zest and dill’s fragrance will elevate the overall flavor profile of the dish.

Step 22
Carefully gather another sheet of parchment paper and use it to create a ‘lid’ over the ingredients. This encloses the steam and aromas, ensuring the seafood and vegetables cook gently and stay incredibly moist.

Step 23
Now, place the prepared cartoccia back into the air fryer and cook at 180°C (350°F) for approximately 40 minutes. This slow cooking process, similar to steaming, allows the natural flavors of each ingredient to shine through.

Step 24
As you wait for the moment to open the air fryer door, with anticipation, the time can feel as long as two hours. Get ready to reveal the wonderful creation!

Step 25
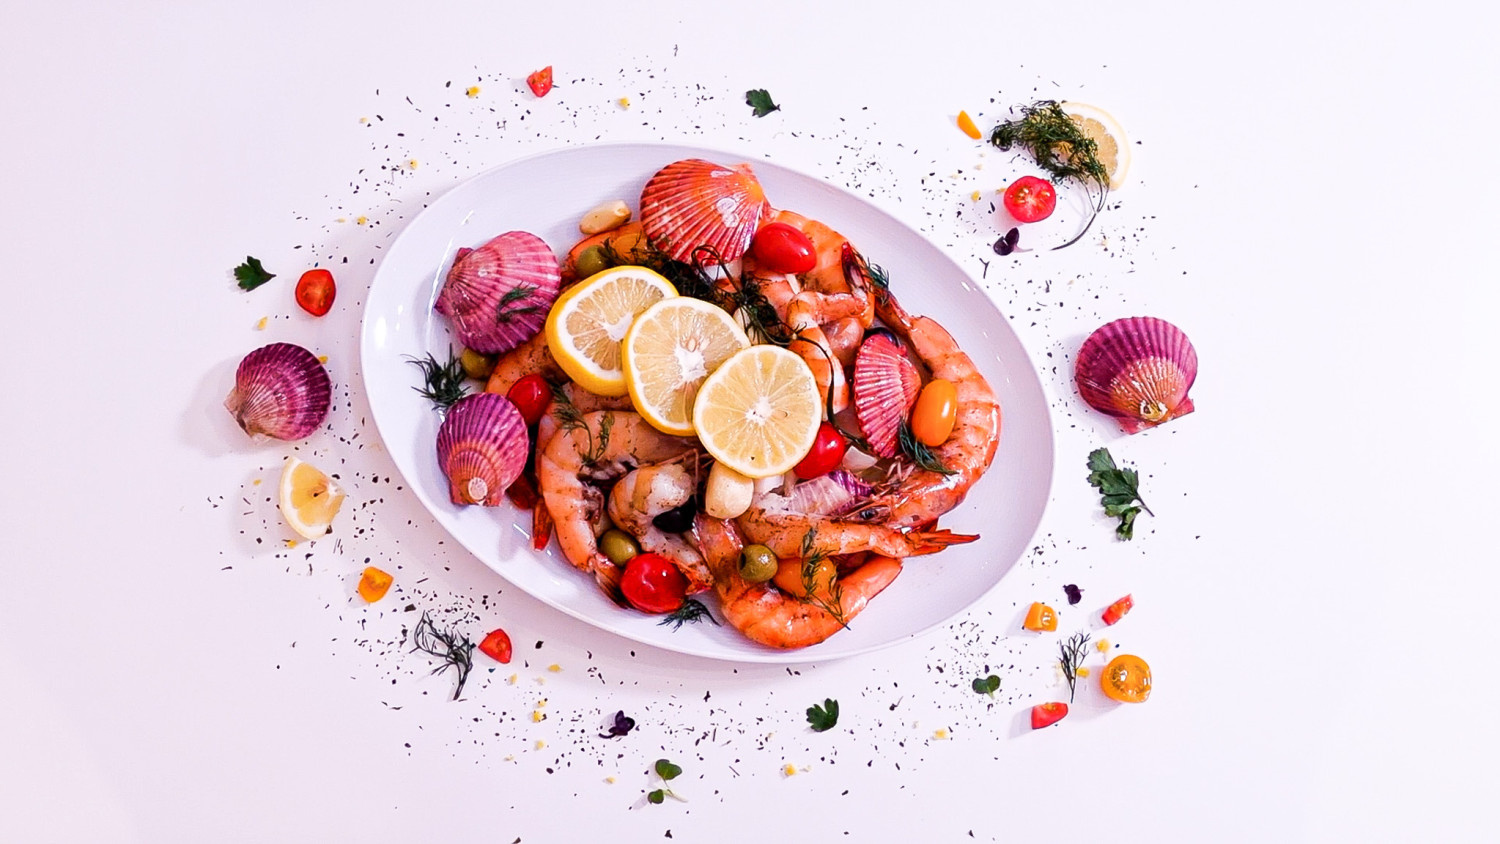
Ta-da! Isn’t it absolutely beautiful and appetizing? The vibrant colors and abundance of ingredients are truly captivating.

Step 26
Carefully transfer the finished Shrimp Cartoccia onto an elegant oval serving platter. The steam rising from the dish is sure to whet your appetite.

Step 27
Finally, finely chop the remaining dill sprig and sprinkle it over the finished dish. The fresh dill aroma adds the perfect finishing touch.

Step 28
And there you have it – Shrimp Cartoccia, a dish that seems to capture all the vibrant colors of the world! Enjoy this visually stunning and deliciously satisfying meal!


