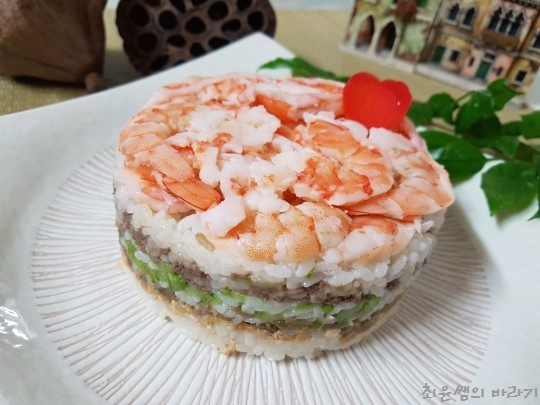
Shrimp Sushi Cake
A Heartfelt Shrimp Sushi Cake Recipe

Introducing a beautiful and carefully crafted sushi cake made with love. It’s perfect for special occasions like birthdays, but also wonderful for adding a touch of elegance to any meal. While my initial attempts weren’t the prettiest, with a few tries, I can now create a quite impressive sushi cake! Make someone’s day special with this homemade delight.
Main Ingredients- 250g cooked rice
- 10 medium shrimp
- 100g minced beef
- 80g simmered burdock root (store-bought or homemade)
- 1/2 cucumber
- 100g seasoned fried tofu skins (aburaage), triangular shape (about 14 pieces)
- 30g seasoned sushi vinegar mix for inari sushi (store-bought)
- Cake mold (12cm diameter, 4.5cm height)
Beef Stir-fry Seasoning- 1 Tbsp soy sauce
- 1 tsp sugar
- 1/2 tsp minced garlic
- 1 tsp sesame oil
- 1/4 tsp black pepper
- 1/4 tsp toasted sesame seeds
- 1 Tbsp soy sauce
- 1 tsp sugar
- 1/2 tsp minced garlic
- 1 tsp sesame oil
- 1/4 tsp black pepper
- 1/4 tsp toasted sesame seeds
Cooking Instructions
Step 1
Prepare the medium shrimp and cucumber. Ensure the shrimp are fresh.

Step 2
Peel the shrimp, removing the head, tail, and legs. Make a shallow cut along the back to remove the vein. Boil them in water until they turn pink and are cooked through. Be careful not to overcook, as this can make the shrimp tough.

Step 3
Once cooked, let the shrimp cool slightly. Then, slice them in half lengthwise for decoration. You can set aside a few whole shrimp for garnish if desired.

Step 4
Wash the cucumber thoroughly. Use a spoon to gently scoop out the seedy core. This step helps prevent the cucumber from making the sushi mixture too watery and improves the texture.

Step 5
Finely dice the cucumber after removing the seeds. Lightly squeezing out excess moisture from the diced cucumber will prevent the rice mixture from becoming too wet.

Step 6
Get ready with the store-bought seasoned fried tofu skins (aburaage) and the seasoned sushi vinegar mix for inari sushi. Using pre-made products makes preparation convenient.

Step 7
Finely dice the seasoned fried tofu skins, similar to how you diced the cucumber. The sweet and savory flavor of the tofu will complement the sushi rice beautifully.

Step 8
Prepare the minced beef and the simmered burdock root. You can use either store-bought or homemade burdock root.

Step 9
Chop the simmered burdock root into small, bite-sized pieces. The slightly crunchy texture and aroma of the burdock will add depth to the sushi cake.

Step 10
In a bowl, combine the minced beef with all the ‘Beef Stir-fry Seasoning’ ingredients (soy sauce, sugar, minced garlic, sesame oil, black pepper, and sesame seeds). Mix well. Heat a non-stick pan over medium-low heat without any oil. Add the seasoned beef and stir-fry until it’s cooked through and the liquid has evaporated.

Step 11
Cook the rice so it’s slightly firm and fluffy. Overly moist rice can cause the sushi cake to lose its shape. Once the rice is cooked, add the seasoned sushi vinegar mix and gently fold it in using a rice paddle, as if you’re cutting the rice, to create sushi rice.

Step 12
To the sushi rice, add about 1 tablespoon each of the prepared minced beef, diced burdock root, diced cucumber, and diced fried tofu. Gently mix each addition into the rice, ensuring it’s evenly distributed without clumping.

Step 13
Prepare your cake mold. This mold, a gift from my sister, was purchased from the baking section of Lotte Mart and measures 12cm in diameter and 4.5cm in height. If you don’t have a special mold, you can use a round container or even a cleaned milk carton of a similar size.

Step 14
Line the inside of the cake mold with plastic wrap. This will make it easy to unmold the finished sushi cake. Start by layering the halved shrimp at the bottom, followed by a layer of sushi rice, then the beef mixture, cucumber, fried tofu, and finally another layer of sushi rice. As you add each layer, press down firmly with the back of a spoon to compact the ingredients and create a neat shape. Once filled, carefully invert the mold onto a serving plate, keeping the shape intact, and gently lift the mold away. Finally, peel off the plastic wrap to reveal your beautiful sushi cake.

Step 15
If you don’t have a dedicated cake mold, you can get creative with common household containers to make your own sushi cake molds. For example, cleaned milk cartons or yogurt cups can be repurposed.

Step 16
For a milk carton, a diameter of about 8.5cm would be suitable. A height of around 6cm is generally good for shaping a cake. By cutting and shaping a milk carton, you can create a simple mold for your sushi cake.

Step 17
Using various sized containers you have at home, you can create sushi cakes of different sizes, from small ones for kids to larger ones to share. Unleash your creativity for a fun cooking experience!


