Soft and Fluffy Butter Rolls
Homemade Butter Rolls Made with a Meister Multi Oven

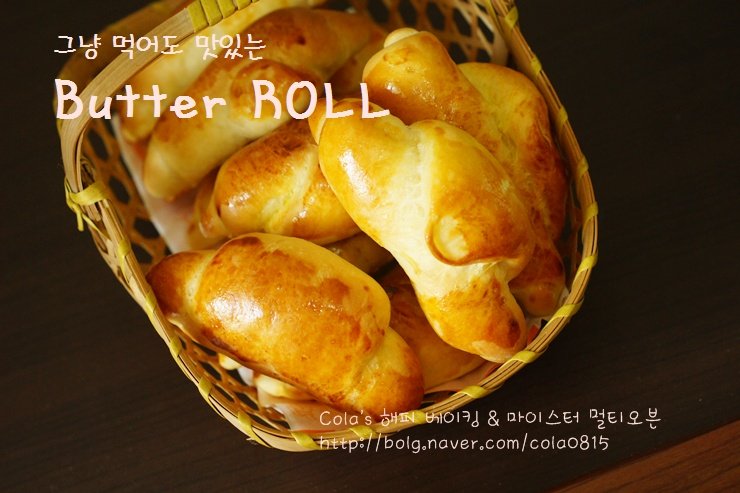
Experience the nostalgic butter rolls that the protagonist Takgu practiced making in the drama ‘King of Baking, Takgu’! These rolls are slightly crispy on the outside and incredibly moist and buttery on the inside, making them perfect for a snack with milk or a hearty breakfast spread with jam or butter. This recipe, utilizing a Meister Multi Oven, ensures you can easily achieve delicious results at home.
Butter Roll Dough Ingredients- 320g Bread Flour
- 6g Instant Dry Yeast
- 40g Sugar
- 5g Salt
- 1 Large Egg
- 80ml Milk
- 60ml Water
- 50g Unsalted Butter, softened
- 1 Egg Yolk (for egg wash)
Cooking Instructions
Step 1
To begin, prepare the liquid ingredients for your bread maker. In a bowl, whisk together the water, milk, and egg. Gently warm the mixture to lukewarm (around 35-40°C or 95-104°F) – it should feel comfortably warm to the touch, not hot. Pour this mixture into the bread maker’s pan. Be careful not to overheat, as this can kill the yeast.

Step 2
Add the bread flour to the bread maker pan over the liquid mixture. Next, add the salt, instant dry yeast, and sugar separately on top of the flour. It’s best to keep the salt and yeast from directly touching each other, as salt can inhibit yeast activity.

Step 3
Select the ‘Dough’ or ‘Knead’ cycle on your bread maker. Once the ingredients have started to combine into a shaggy dough, add the softened butter (at room temperature, so it’s pliable). Let the bread maker continue kneading until the dough is smooth and elastic, and the butter is fully incorporated.

Step 4
Once the dough cycle is complete, turn the dough out onto a lightly floured work surface. Gently punch down the dough to release the trapped gases. Cover the dough with a clean, damp kitchen towel and let it rest for 10-20 minutes. This resting period, called ‘benching’ or ‘intermediate proofing,’ relaxes the gluten, making the dough easier to shape.

Step 5
After the intermediate proof, gently degas the dough again by pressing down on it. Divide the dough into equal portions, approximately 40g each. Using a kitchen scale will ensure uniform sizing, which leads to even baking.

Step 6
Take each piece of dough and gently roll it between your palms to form a smooth, round ball. This shaping helps to create a nice surface texture for the final rolls.

Step 7
Now, let’s shape the rolls. Lightly dust your hands with flour. Using one hand to gently press down on the bottom of the dough ball, use your other hand to carefully pull the dough surface outwards and upwards, creating a teardrop or oval shape. Refer to the accompanying image for a visual guide on this technique.

Step 8
Use a rolling pin to evenly flatten the shaped dough. Roll it out to a consistent thickness, being careful not to roll it too thin. Aim for a uniform sheet of dough.

Step 9
Shape the flattened dough into a triangle, starting from the wider end and gently rolling it towards the narrower tip, as shown in the picture. Be gentle to avoid tearing the dough or deflating it too much. Once you’ve shaped more than half of your dough pieces, it’s time to prepare for the second proof. Briefly turn on your oven to create a warm environment. Mist the inside of the oven with water using a spray bottle, then turn off the oven. When you can comfortably hold your hand inside without feeling excessive heat, the environment is ready. This creates a warm, humid space ideal for proofing.

Step 10
Place the shaped rolls onto a baking sheet lined with parchment paper, ensuring they have ample space between them. Remember, they will expand significantly during the final proof.

Step 11
Begin the second proofing stage. Aim for approximately 40 minutes, but prioritize observing the dough’s development over strictly adhering to the time. The rolls are ready for baking when they have visibly increased in size, roughly doubling their original volume.

Step 12
Once the rolls have finished their second proof, carefully remove the baking sheet from the warm proofing environment. Preheat your Meister Multi Oven to 200°C (392°F), selecting the convection function and top/bottom heating elements for 15 minutes. While the oven preheats, prepare an egg wash by lightly whisking the egg yolk with a splash of water. Brush this mixture evenly over the surface of the proofed rolls for a beautiful golden-brown crust.

Step 13
Place the egg-washed rolls into the preheated oven and bake until golden brown. The recipe suggests 200°C for 15 minutes, but oven temperatures can vary. If your rolls aren’t as golden as you’d like after 15 minutes, you can increase the temperature slightly to 210°C (410°F) and bake for a few additional minutes, keeping a close eye to prevent burning. Adjust baking time and temperature as needed based on your oven’s performance.

Step 14
As soon as the butter rolls come out of the oven, while they are still warm, gently brush the tops with a pat of butter. Placing the butter on top of the oven will allow it to melt naturally from the residual heat, so there’s no need to use a microwave. The melted butter will soak into the rolls, adding extra flavor and a lovely sheen.

Step 15
Allow the buttered rolls to cool slightly before enjoying. Your delicious homemade butter rolls are now complete! They are wonderful served warm or at room temperature.


