Spaceship Kimchi Fried Rice
[Home Cooking Level 3] Make a Restaurant-Style ‘Spaceship Kimchi Fried Rice’ and Enjoy a Korean BBQ Vibe at Home

You can make restaurant-quality kimchi fried rice right at home with a regular frying pan! You’ll love these tips that make it easy for anyone to achieve that delicious, savory flavor. Let’s get cooking!
Main Ingredients- 1/2 cup thinly sliced green onions
- 1/3 bowl bacon or sausage ham (approx. 50g)
- 1/2 bowl finely chopped kimchi (approx. 100g)
- 1 bowl warm cooked rice (approx. 200g)
- 3 eggs
- 1 handful shredded cheese (approx. 30g)
Cooking Instructions
Step 1
First, wash the green onions thoroughly and slice them thinly. Finely chop the bacon or sausage ham into bite-sized pieces. Tip: The white part of the green onion has a stronger aroma, so using more of the white part will result in a richer flavor.

Step 2
For the kimchi, it’s best to use the stem part rather than the leafy parts. Chop it finely with scissors. The leaves can become mushy and lose texture when stir-fried.

Step 3
Place the sliced green onions generously in a frying pan or pot. Pour about 4 tablespoons of cooking oil over them. *Caution: If using frozen green onions, be careful as the oil can splatter. Start with low heat and cook the green onions slowly.

Step 4
Once the green onions become translucent and soften, add the chopped bacon (or sausage) and stir-fry together. When the bacon fat starts to render and turn golden brown, push the ingredients to one side of the pan. Pour 1-2 tablespoons of soy sauce into the empty space and let it caramelize slightly. This will add a deep, savory flavor. Stir everything together, being careful not to burn the soy sauce. (This quantity is for 1 bowl of rice).

Step 5
After the soy sauce has integrated, add the chopped kimchi and stir-fry. If you want a richer, more appetizing color, add 2 tablespoons of red pepper powder at this stage (optional). Stir-fry until the kimchi is fully cooked and tender. Once the kimchi is done, turn off the heat and add the warm cooked rice. Mix everything together thoroughly.

Step 6
If you enjoy the slightly toasted, crispy rice at the bottom of the pan, turn the heat back on to low. Press the rice down gently against the pan as you stir-fry. This will create a delightful crispy texture and enhance the rice’s flavor.

Step 7
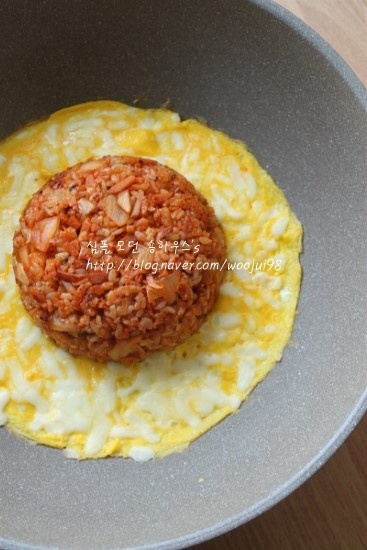
Now it’s time to plate the kimchi fried rice. Pack the rice tightly into a bowl, pressing it down firmly. Then, carefully invert the bowl onto your serving plate, holding the frying pan on top. Lift the pan to reveal your perfectly shaped ‘Spaceship Kimchi Fried Rice’!

Step 8
For a perfectly fluffy fried egg, try the tip shared by Yoon Doo-joon! Using two forks makes it easier and faster to whisk the eggs. Of course, you can also whisk them with chopsticks.

Step 9
Heat a little oil in a clean frying pan over medium heat. Pour in the whisked egg and let it set slightly. Gently scramble the egg with chopsticks until it’s soft and custardy, being careful not to overcook it. Keep the heat on low to prevent the egg from burning. Sprinkle shredded cheese generously over the cooked egg, then quickly cover the pan. Let it rest for a moment, allowing the residual heat to melt the cheese into a gooey, delicious topping. Enjoy the wonderful combination of soft egg and stretchy cheese!


