Special Beef Inari Sushi: A Fun Cooking Activity for Kids
Make Delicious Inari Sushi with Your Children: A Perfect Kitchen Adventure!

Don’t just make regular inari sushi! Elevate your meal by adding flavorful minced beef, turning it into a fun cooking activity with your kids and a delicious dish everyone will love. It’s perfect for special occasions or as a delightful weekend treat for the family.
Essential Ingredients- 1 packet Inari Sushi Kit (includes seasoning sauce and garnish)
- 1 standard rice bowl of short-grain rice (approx. 180g)
- 1 paper cup of glutinous rice (approx. 100g)
- 1 paper cup of minced beef (approx. 100g)
Cooking Instructions
Step 1
First, prepare the fried tofu pouches from your Inari Sushi Kit. These are the essential ‘wrappers’ for our delicious sushi.

Step 2
The secret to great inari sushi is the rice! For a chewier and softer texture, I recommend mixing short-grain rice with glutinous rice. I used a ratio of 1 standard rice bowl (about 180g) of short-grain rice to 1 paper cup (about 100g) of glutinous rice. Rinse the rice thoroughly.

Step 3
When cooking the mixed rice, use slightly less water than usual. Add 3 paper cups of water and cook the rice.

Step 4
Now, let’s prepare the tofu pouches. Gently rinse them once under cold running water. This helps remove any excess liquid and prepares them for filling.

Step 5
Carefully squeeze out the excess water from the tofu pouches. Be gentle to avoid tearing them. Once squeezed, they are ready to be filled with sushi rice.

Step 6
Next, let’s prepare the flavorful minced beef. In a bowl, combine 1 paper cup (about 100g) of minced beef with 2 Tbsp of soy sauce.

Step 7
Add 1 Tbsp of corn syrup for a touch of sweetness. If you don’t have corn syrup, sugar can be used as a substitute.

Step 8
Stir in 1 Tbsp of Mirin (rice wine) to enhance the beef’s flavor and reduce any gamey notes.

Step 9
Add 1 Tbsp of perilla oil for a nutty aroma. Sesame oil is also a great alternative.

Step 10
Heat a pan over medium heat and cook the seasoned minced beef. Stir-fry until the liquid has mostly evaporated and the beef is well-coated. This concentration of flavor is key!

Step 11
Once the rice is cooked, transfer the desired amount to a large bowl. Sprinkle the Inari Sushi Kit sauce over the rice. This sauce provides the signature sweet and tangy flavor.

Step 12
Yes, add all of the sauce packet from the kit!

Step 13
For an extra tangy kick, add 2 Tbsp of rice vinegar. Feel free to adjust this to your preference for sourness.

Step 14
Add 1 Tbsp of sugar to balance the flavors. You can increase this slightly if making it for kids who prefer sweeter tastes.

Step 15
Sprinkle in 1 Tbsp of toasted sesame seeds for added texture and nutty flavor. Rubbing them between your hands before adding can enhance their aroma.

Step 16
Now, add the cooked savory minced beef to the rice mixture. This beef is what makes these inari sushi so special!

Step 17
Gently mix all the ingredients together using a rice paddle or spatula. Be careful not to mash the rice grains; aim for a light and fluffy consistency. Your delicious beef inari sushi rice is now ready!

Step 18
Using a spoon, carefully fill each prepared tofu pouch with the sushi rice mixture. Gently press down with your fingers to pack the rice snugly and create a neat shape. Fill them generously!

Step 19
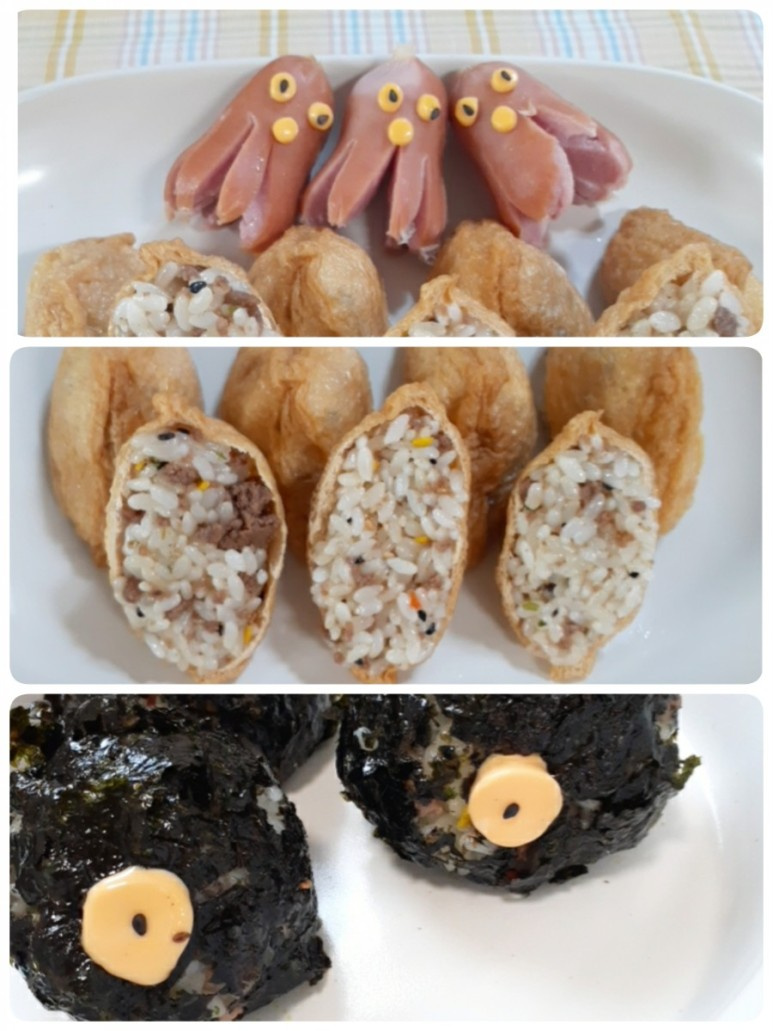
Let’s make some fun sausage octopuses! Cut the sausages more than halfway up, making about 8 evenly spaced cuts to form the tentacles. Scoring them beforehand helps them curl nicely.

Step 20
Boil the cut sausages in a pot of water. As they cook, the cuts will open up, revealing the adorable octopus shape.

Step 21
Now for the fun part – decorating! The cheese works best when slightly warm, so work efficiently. 1. Use a straw or small circular cutter to punch out circles from the cheese. 2. Gently blow through the straw to release the cheese circle. 3. Carefully place the cheese circle onto the inari sushi to create eyes. 4. Finish by adding black sesame seeds for the pupils. Easy and cute!

Step 22
First, use a straw or small cookie cutter to punch out round shapes from the cheese slices. This will form the base of the eyes.

Step 23
Gently blow through the straw or use a tool to carefully dislodge the cheese circles. They should come out easily.

Step 24
Place the cheese circles onto your inari sushi and add a black sesame seed to each for the pupil. Now you have adorable eyes!

Step 25
Let’s create some monster inari sushi using seaweed! Place some dried seaweed sheets into a bag and crumble them into small pieces. We’ll use this seaweed ‘dust’.

Step 26
Shape the sushi rice into bite-sized balls or ovals. Making them into easy-to-eat portions is perfect for kids.

Step 27
1. Crumble the seaweed into a plastic bag. 2. Spread the crumbled seaweed evenly on a plate or tray. 3. Roll the sushi balls in the seaweed, pressing gently with your hands to help it adhere. 4. For the monster eyes, you might want a larger ‘pupil’. You can use something like a small bottle cap to gently press and create a larger indentation for the eyes on the seaweed-covered sushi.

Step 28
Voila! Your uniquely decorated inari sushi, made with the help of your little chefs, are complete! We hope this fun cooking experience creates wonderful memories for your children. Enjoy your delicious meal!


