Spicy and Crisp Chives Kimchi: A Golden Recipe to Boost Your Appetite!
The Best When You Have No Appetite! Chives Kimchi Golden Recipe to Revive Your Taste Buds

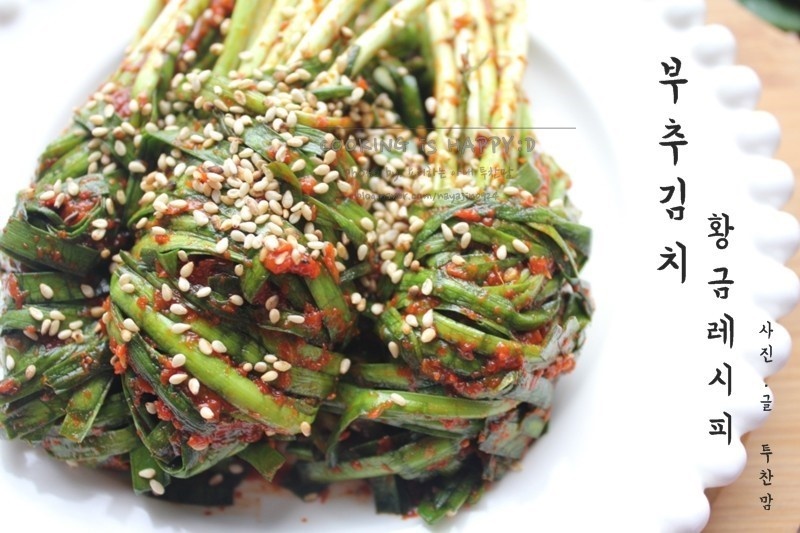
When the weather gets hot and your appetite fades, this spicy and sweet, crisp chives kimchi will bring it right back! It’s so simple to make, anyone can do it, and it’s the perfect side dish to make you eat more rice. It tastes delicious right after making, and even better after it’s fermented.
Basic Ingredients- 500g fresh chives
- 10 Korean green chilies (adjust quantity based on your spice preference)
Golden Seasoning Ingredients- 10 Tbsp Gochugaru (Korean chili flakes, for color and flavor)
- 10 Tbsp Fish Sauce (anchovy or sand lance, for umami)
- 2 Tbsp Saeujeot (fermented salted shrimp, finely minced)
- 2 Tbsp Minced Garlic (fresh garlic recommended)
- 2 Tbsp Plum Extract (for natural sweetness and aroma)
- 1 Tbsp Sugar (adjust to taste)
- 1 Tbsp Grated Ginger (to remove gamey odors and enhance flavor)
- 1 Tbsp Toasted Sesame Seeds (for nutty flavor)
- 10 Tbsp Gochugaru (Korean chili flakes, for color and flavor)
- 10 Tbsp Fish Sauce (anchovy or sand lance, for umami)
- 2 Tbsp Saeujeot (fermented salted shrimp, finely minced)
- 2 Tbsp Minced Garlic (fresh garlic recommended)
- 2 Tbsp Plum Extract (for natural sweetness and aroma)
- 1 Tbsp Sugar (adjust to taste)
- 1 Tbsp Grated Ginger (to remove gamey odors and enhance flavor)
- 1 Tbsp Toasted Sesame Seeds (for nutty flavor)
Cooking Instructions
Step 1
First, measure and prepare all the ingredients needed for the chives kimchi. Wash the chives thoroughly and pat them dry. Wash the Korean green chilies as well.

Step 2
Cut the prepared chives into approximately 5-7cm lengths. Cutting them too short might reduce the satisfying chewiness, so aim for a suitable size.

Step 3
In a bowl, combine all the seasoning ingredients except the gochugaru (fish sauce, minced saeujeot, minced garlic, plum extract, sugar, grated ginger). Mix well to create the seasoning base. If using whole saeujeot, you can mince them or just use the salted shrimp part for smoother mixing.

Step 4
Add the gochugaru to the seasoning base made in step 2 and mix until it’s smoothly dissolved, without any lumps. If the seasoning mixture seems too thick, you can add a tiny bit more fish sauce or water to adjust the consistency.

Step 5
Place the cut chives in a large bowl and pour all the prepared seasoning over them. Now, gently mix with your hands, ensuring the seasoning coats the chives evenly. At this stage, if you like it spicy, you can add thinly sliced Korean green chilies. Be careful not to overmix or mash the chives; gently combine them.

Step 6
The chives kimchi coated with seasoning tastes delicious right away, but for a deeper flavor, transfer it to an airtight container. Let it sit at room temperature for half a day to a full day, then move it to a kimchi refrigerator to ferment for 2-3 days. Fermenting allows the chives to remain crisp while absorbing the flavors beautifully.

Step 7
This is what the chives kimchi looks like after about a day of room temperature fermentation. It looks appetizing, doesn’t it? The flavors start to develop from this point, so it’s ready to eat.

Step 8
Place a piece of this flavorful chives kimchi on a bowl of freshly steamed white rice, and you’ll have a perfect meal without needing any other side dishes! Its spicy and tangy flavor will stimulate your appetite, making it easy to finish two bowls of rice. It’s a true rice thief!


