Spicy and Refreshing Chongmongmu Kimchi (Radish Kimchi)
Learn How to Make Delicious Chongmongmu Kimchi

Chongmongmu, often used in Dongchimi (watery radish kimchi), makes for a delightful side dish when prepared as a traditional kimchi. This recipe will guide you through making a unique and flavorful Chongmongmu kimchi that balances its natural spiciness with a sweet and savory seasoning, perfect for any meal.
Kimchi Ingredients- 2 bunches Chongmongmu (Korean small radishes)
- 1 handful Crown Daisy (or mustard greens)
- 1 handful Green Onions (scallions)
- 6 leaves Mustard Greens (or Korean mustard greens)
1st Filling Seasoning- Coarsely julienned Chongmongmu
- 2 Tbsp minced garlic
- 1/2 Tbsp minced ginger
- 1 Tbsp salted fermented shrimp (saeujeot, with brine)
- 2 Tbsp fish sauce (anchovy or sand lance)
- 1 cup red pepper flakes (gochugaru, approx. 100g)
- 3 Tbsp glutinous rice paste (chapssal pool)
- 1 Tbsp sugar
- 1/2 Tbsp toasted sesame seeds
2nd Coating Seasoning- 5 Tbsp glutinous rice paste (chapssal pool)
- 8 Tbsp fish sauce (anchovy or sand lance)
- 2 cups red pepper flakes (gochugaru, approx. 200g)
- 3 Tbsp minced garlic
- 1 Tbsp minced ginger
- 2 Tbsp sugar
- 1 Tbsp toasted sesame seeds
- Coarsely julienned Chongmongmu
- 2 Tbsp minced garlic
- 1/2 Tbsp minced ginger
- 1 Tbsp salted fermented shrimp (saeujeot, with brine)
- 2 Tbsp fish sauce (anchovy or sand lance)
- 1 cup red pepper flakes (gochugaru, approx. 100g)
- 3 Tbsp glutinous rice paste (chapssal pool)
- 1 Tbsp sugar
- 1/2 Tbsp toasted sesame seeds
2nd Coating Seasoning- 5 Tbsp glutinous rice paste (chapssal pool)
- 8 Tbsp fish sauce (anchovy or sand lance)
- 2 cups red pepper flakes (gochugaru, approx. 200g)
- 3 Tbsp minced garlic
- 1 Tbsp minced ginger
- 2 Tbsp sugar
- 1 Tbsp toasted sesame seeds
Cooking Instructions
Step 1
Gently scrape off any fine hairs or blemishes from the surface of the Chongmongmu using the back of a knife or a scrub brush. Then, wash them thoroughly under running water.

Step 2
Make cross-shaped slits (like an ‘X’) into the bottom of each Chongmongmu. If the radishes are very large, you can cut them into six sections. Chongmongmu has a natural pungency that can be quite strong if eaten immediately. While typically cooked for Dongchimi, a special technique allows for immediate enjoyment of this kimchi. Let’s uncover that secret!

Step 3
Mix 1 tablespoon of New Sugar (a type of sweetener, available at most Asian markets) into the salt you’ll use for brining. This is a key step for balancing flavors.

Step 4
Sprinkle the salt mixture (with New Sugar) generously into the slits of each prepared Chongmongmu. Ensure the salt reaches the inner parts of the radish.

Step 5
The New Sugar adds a subtle sweetness, while the salt draws out moisture and softens the radish through osmosis. This combination helps to tame the radish’s inherent spicy kick, making it more palatable and delicious.

Step 6
Let the radishes brine for about 3 hours. It’s beneficial to turn them over once or twice during this time to ensure even brining.

Step 7
After 3 hours, the Chongmongmu will be pliable and suitably brined.

Step 8
Rinse the brined radishes gently under cool running water. Drain them thoroughly. A helpful tip for effective draining is to place the radishes cut-side down in a colander. Proper brining and draining are crucial for successful kimchi making – they account for half the battle!

Step 9
Prepare the glutinous rice paste (chapssal pool) for the kimchi filling. If you don’t have glutinous rice paste, regular rice paste (from non-glutinous rice) can be used. Avoid using flour paste, as it can alter the kimchi’s flavor and texture negatively.

Step 10
Select the largest of the brined Chongmongmu and coarsely julienne it. This will be a key component of the kimchi filling.

Step 11
Wash the crown daisy and green onions and cut them into approximately 2-3 cm lengths. Cut the mustard greens into similar sizes as well. If mustard greens are out of season, fragrant crown daisy can be a good substitute.

Step 12
In a large bowl, combine the julienned Chongmongmu with minced garlic (2 Tbsp), minced ginger (1/2 Tbsp), salted fermented shrimp (1 Tbsp), and fish sauce (2 Tbsp). Gently mix these ingredients together to coat the julienned radish. This begins the first stage of seasoning.

Step 13
Add the red pepper flakes (1 cup) and glutinous rice paste (3 Tbsp) to the bowl. Mix everything thoroughly until well combined. This mixture forms the primary filling for the Chongmongmu kimchi. Ensure the gochugaru is evenly distributed without clumps.

Step 14
Add the prepared crown daisy, green onions, and mustard greens to the filling. Stir in 1 tablespoon of sugar and 1/2 tablespoon of toasted sesame seeds. Mix gently, aiming to keep the vegetables crisp.

Step 15
Taste the filling and adjust the saltiness if needed with a pinch of salt. This flavorful mixture will be stuffed into the slits of the Chongmongmu. Doesn’t it look appetizing already?

Step 16
Now, let’s prepare the second layer of seasoning – the coating. While many kimchi recipes stop after the filling, a secondary coating adds another dimension of flavor. In a separate bowl, combine glutinous rice paste (5 Tbsp), fish sauce (8 Tbsp), red pepper flakes (2 cups), minced garlic (3 Tbsp), minced ginger (1 Tbsp), sugar (2 Tbsp), and toasted sesame seeds (1 Tbsp). Mix well and let it sit for about 10 minutes to allow the flavors to meld.

Step 17
Add the chopped green onions to the coating mixture and gently toss to combine. (The amount of green onions can be adjusted to your preference.)

Step 18
Gently add the brined Chongmongmu to the coating seasoning. Toss carefully to coat each radish evenly with the seasoning, being mindful not to break the radishes.

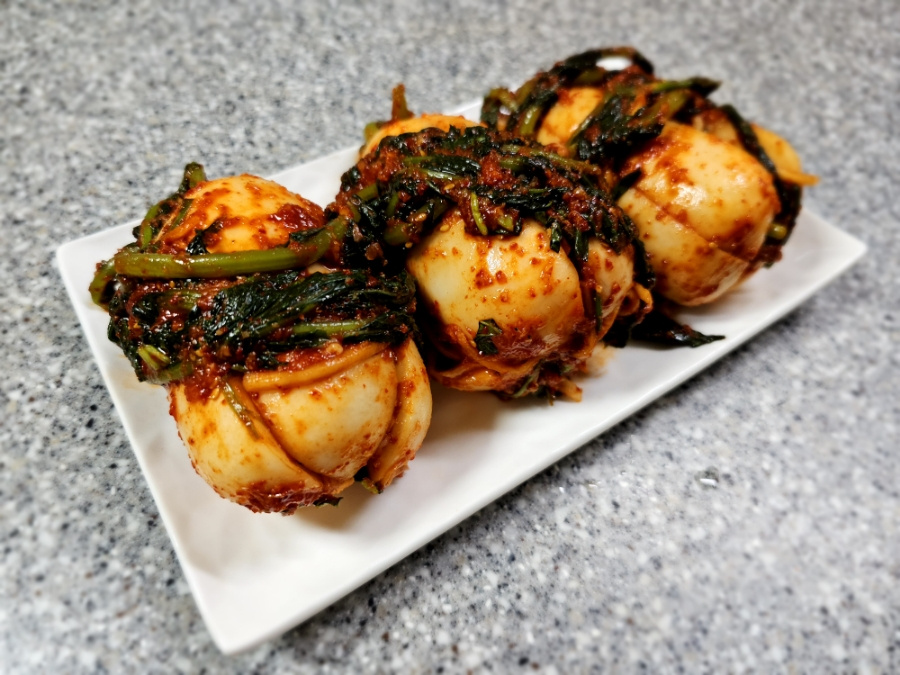
Step 19
Now, carefully spoon the prepared filling (from step 14) into the slits of each Chongmongmu. The reason for using two separate seasoning stages (filling and coating) is to ensure that the flavors penetrate deeply into the larger Chongmongmu, resulting in a much richer taste experience. This layering technique significantly enhances the kimchi’s overall flavor!

Step 20
Your delicious, spicy, and refreshing Chongmongmu kimchi is now complete! Enjoy this wonderful homemade kimchi.


