Spicy and Sweet Delicious Duck Bulgogi Recipe
Easy and Quick Homemade Duck Bulgogi Recipe

Introducing a duck bulgogi recipe that’s surprisingly easy to make, perfect for a hearty meal on hot days. It’s a fantastic option for special occasions like ‘Boknal’ (Korean summer days) and is simple enough for anyone to succeed!
Duck Bulgogi Ingredients- 1 pack fresh duck meat (sliced)
- 1 onion
- 1/2 carrot
- 10 cloves garlic
- 1/2 bunch chives
- 1/2 stalk green onion
- 5 perilla leaves (optional)
- 1-2 Korean chili peppers (optional)
Duck Bulgogi Seasoning- 3 Tbsp gochujang (Korean chili paste)
- 3 Tbsp gochugaru (Korean chili flakes)
- 3 Tbsp soy sauce
- 2 Tbsp cooking wine (mirin or cheongju)
- 1 Tbsp sugar
- 1 Tbsp minced garlic
- Pinch of black pepper
- 2 Tbsp perilla seed powder
- 1 Tbsp sesame oil
- Pinch of sesame seeds
- 3 Tbsp gochujang (Korean chili paste)
- 3 Tbsp gochugaru (Korean chili flakes)
- 3 Tbsp soy sauce
- 2 Tbsp cooking wine (mirin or cheongju)
- 1 Tbsp sugar
- 1 Tbsp minced garlic
- Pinch of black pepper
- 2 Tbsp perilla seed powder
- 1 Tbsp sesame oil
- Pinch of sesame seeds
Cooking Instructions
Step 1
For the duck meat, it’s most convenient to purchase pre-sliced fresh duck meat specifically for ‘duck bulgogi’ from a butcher, a poultry shop, or a large supermarket. If pre-sliced duck isn’t available, buy fresh duck meat intended for bulgogi from online retailers or large grocery stores. Rinse the purchased fresh duck briefly under running water to remove any blood, then drain it in a colander.

Step 2
Peel and thinly slice the onion into strips. Prepare about 10 cloves of garlic by cleaning them. Wash the carrot and slice it thinly into rounds, about 0.5 cm thick. Having your vegetables prepped like this will make the cooking process much smoother.

Step 3
Cut the chives into bite-sized pieces, approximately 3-4 cm long, as they will be stir-fried with the duck. Cutting them to a suitable length will make them easier to handle while cooking.

Step 4
Now, let’s make the delicious seasoning for the duck bulgogi. It’s similar to ‘Dakgalbi’ seasoning but with a slightly different balance, aiming for less sweetness. In a bowl, combine 3 Tbsp gochujang, 3 Tbsp gochugaru, 3 Tbsp soy sauce, 2 Tbsp cooking wine, 1 Tbsp sugar, 1 Tbsp minced garlic, and a pinch of black pepper. Mix thoroughly until all the ingredients are well combined and there are no lumps.

Step 5
Add the sliced duck meat to the prepared seasoning mixture. Gently massage the seasoning into the duck with your hands, ensuring it’s evenly coated. Be careful not to knead too vigorously, as this could break the meat apart.

Step 6
Once the duck is well-marinated, add the sliced onions and carrots to the bowl. Mix everything together gently, ensuring the vegetables and duck are evenly combined.

Step 7
Chives tend to wilt quickly when cooked, so it’s best to add them just before you turn off the heat. Garlic, when coated in the marinade, can burn easily in the pan. A great tip for preserving both flavor and texture is to add the garlic partway through the cooking process, after the duck has started to cook.

Step 8
Use a wide pan and do not add any oil. Heat the pan over medium-high heat for about 10 seconds. Then, add the marinated duck meat and stir-fry it over medium-high heat for about 3-4 minutes. Starting with medium-high heat helps to sear the surface of the duck.

Step 9
After stir-frying the duck over medium-high heat for 3-4 minutes, you’ll notice some liquid forming, likely from the onions releasing their juices. Interestingly, the duck itself will also release its own juices, creating a flavorful broth.

Step 10
When you see the broth starting to form, it’s time to add the prepared garlic. Adding it at this stage ensures it cooks through sufficiently and infuses its flavor without burning.

Step 11
After adding the garlic, turn the heat up to high and cover the pan with a lid. Let it cook for about 5 more minutes. Cooking over high heat ensures the duck is fully cooked. However, keep an eye on it by lifting the lid occasionally to check for any signs of burning, as cooking times can vary slightly depending on your stove’s heat and the pan.

Step 12
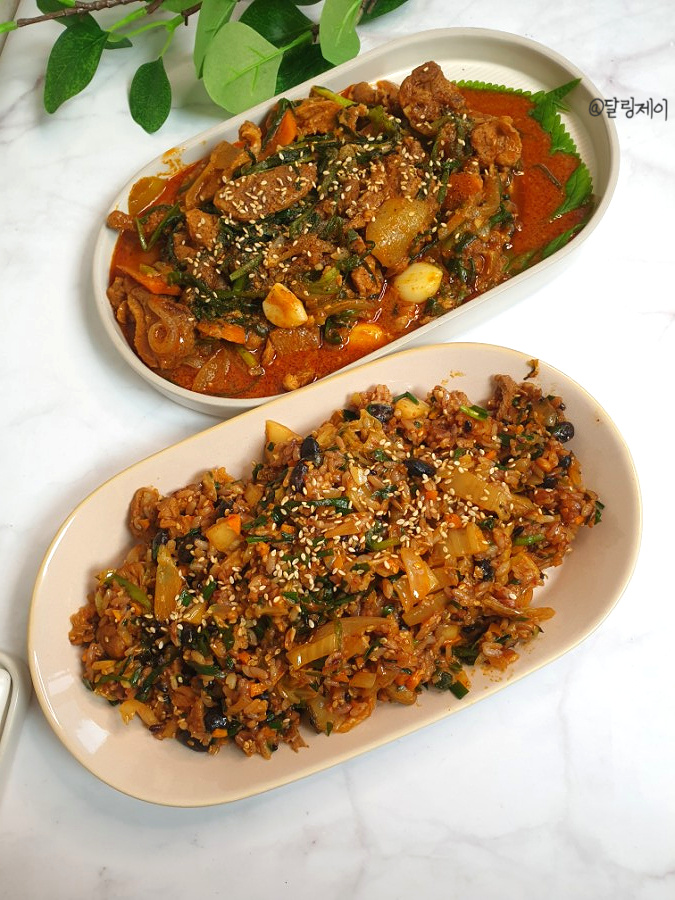
After 5 minutes, lift the lid to reveal fully cooked duck. Now, add the chives and 2 Tbsp perilla seed powder. Reduce the heat to low and stir-fry for another 2-3 minutes. Cooking on low heat will allow the sauce to thicken nicely and deepen its flavor. Finally, turn off the heat, stir in 1 Tbsp of sesame oil and a pinch of sesame seeds, and your delicious duck bulgogi is ready! If you prefer it spicier, feel free to add thinly sliced Korean chili peppers during this stage.

Step 13
After enjoying your delicious duck bulgogi, you can’t forget the fried rice! Leave a small portion of the cooked duck bulgogi in the pan and chop it into small pieces with scissors. This helps integrate the duck bits into the fried rice.

Step 14
Prepare the ingredients for the fried rice. Finely chop some well-fermented kimchi. Also, finely mince or chop the carrot, onion, and chives. Adding kimchi is highly recommended as it cuts through any richness and adds a great texture.

Step 15
Add a little sesame oil to the pan and stir-fry the kimchi and chopped vegetables until softened. Once the vegetables are cooked, add rice and stir-fry, breaking up any clumps with your spatula. Finish with a drizzle of sesame oil and a sprinkle of sesame seeds for a flavorful and nutty duck bulgogi fried rice. The crunchy kimchi is a key element, so be sure to include it!


