Strawberry Jam Bread: A Delightful Homemade Treat
Easy and Delicious Homemade Strawberry Jam Bread Recipe

Today, I made jam bread, and I highly recommend it! Once you try this recipe, you’ll find yourself reaching for it often as it’s a wonderful way to use up your favorite strawberry jam. Imagine the fluffy, pull-apart bread texture combined with warm, freshly baked bread topped with even more warm strawberry jam. It’s truly a sweet and magical experience. Enjoy this delightful treat!
Dough Ingredients- 250g Bread Flour
- 160g Milk
- 17g Sugar
- 3g Salt
- 2g Instant Dry Yeast
- 25g Butter, softened at room temperature
Cooking Instructions
Step 1
First, place all ingredients for the dough into your bread maker, except for the strawberry jam and sliced almonds. When adding ingredients to a bread maker, it’s typically best to follow the order: liquids first, then dry ingredients, and finally butter and any other additions. When adding the dry ingredients, make sure to keep the sugar, salt, and yeast separated to prevent them from clumping together, then gently cover them with the bread flour.

Step 2
During the dough-making cycle of the bread maker, pause briefly to add the softened butter at room temperature. Then, allow the bread maker to continue kneading the dough until it’s smooth and elastic.

Step 3
Once the dough is ready, let it undergo its first proofing for 40 minutes. I prefer to proof my dough inside a proofing oven, but nowadays, with warmer weather, you can achieve excellent results by proofing it at room temperature with a warm water bath (bain-marie).

Step 4
This is what the dough looks like after the first proofing. It should have increased significantly in volume.

Step 5
Gently punch down the dough to release the gas. Shape it into a round ball, cover it with a damp kitchen towel, and let it rest for a 15-minute intermediate proof. This resting period helps the dough relax and makes it easier to shape.

Step 6
After the intermediate proof, gently punch down the dough again to release any remaining gas. Lightly dust your work surface and rolling pin with bread flour. Roll out the dough into a rectangular shape using the rolling pin. Aim for an even thickness.

Step 7
Spread a generous amount of strawberry jam over the rolled-out dough, leaving about a 1cm border around the edges. Feel free to use any brand of strawberry jam you have on hand. The sweet jam will add wonderful flavor to your bread.

Step 8
Carefully roll up the dough lengthwise, similar to how you would roll sushi. Ensure you roll it tightly to prevent the jam from oozing out. Pinch the seams firmly to seal the roll, and also seal the ends securely.

Step 9
With the rolled dough seam-side down, make a cut down the center of the dough, starting about 2cm from the top edge and going all the way to the bottom. Then, carefully twist the two resulting strands together. The dough might be a bit soft, making this step a little tricky, but don’t worry! Wash your hands well, and even if they get sticky with jam, work quickly to twist the dough strands together. A slightly rustic look is perfectly fine!

Step 10
Place the twisted dough into your desired baking pan. A standard loaf pan works well, or you can simply place it on a baking sheet if you don’t have a specific pan. I used a round pan and placed a paper cup in the center to hold the dough around it. Make sure to seal the ends of the dough again once it’s in the pan to prevent it from unraveling. Let it undergo its second proofing for 50 minutes.

Step 11
After 50 minutes, the dough is ready for baking after its second proof. See how beautifully it has puffed up! Don’t worry if the shape isn’t perfectly uniform – taste is what matters most! Sprinkle a handful of sliced almonds over the top of the dough. Bake in a preheated oven at 180°C (350°F) for about 20 minutes, or until golden brown. The delightful aroma of warm strawberry jam will fill your kitchen as it bakes!

Step 12
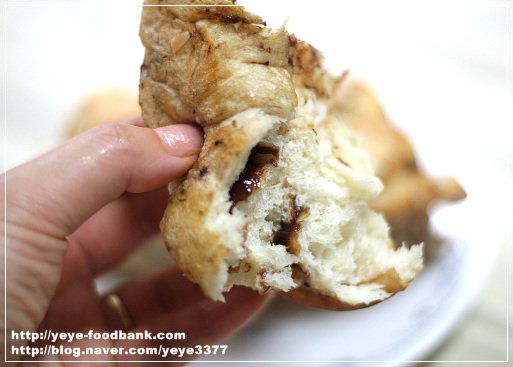
Here it is – the finished Strawberry Jam Bread! The sweet, comforting aroma that wafted through the house during baking was almost intoxicating. This wonderfully sweet and soft bread is pure bliss; you’ll be tempted to lick your fingers after every bite! It’s so convenient because you don’t need to spread extra jam on top. Enjoy this delicious and easy-to-make bread!


