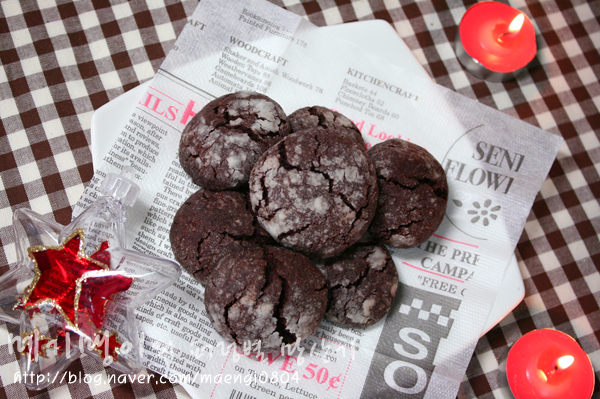
Sweet Balls for Christmas: Handmade Chocolate Delights
Handmade Chocolate Balls Perfect for Gifting While Waiting for Christmas

These handmade chocolate balls are perfect for gifting as you await the festive Christmas season. They make a heartwarming present for your loved ones, bringing joy to both the giver and receiver. Easy to make at home, they add an extra special touch to your holiday celebrations.
Basic Ingredients- 70g Cake Flour (low-gluten flour for a tender texture)
- 20g Cocoa Powder (for rich chocolate flavor)
- 10g Cornstarch (enhances a smooth, melt-in-your-mouth feel)
- 1g Baking Powder (for a light crispiness)
- Powdered Sugar for dusting (for a snowy finish)
Flavor Enhancers- 80g Unsalted Butter, softened to room temperature (creamy consistency is key)
- 40g Powdered Sugar (adjust sweetness to your preference)
- 80g Unsalted Butter, softened to room temperature (creamy consistency is key)
- 40g Powdered Sugar (adjust sweetness to your preference)
Cooking Instructions
Step 1
First, dice the butter into small cubes and leave it at room temperature until softened. Dicing it helps it soften and cream more evenly compared to a single large block. Once the butter is creamy, add the powdered sugar and mix gently with a whisk or spatula until smooth. Creaming it well will incorporate air for a lighter texture.

Step 2
Sift together the cocoa powder, cornstarch, cake flour, and baking powder twice. Sifting multiple times ensures the dry ingredients are well combined without lumps, contributing to the delicate texture of the chocolate balls. Add the sifted dry ingredients to the butter mixture. Using a spatula, gently fold the ingredients together until just combined and no dry flour streaks remain. Be careful not to overmix, as this can develop gluten and make the cookies tough.

Step 3
Once the dough comes together into a cohesive ball, wrap it tightly in plastic wrap. Flatten it slightly to help it chill evenly. Refrigerate for at least 1 hour to rest. This chilling period makes the dough firm and easier to shape, allowing the flavors to meld together for a richer taste. A well-chilled dough is much easier to handle.

Step 4
Remove the chilled dough from the refrigerator and knead it gently with your hands to soften it slightly. Divide the dough into equal portions of about 10g each (or your desired size). Roll each portion into a smooth ball. Ensuring all balls are the same size will help them bake uniformly. Place some powdered sugar in a resealable bag. Add the dough balls and gently shake the bag to coat them evenly with powdered sugar, being careful not to crush the dough. A generous coating of powdered sugar will give them a beautiful, snowy appearance.

Step 5
Line a baking sheet with parchment paper or a silicone mat. Arrange the powdered-sugar-coated dough balls on the prepared baking sheet, leaving a little space between each one. Preheat your oven to 180°C (350°F). Bake for approximately 12 to 15 minutes. They are ready when they appear slightly dry on the outside and are cooked through. Baking times may vary slightly depending on your oven, so keep an eye on them. Let them cool slightly before enjoying these delightful Christmas treats!


