Vibrant Spring Blossom Kimbap
Spring Picnic Ready! Blossom Kimbap – Pretty Lunchbox Ideas.

My daughter started school, and it was her first field trip! I packed her Blossom Kimbap. Well, actually, she *insisted* I make it… haha. So, I thought, ‘Alright, why not!’ and quickly whipped it up.
Ingredients- Kimbap seaweed sheets
- Cooked rice
Rice Seasoning- Sesame oil
- Salt (to taste)
- Toasted sesame seeds
Kimbap Fillings- Carrot (julienned and stir-fried)
- Cucumber (julienned and lightly salted)
- Ham (julienned)
- Pickled radish (julienned)
- Fish cake (julienned and stir-fried)
- Crab stick (julienned)
- Egg omelet (thinly and broadly cooked)
- Sesame oil
- Salt (to taste)
- Toasted sesame seeds
Kimbap Fillings- Carrot (julienned and stir-fried)
- Cucumber (julienned and lightly salted)
- Ham (julienned)
- Pickled radish (julienned)
- Fish cake (julienned and stir-fried)
- Crab stick (julienned)
- Egg omelet (thinly and broadly cooked)
Cooking Instructions
Step 1
First, prepare all your kimbap fillings. Julienned carrots can be lightly stir-fried. Julienned cucumber can be lightly salted, then squeezed to remove excess water. Julienne the ham, fish cake, and crab sticks. Feel free to add or substitute ingredients based on what you have in your fridge!

Step 2
The special touch for this kimbap is the egg omelet! Cook a thin and wide egg omelet, then slice it into long, broad strips that can accommodate the kimbap fillings. This will make your kimbap look much more substantial and beautiful.

Step 3
For a better texture and appearance, finely chop the prepared fish cake, crab stick, and ham. This helps them blend well inside the kimbap.

Step 4
The key to creating the blossom effect is how you cut the seaweed! Cut each kimbap seaweed sheet into 4 equal parts. Then, cut each of those 4 parts in half again, resulting in 8 small pieces of seaweed per sheet. These smaller pieces will be used to form the ‘petals’.

Step 5
Prepare fluffy, cooked rice. If you mix in some millet while cooking the rice, it will give it a lovely yellow hue, making it even more appealing. While the rice is warm, drizzle with sesame oil, season with salt to taste, and sprinkle with toasted sesame seeds. Gently mix everything together, ensuring the rice grains don’t clump.

Step 6
Now, let’s make the ‘petals’. Spread a thin layer of the seasoned rice onto one of the 8-piece cut seaweed squares. Arrange your prepared fillings neatly on top, one by one. Then, carefully roll it up. Repeat this process for all 5 fillings, rolling each one inside a small seaweed piece. The tip here is to roll them snugly without letting the fillings overlap too much.

Step 7
Prepare a larger sheet of seaweed for the outer layer of the kimbap. Cut this sheet in half lengthwise. Spread a thin, even layer of rice over it. Again, make sure the rice is spread evenly without clumping.

Step 8
Place the broadly sliced egg omelet onto the rice-covered seaweed. Now, artfully arrange the 5 individually rolled fillings in the center, creating a beautiful pattern. Place julienned pickled radish in the middle to add a pop of color and texture contrast. The five colorful rolls will resemble flower petals.

Step 9
Once all the fillings are in place, gently but firmly roll the kimbap, pressing as you go. Be careful not to press too hard, which might cause the fillings to squeeze out. The goal is a tightly rolled kimbap.

Step 10
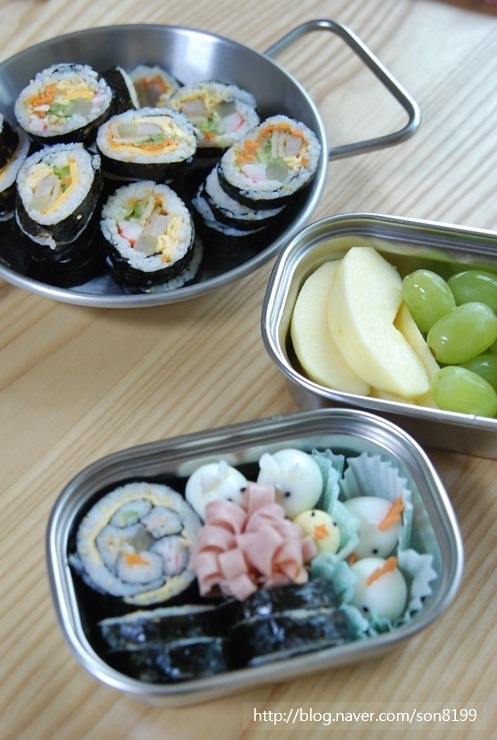
Ta-da! Your beautiful blossom kimbap is complete. When sliced, the cross-section will look like a flower, making it a delight for both children and adults. It’s as enjoyable to look at as it is to eat. See? Kimbap can be fun and easy!

Step 11
Extra Tip: For an even cuter touch, you can add boiled quail eggs or decorate with flower-shaped ham slices. For more creative ideas, check out this blog post: http://son8199.blog.me/220840681092


